編輯:Android編程入門
本文演示用Android Studio寫一個最簡單的輸入法。界面和交互都很簡陋,只為剔肉留骨,彰顯寫一個Android輸入法的要點。
我給該輸入法命名為AndroidXXIME。
如前文《Android下創建一個輸入法》中所說:輸入法是一個包含IME service的安卓應用程序,首先應該在程序的manifest中聲明service。我的manifest.xml文件如下:
<manifest xmlns:android="http://schemas.android.com/apk/res/android"
    package="com.binglen.androidxxime">

    <application
        android:allowBackup="true"
        android:icon="@mipmap/ic_launcher"
        android:label="@string/app_name"
        android:supportsRtl="true"
        android:theme="@style/AppTheme">

        <service android:name=".AndroidXXIME"
            android:label="@string/xxime"
            android:permission="android.permission.BIND_INPUT_METHOD"
            >
            <intent-filter>
                <action android:name="android.view.InputMethod" />
            </intent-filter>
            <meta-data android:name="android.view.im" android:resource="@xml/method"/>
        </service>

    </application>

</manifest>
在Android Studio生成application塊的尾部添加IME service的聲明。第一行粗體字聲明需要BIND_INPUT_METHOD權限,第二行粗體字創建了一個能夠匹配android.view.InputMethod的intent filter,第三行粗體字定義了輸入法的metadata。
需要注意:service android:name必須與後面java文件中的類名保持一致。
接下來創建該service中聲明的資源。
meta-data裡用到了資源xml/method文件,該文件中包含了輸入法的subtype屬性,輸入法通過該屬性定義它所支持的輸入模式和語言,一個輸入法可以包含多個subtype屬性。在工程中res下創建xml文件夾,把method.xml添加到該文件夾下。method.xml內容如下:
<?xml version="1.0" encoding="utf-8"?>
<input-method xmlns:android="http://schemas.android.com/apk/res/android">
    <subtype
        android:label="@string/subtype_en_US"
        android:imeSubtypeLocale="en_US"
        android:imeSubtypeMode="keyboard" />
</input-method>
關於subtype的屬性,可以參見InputMethodSubtype:
label是該subtype的名字
imeSubtypeLocale是該subtype支持的語言類型
imeSubtypeMode是它所支持的模式,可以是keyboard或者voice,當輸入法被調起是,系統會把用戶選擇的mode值傳給輸入法。
在這裡補上前文引用到的字符串定義:
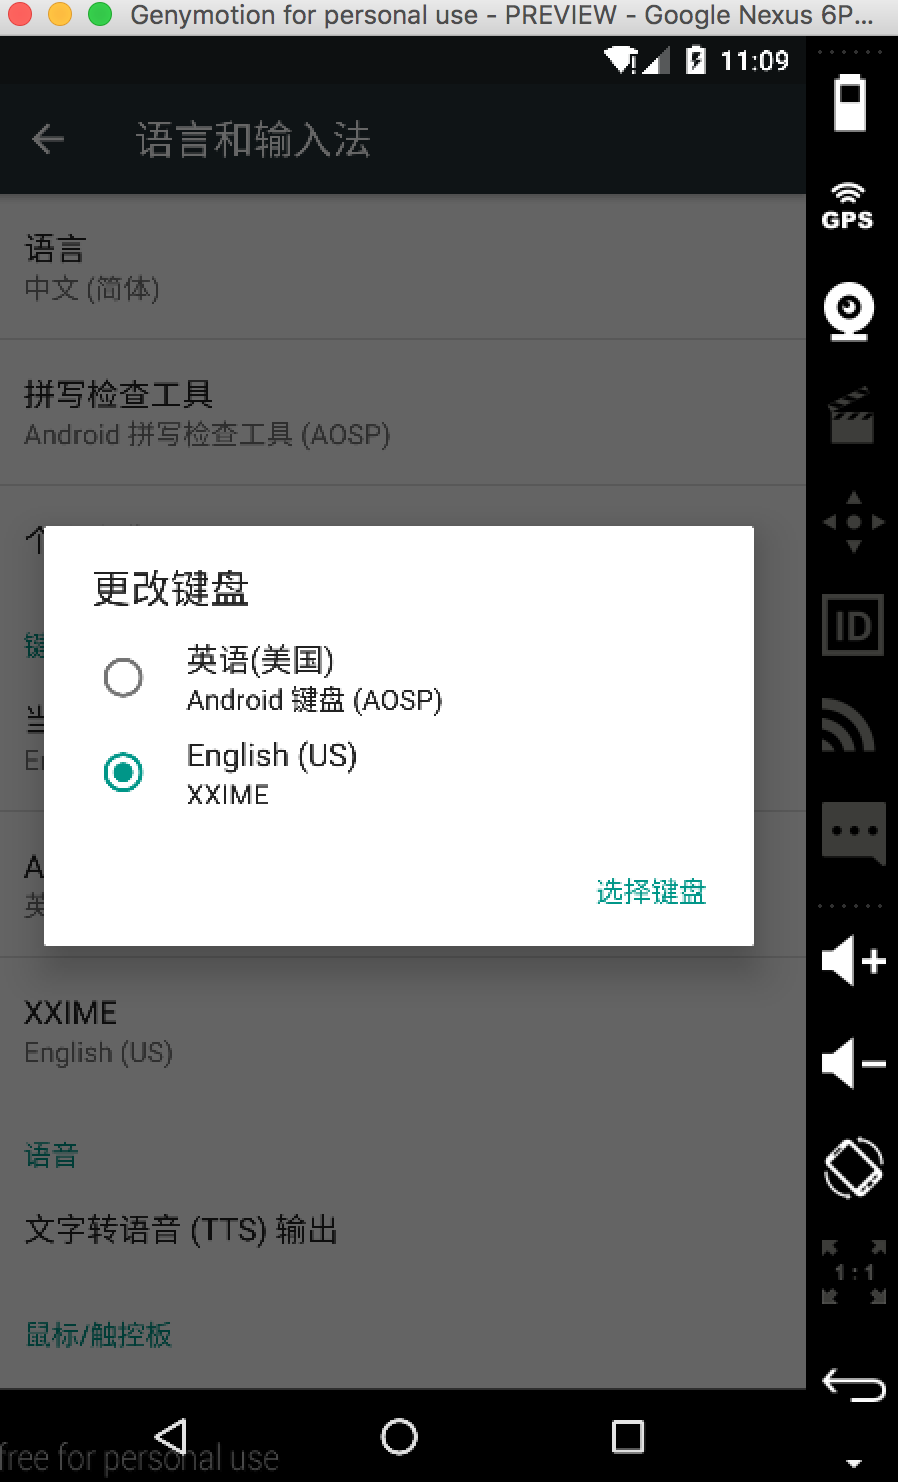
<string name="xxime">XXIME</string>
<string name="subtype_en_US">English (US)</string>
xxime在manifest中定義service的android:label時被引用到,該字串用來顯示系統“語言和輸入法”中本輸入法的名字:
在res/layout/中添加文件keyboard.xml,定義鍵盤布局,內容如下:
<?xml version="1.0" encoding="UTF-8"?>
<android.inputmethodservice.KeyboardView
    xmlns:android="http://schemas.android.com/apk/res/android"
    android:id="@+id/keyboard"
    android:layout_width="match_parent"
    android:layout_height="wrap_content"
    android:layout_alignParentBottom="true"
    android:keyPreviewLayout ="@layout/preview"
/>
點擊android.inputmethodservice.KeyboardView查看關於它的XML屬性,其中keyPreviewLayout表示鍵盤被按下時的布局資源。在res/layout中添加preview.xml如下:
<?xml version="1.0" encoding="utf-8"?>
<TextView xmlns:android="http://schemas.android.com/apk/res/android"
    android:layout_width="match_parent"
    android:layout_height="match_parent"
    android:gravity="center"
    android:background="#ffff00"
    android:text
    android:textSize="30sp"
    >
</TextView>
裡面僅有一個TextView。
前面資源引用的源頭都來自manifest文件,卻不見哪裡引用keyboard.xml。答案在後面,AndroidXXIME.java文件中onCreateInputView()函數中創建鍵盤視圖和鍵盤布局時會用到,包括下面的qwerty.xml。
按鍵信息定義在Keyboard中,其格式形式如下:
 <Keyboard
         android:keyWidth="%10p"
         android:keyHeight="50px"
         android:horizontalGap="2px"
         android:verticalGap="2px" >
     <Row android:keyWidth="32px" >
         <Key android:keyLabel="A" />
         ...
     </Row>
     ...
 </Keyboard>
這是一個嵌套結構,其下包含了Row表示一行,內部又包含Key表示一個按鍵,每個按鍵有兩個必填屬性:
· keyLabel:按鍵上顯示的文字
· codes:該按鍵代表的Unicode碼
我們的按鍵信息文件在res/xml/qwerty.xml中,定義如下:
<Keyboard xmlns:android="http://schemas.android.com/apk/res/android"
    android:keyWidth="10%p"
    android:horizontalGap="0px"
    android:verticalGap="0px"
    android:keyHeight="60dp"
    >
    <Row>
        <Key android:codes="113" android:keyLabel="q" android:keyEdgeFlags="left"/>
        <Key android:codes="119" android:keyLabel="w"/>
        <Key android:codes="101" android:keyLabel="e"/>
        <Key android:codes="114" android:keyLabel="r"/>
        <Key android:codes="116" android:keyLabel="t"/>
        <Key android:codes="121" android:keyLabel="y"/>
        <Key android:codes="117" android:keyLabel="u"/>
        <Key android:codes="105" android:keyLabel="i"/>
        <Key android:codes="111" android:keyLabel="o"/>
        <Key android:codes="112" android:keyLabel="p" android:keyEdgeFlags="right"/>
    </Row>
    <Row android:layout_centerHorizontal="true">
        <Key android:codes="97" android:keyLabel="a" android:horizontalGap="5%p" android:keyEdgeFlags="left"/>
        <Key android:codes="115" android:keyLabel="s"/>
        <Key android:codes="100" android:keyLabel="d"/>
        <Key android:codes="102" android:keyLabel="f"/>
        <Key android:codes="103" android:keyLabel="g"/>
        <Key android:codes="104" android:keyLabel="h"/>
        <Key android:codes="106" android:keyLabel="j"/>
        <Key android:codes="107" android:keyLabel="k"/>
        <Key android:codes="108" android:keyLabel="l" android:keyEdgeFlags="right"/>
    </Row>
    <Row>
        <Key android:codes="39" android:keyLabel="'" android:keyEdgeFlags="left"/>
        <Key android:codes="122" android:keyLabel="z"/>
        <Key android:codes="120" android:keyLabel="x"/>
        <Key android:codes="99" android:keyLabel="c"/>
        <Key android:codes="118" android:keyLabel="v"/>
        <Key android:codes="98" android:keyLabel="b"/>
        <Key android:codes="110" android:keyLabel="n"/>
        <Key android:codes="109" android:keyLabel="m"/>
        <Key android:codes="44" android:keyLabel=","/>
        <Key android:codes="46" android:keyLabel="." android:keyEdgeFlags="right"/>
    </Row>
    <Row android:rowEdgeFlags="bottom">
        <Key android:codes="63" android:keyLabel="\?" android:keyWidth="10%p"  android:keyEdgeFlags="left"/>
        <Key android:codes="47" android:keyLabel="/" android:keyWidth="10%p" />
        <Key android:codes="32" android:keyLabel=" " android:keyWidth="40%p" android:isRepeatable="true"/>
        <Key android:codes="-5" android:keyLabel="DEL" android:keyWidth="20%p" android:isRepeatable="true"/>
        <Key android:codes="-4" android:keyLabel="DONE" android:keyWidth="20%p" android:keyEdgeFlags="right"/>
    </Row>
</Keyboard>
其中有一些負值是定義在Keyboard類中的常量。
在字母a鍵的定義中有:android:horizontalGap="5%p",官方文檔解釋android:horizontalGap用來定義按鍵之間的間距,其實是與上一個按鍵之間的距離,如果是左邊打頭的的按鍵,則是與左邊緣之間的距離。%p表示在父組件中的尺寸占比。
接下來就需要為輸入法創建service和listener了。可以在一個類裡完成這兩個角色,AndroidXXIME類擴展了InputMethodService,並實現了KeyboardView.OnKeyboardActionListener接口。該類的定義如下:
public class AndroidXXIME extends InputMethodService
        implements KeyboardView.OnKeyboardActionListener {

    private KeyboardView keyboardView; // 對應keyboard.xml中定義的KeyboardView
    private Keyboard keyboard;         // 對應qwerty.xml中定義的Keyboard

    @Override
    public void onPress(int primaryCode) {
    }

    @Override
    public void onRelease(int primaryCode) {
    }

    @Override
    public void onText(CharSequence text) {
    }

    @Override
    public void swipeDown() {
    }

    @Override
    public void swipeLeft() {
    }

    @Override
    public void swipeRight() {
    }

    @Override
    public void swipeUp() {
    }

    @Override
    public View onCreateInputView() {
        // keyboard被創建後,將調用onCreateInputView函數
        keyboardView = (KeyboardView)getLayoutInflater().inflate(R.layout.keyboard, null);  // 此處使用了keyboard.xml
        keyboard = new Keyboard(this, R.xml.qwerty);  // 此處使用了qwerty.xml
        keyboardView.setKeyboard(keyboard);
        keyboardView.setOnKeyboardActionListener(this);
        return keyboardView;
    }

    private void playClick(int keyCode){
        // 點擊按鍵時播放聲音,在onKey函數中被調用
        AudioManager am = (AudioManager)getSystemService(AUDIO_SERVICE);
        switch(keyCode){
            case 32:
                am.playSoundEffect(AudioManager.FX_KEYPRESS_SPACEBAR);
                break;
            case Keyboard.KEYCODE_DONE:
            case 10:
                am.playSoundEffect(AudioManager.FX_KEYPRESS_RETURN);
                break;
            case Keyboard.KEYCODE_DELETE:
                am.playSoundEffect(AudioManager.FX_KEYPRESS_DELETE);
                break;
            default: am.playSoundEffect(AudioManager.FX_KEYPRESS_STANDARD);
        }
    }

    @Override
    public void onKey(int primaryCode, int[] keyCodes) {
        InputConnection ic = getCurrentInputConnection();
        playClick(primaryCode);
        switch(primaryCode){
            case Keyboard.KEYCODE_DELETE :
                ic.deleteSurroundingText(1, 0);
                break;
            case Keyboard.KEYCODE_DONE:
                ic.sendKeyEvent(new KeyEvent(KeyEvent.ACTION_DOWN, KeyEvent.KEYCODE_ENTER));
                break;
            default:
                char code = (char)primaryCode;
                ic.commitText(String.valueOf(code), 1);
        }
    }
}
該例程代碼可參見https://github.com/palanceli/AndroidXXIME/tree/v1
 Android 橫豎屏+碎片的應用
最終效果展示: 項目介紹:通過碎片的方式顯示標題列表和內容,其中也牽涉到橫豎屏的知識 項目代碼下載:http://files.cnblogs.com/
 補間動畫TweenAnimation
animation_translate = AnimationUtils.loadAnimation(MainActivity.this, R.anim.transalt
 深入了解View的繪制流程
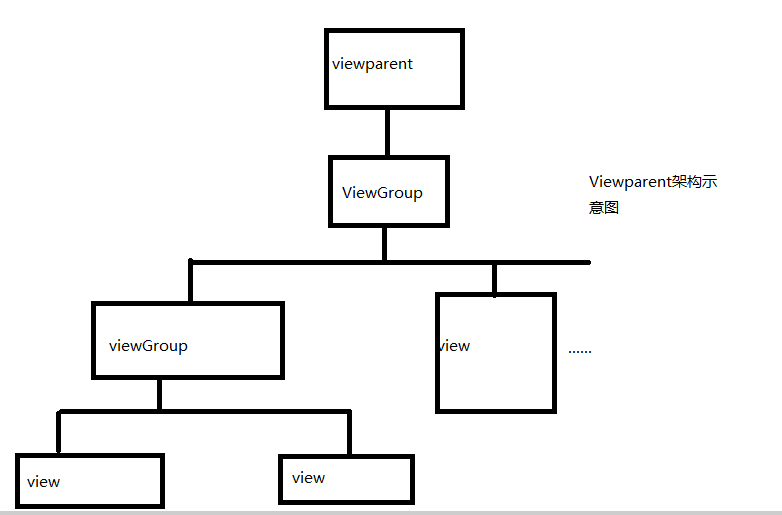
1. ViewRoot ViewRoot是連接WindowManager與DecorView的紐帶,View的整個繪制流程的三大步(
 Android設置虛線、圓角、漸變
有圖又真相,先上圖再說。點擊效果: 設置虛線: [html] view plain copy &