編輯:關於android開發
前言:前幾天看到了迅雷app上有個一元奪寶,那時無聊就參加了幾次,到後來中獎結果出來了,哎,根本就沒我的份啊(意料之中),還好投的錢不多,就一塊兩塊,不過,我看到了那裡有個數值輸入的效果,我當時想了想這個實現挺簡單了,應該有很多種方式,於是做了個決定,如果沒中獎,我就把那個數值輸入器做出來以懲罰自己(開玩笑~),現在,該是兌現自己承諾的時候了。
先看看我們即將要實現的效果圖:

大家看到這個效果,要實現這麼一個控件,我們可以怎麼做?
一開始,我心想,這還不簡單,自定義一個view,然後分別畫出左邊的減號按鈕,中間的輸入控件,和右邊的加法按鈕,包括最外邊的邊框,最後重新view的事件監聽方法,在裡面判斷點擊的坐標,如果是點擊了左邊按鈕的坐標范圍,那麼讓中間的輸入控件數值遞減,如果是點擊了右邊按鈕的坐標范圍,那麼讓中間的輸入按鈕數值遞增。
嗯,這聽起來不錯,好吧,我動手試著按照這種思路開始做了,當我在畫中間的輸入按鈕的時候,我懵了,怎麼才能畫出一個可以讓用戶輸入的控件?於是,我放棄了這種思路,開始了另一種思路。
接著,我想,這用類似組合控件的形式不是很簡單嗎,干嘛搞得那麼復雜啊,這樣一來,不是不僅不用自己畫一個輸入控件了,而且還不用計算點擊坐標了。所以,下面將用組合控件的形式實現這個控件。
1. 自定義屬性
?為了提供控件的可定制性,我們需要自定義屬性,觀察上面的效果圖,我們可以定義下面9個屬性供用戶使用(當然,你也可以定義其他的屬性供用戶定制)
border_color:邊框的顏色 border_width:邊框的寬度 minus_color:減號的顏色 minus_width:… plus_color:加號的顏色 plus_width:… min_value:允許的最小值 initial_value:初始值 max_value:允許的最大值2. 自定義加減按鈕
?為了解決耦合問題,那個減號,加號按鈕使用自定義view繪圖來實現,不引用任何資源,這裡以加號按鈕為例,做個說明(在文章結尾將會貼上全部代碼)。
class PlusView extends View{

    private Paint mPlusPaint;

    public PlusView(Context context) {
        this(context, null);
    }

    public PlusView(Context context, AttributeSet attrs) {
        this(context, attrs, 0);
    }

    public PlusView(Context context, AttributeSet attrs, int defStyleAttr) {
        super(context, attrs, defStyleAttr);
        mPlusPaint = new Paint();
        mPlusPaint.setAntiAlias(true);
        mPlusPaint.setStrokeWidth(mPlusWidth);
        mPlusPaint.setStyle(Paint.Style.STROKE);
        mPlusPaint.setStrokeCap(Paint.Cap.ROUND);
        mPlusPaint.setColor(mPlusColor);
    }

    @Override
    protected void onMeasure(int widthMeasureSpec, int heightMeasureSpec) {
        super.onMeasure(widthMeasureSpec, heightMeasureSpec);
        int widthMode = MeasureSpec.getMode(widthMeasureSpec);
        int heightMode = MeasureSpec.getMode(heightMeasureSpec);
        int widthSize = MeasureSpec.getSize(widthMeasureSpec);
        int heightSize = MeasureSpec.getSize(heightMeasureSpec);

        if(widthMode == MeasureSpec.AT_MOST){
            widthSize = Math.min(widthSize,100);
        }
        if(heightMode == MeasureSpec.AT_MOST){
            heightSize = Math.min(heightSize,100);
        }
        setMeasuredDimension(widthSize,heightSize);
    }

    @Override
    protected void onDraw(Canvas canvas) {
        super.onDraw(canvas);
        mWidth = getMeasuredWidth();
        mHeight = getMeasuredHeight();
        canvas.drawLine(mWidth - mWidth / 5, mHeight / 2, mWidth / 5, mHeight / 2, mPlusPaint);
        canvas.save();
        canvas.rotate(90, mWidth / 2, mHeight / 2);
        canvas.drawLine(mWidth / 5, mHeight / 2, mWidth - mWidth / 5, mHeight / 2, mPlusPaint);
        canvas.restore();
    }
}
這裡自定義view,就是在測量的時候判斷一些測量模式,如果是AT_MOST模式,那麼給個最小值。測量完了以後,在onDraw()方法中畫個加號就行了,對於自定義view不熟悉的可以參考這篇文章:android自定義view(一),打造絢麗的驗證碼
3. 繼承LinearLayout實現控件組合
?觀察上面的效果圖,可以看出這個控件的三部分是等寬的,所以,使用LinearLayout實現非常簡單(weight屬性),下面,定義類繼承LinearLayout:
public class NumberInput extends LinearLayout {

    public NumberInput(Context context) {
        this(context, null);
    }

    public NumberInput(Context context, AttributeSet attrs) {
        this(context, attrs, 0);
    }

    public NumberInput(Context context, AttributeSet attrs, int defStyleAttr) {
        super(context, attrs, defStyleAttr);
        // viewGroup必須設置背景,這樣才會調用onDraw()方法
        setBackgroundColor(Color.TRANSPARENT);
        init(context,attrs);
        initView(context);
    }
}
這裡,三個構造方法的調用情況就不多說了,不懂的可以問度娘~。我們在構造方法中做了一些初始化的工作,包括獲取布局屬性值,添加子view等等。這裡,要注意的事,viewGroup默認是不會調用onDraw()方法的,我們可以給它設置背景強制viewGroup調用onDraw()方法。
獲取屬性值:
/**
 * 獲取自定義屬性值
 */
private void init(Context context,AttributeSet attrs) {
    TypedArray typedArray = context.obtainStyledAttributes(attrs,R.styleable.NumberInput);
    mBorderColor = typedArray.getColor(R.styleable.NumberInput_border_color, Color.GRAY);
    mBorderWidth = typedArray.getDimension(R.styleable.NumberInput_border_width, 6);
    mMinusColor = typedArray.getColor(R.styleable.NumberInput_minus_color, Color.GRAY);
    mMinusWidth = typedArray.getDimension(R.styleable.NumberInput_minus_width, 5);
    mPlusColor = typedArray.getColor(R.styleable.NumberInput_plus_color, Color.GRAY);
    mPlusWidth = typedArray.getDimension(R.styleable.NumberInput_plus_width, 5);
    mInitialValue = typedArray.getInteger(R.styleable.NumberInput_initial_value, 0);
    mMinValue = typedArray.getInteger(R.styleable.NumberInput_min_value, Integer.MIN_VALUE);
    mMaxValue = typedArray.getInteger(R.styleable.NumberInput_max_value, Integer.MAX_VALUE);
    // 回收資源
    typedArray.recycle();
}
添加子View:
private void initView(Context context) {
    LinearLayout.LayoutParams params = new LinearLayout.LayoutParams(ViewGroup.LayoutParams.WRAP_CONTENT, ViewGroup.LayoutParams.WRAP_CONTENT);
    params.gravity = Gravity.CENTER;
    params.setMargins(20, 6, 20, 6);
    params.weight = 1;

    mMinusButton = new MinusView(context);
    mMinusButton.setOnClickListener(new OnClickListener() {
        @Override
        public void onClick(View v) {
            int currentNum = Integer.valueOf(mEditText.getText().toString());
            currentNum--;
            mEditText.setText(currentNum + "");
        }
    });
    if(mInitialValue<=mMinValue){
        mMinusButton.setEnabled(false);
    }
    addView(mMinusButton, params);

    mEditText = new EditText(context);
    // 做個判斷,如果給的初始值小於最小值,那麼初始值就是最小值
    // 如果給的初始值大於最大值,那麼初始值就是最大值
    if(mInitialValue<=mMinValue){
        mEditText.setText(mMinValue + "");
    }else if(mInitialValue>=mMaxValue){
        mEditText.setText(mMaxValue + "");
    }else {
        mEditText.setText(mInitialValue + "");
    }
    mEditText.requestFocus();
    mEditText.setGravity(Gravity.CENTER);
    mEditText.setInputType(InputType.TYPE_CLASS_NUMBER);
    // 去除默認的下劃線
    mEditText.setBackground(null);
    mEditText.addTextChangedListener(mWatcher);
    addView(mEditText, params);

    mPlusButton = new PlusView(context);
    params.weight = 1;
    mPlusButton.setOnClickListener(new OnClickListener() {
        @Override
        public void onClick(View v) {
            int currentNum = Integer.valueOf(mEditText.getText().toString());
            currentNum++;
            mEditText.setText(currentNum + "");
        }
    });
    if(mInitialValue>=mMaxValue){
        mPlusButton.setEnabled(false);
    }
    addView(mPlusButton,params);
}
這裡相信大家都看得懂,就是用代碼分別添加了左邊按鈕,中間的輸入控件和右邊的按鈕,並做了一些初始判斷操作和綁定點擊事件的操作,其中,給EditView添加了文本改變監聽:
private TextWatcher mWatcher = new TextWatcher() {
    @Override
    public void beforeTextChanged(CharSequence s, int start, int count, int after) {

    }

    @Override
    public void onTextChanged(CharSequence s, int start, int before, int count) {
        int value = Integer.valueOf(mEditText.getText().toString());
        if(value<=mMinValue){
            mMinusButton.setEnabled(false);
        }else{
            mMinusButton.setEnabled(true);
        }
        if(value>=mMaxValue){
            mPlusButton.setEnabled(false);
        }else{
            mPlusButton.setEnabled(true);
        }
    }

    @Override
    public void afterTextChanged(Editable s) {

    }
};
完成了子控件的添加,那麼,這個容器還需要繪制最外邊和中間的邊框
@Override
protected void onDraw(Canvas canvas) {
    mWidth = getMeasuredWidth();
    mHeight = getMeasuredHeight();

    Paint borderPaint = new Paint();
    borderPaint.setAntiAlias(true);
    borderPaint.setStrokeWidth(mBorderWidth);
    borderPaint.setStyle(Paint.Style.STROKE);
    borderPaint.setColor(mBorderColor);

    canvas.drawRect(0, 0, mWidth, mHeight, borderPaint);
    borderPaint.setStrokeWidth(mBorderWidth/2);
    canvas.drawLine(mWidth / 3 - mBorderWidth/2, 0, mWidth / 3 - mBorderWidth/2, mHeight, borderPaint);
    canvas.drawLine(mWidth * 2 / 3 - mBorderWidth/2, 0, mWidth * 2 / 3 - mBorderWidth/2, mHeight, borderPaint);
}
最後將編輯控件中的數值暴露出去:
/**
 * 返回控件中的數值
 * @return 數值
 */
public int getNumber(){
    return Integer.valueOf(mEditText.getText().toString());
}
都這裡,這個簡易的數值輸入器就基本完工了。
4. 使用控件
?萬事具備,只欠測試了,所以,寫一個測試的布局文件,如下:
將這個布局文件作為activity的內容視圖,運行這個應用就可以測試效果了。
由於只是這個控件只是一個類而已,並沒有涉及什麼圖片資源,所以就不麻煩大家下載了,直接貼上完整代碼:
NumberInput.java
package com.example.lt.custom_number_input;

import android.content.Context;
import android.content.res.TypedArray;
import android.graphics.Canvas;
import android.graphics.Color;
import android.graphics.Paint;
import android.text.Editable;
import android.text.InputType;
import android.text.TextWatcher;
import android.util.AttributeSet;
import android.view.Gravity;
import android.view.MotionEvent;
import android.view.View;
import android.view.ViewGroup;
import android.widget.Button;
import android.widget.EditText;
import android.widget.LinearLayout;
import android.widget.RelativeLayout;
import android.widget.TextView;

/**
 * Created by lt on 2016/3/12.
 */
public class NumberInput extends LinearLayout {

    private int mHeight;
    private int mWidth;
    private EditText mEditText;
    private int mBorderColor;
    private float mBorderWidth;
    private int mMinusColor;
    private float mMinusWidth;
    private int mPlusColor;
    private float mPlusWidth;
    private int mInitialValue;
    private int mMinValue;
    private int mMaxValue;
    private TextWatcher mWatcher = new TextWatcher() {
        @Override
        public void beforeTextChanged(CharSequence s, int start, int count, int after) {

        }

        @Override
        public void onTextChanged(CharSequence s, int start, int before, int count) {
            int value = Integer.valueOf(mEditText.getText().toString());
            if(value<=mMinValue){
                mMinusButton.setEnabled(false);
            }else{
                mMinusButton.setEnabled(true);
            }
            if(value>=mMaxValue){
                mPlusButton.setEnabled(false);
            }else{
                mPlusButton.setEnabled(true);
            }
        }

        @Override
        public void afterTextChanged(Editable s) {

        }
    };
    private View mPlusButton;
    private View mMinusButton;

    public NumberInput(Context context) {
        this(context, null);
    }

    public NumberInput(Context context, AttributeSet attrs) {
        this(context, attrs, 0);
    }

    public NumberInput(Context context, AttributeSet attrs, int defStyleAttr) {
        super(context, attrs, defStyleAttr);
        // viewGroup必須設置背景,這樣才會調用onDraw()方法
        setBackgroundColor(Color.TRANSPARENT);
        init(context,attrs);
        initView(context);
    }

    /**
     * 獲取自定義屬性值
     */
    private void init(Context context,AttributeSet attrs) {
        TypedArray typedArray = context.obtainStyledAttributes(attrs,R.styleable.NumberInput);
        mBorderColor = typedArray.getColor(R.styleable.NumberInput_border_color, Color.GRAY);
        mBorderWidth = typedArray.getDimension(R.styleable.NumberInput_border_width, 6);
        mMinusColor = typedArray.getColor(R.styleable.NumberInput_minus_color, Color.GRAY);
        mMinusWidth = typedArray.getDimension(R.styleable.NumberInput_minus_width, 5);
        mPlusColor = typedArray.getColor(R.styleable.NumberInput_plus_color, Color.GRAY);
        mPlusWidth = typedArray.getDimension(R.styleable.NumberInput_plus_width, 5);
        mInitialValue = typedArray.getInteger(R.styleable.NumberInput_initial_value, 0);
        mMinValue = typedArray.getInteger(R.styleable.NumberInput_min_value, Integer.MIN_VALUE);
        mMaxValue = typedArray.getInteger(R.styleable.NumberInput_max_value, Integer.MAX_VALUE);
        // 回收資源
        typedArray.recycle();
    }

    @Override
    protected void onDraw(Canvas canvas) {
        mWidth = getMeasuredWidth();
        mHeight = getMeasuredHeight();

        Paint borderPaint = new Paint();
        borderPaint.setAntiAlias(true);
        borderPaint.setStrokeWidth(mBorderWidth);
        borderPaint.setStyle(Paint.Style.STROKE);
        borderPaint.setColor(mBorderColor);

        canvas.drawRect(0, 0, mWidth, mHeight, borderPaint);
        borderPaint.setStrokeWidth(mBorderWidth/2);
        canvas.drawLine(mWidth / 3 - mBorderWidth/2, 0, mWidth / 3 - mBorderWidth/2, mHeight, borderPaint);
        canvas.drawLine(mWidth * 2 / 3 - mBorderWidth/2, 0, mWidth * 2 / 3 - mBorderWidth/2, mHeight, borderPaint);
    }

    private void initView(Context context) {
        LinearLayout.LayoutParams params = new LinearLayout.LayoutParams(ViewGroup.LayoutParams.WRAP_CONTENT, ViewGroup.LayoutParams.WRAP_CONTENT);
        params.gravity = Gravity.CENTER;
        params.setMargins(20, 6, 20, 6);
        params.weight = 1;

        mMinusButton = new MinusView(context);
        mMinusButton.setOnClickListener(new OnClickListener() {
            @Override
            public void onClick(View v) {
                int currentNum = Integer.valueOf(mEditText.getText().toString());
                currentNum--;
                mEditText.setText(currentNum + "");
            }
        });
        if(mInitialValue<=mMinValue){
            mMinusButton.setEnabled(false);
        }
        addView(mMinusButton, params);

        mEditText = new EditText(context);
        // 做個判斷,如果給的初始值小於最小值,那麼初始值就是最小值
        // 如果給的初始值大於最大值,那麼初始值就是最大值
        if(mInitialValue<=mMinValue){
            mEditText.setText(mMinValue + "");
        }else if(mInitialValue>=mMaxValue){
            mEditText.setText(mMaxValue + "");
        }else {
            mEditText.setText(mInitialValue + "");
        }
        mEditText.requestFocus();
        mEditText.setGravity(Gravity.CENTER);
        mEditText.setInputType(InputType.TYPE_CLASS_NUMBER);
        // 去除默認的下劃線
        mEditText.setBackground(null);
        mEditText.addTextChangedListener(mWatcher);
        addView(mEditText, params);

        mPlusButton = new PlusView(context);
        params.weight = 1;
        mPlusButton.setOnClickListener(new OnClickListener() {
            @Override
            public void onClick(View v) {
                int currentNum = Integer.valueOf(mEditText.getText().toString());
                currentNum++;
                mEditText.setText(currentNum + "");
            }
        });
        if(mInitialValue>=mMaxValue){
            mPlusButton.setEnabled(false);
        }
        addView(mPlusButton,params);
    }

    class MinusView extends View{

        private Paint mMinusPaint;

        public MinusView(Context context) {
            this(context, null);
        }

        public MinusView(Context context, AttributeSet attrs) {
            this(context, attrs, 0);
        }

        public MinusView(Context context, AttributeSet attrs, int defStyleAttr) {
            super(context, attrs, defStyleAttr);
            mMinusPaint = new Paint();
            mMinusPaint.setAntiAlias(true);
            mMinusPaint.setStrokeWidth(mMinusWidth);
            mMinusPaint.setStyle(Paint.Style.STROKE);
            mMinusPaint.setStrokeCap(Paint.Cap.ROUND);
            mMinusPaint.setColor(mMinusColor);
        }

        @Override
        protected void onMeasure(int widthMeasureSpec, int heightMeasureSpec) {
            super.onMeasure(widthMeasureSpec, heightMeasureSpec);
            int widthMode = MeasureSpec.getMode(widthMeasureSpec);
            int heightMode = MeasureSpec.getMode(heightMeasureSpec);
            int widthSize = MeasureSpec.getSize(widthMeasureSpec);
            int heightSize = MeasureSpec.getSize(heightMeasureSpec);

            if(widthMode == MeasureSpec.AT_MOST){
                widthSize = Math.min(widthSize,80);
            }
            if(heightMode == MeasureSpec.AT_MOST){
                heightSize = Math.min(heightSize,80);
            }
            setMeasuredDimension(widthSize, heightSize);

        }

        /**
         * 返回控件中的數值
         * @return 數值
         */
        public int getNumber(){
            return Integer.valueOf(mEditText.getText().toString());
        }


        @Override
        protected void onDraw(Canvas canvas) {
            super.onDraw(canvas);
            mWidth = getMeasuredWidth();
            mHeight = getMeasuredHeight();
            canvas.drawLine(mWidth/5,mHeight/2,mWidth-mWidth/5,mHeight/2,mMinusPaint);
        }
    }

    class PlusView extends View{

        private Paint mPlusPaint;

        public PlusView(Context context) {
            this(context, null);
        }

        public PlusView(Context context, AttributeSet attrs) {
            this(context, attrs, 0);
        }

        public PlusView(Context context, AttributeSet attrs, int defStyleAttr) {
            super(context, attrs, defStyleAttr);
            mPlusPaint = new Paint();
            mPlusPaint.setAntiAlias(true);
            mPlusPaint.setStrokeWidth(mPlusWidth);
            mPlusPaint.setStyle(Paint.Style.STROKE);
            mPlusPaint.setStrokeCap(Paint.Cap.ROUND);
            mPlusPaint.setColor(mPlusColor);
        }

        @Override
        protected void onMeasure(int widthMeasureSpec, int heightMeasureSpec) {
            super.onMeasure(widthMeasureSpec, heightMeasureSpec);
            int widthMode = MeasureSpec.getMode(widthMeasureSpec);
            int heightMode = MeasureSpec.getMode(heightMeasureSpec);
            int widthSize = MeasureSpec.getSize(widthMeasureSpec);
            int heightSize = MeasureSpec.getSize(heightMeasureSpec);

            if(widthMode == MeasureSpec.AT_MOST){
                widthSize = Math.min(widthSize,100);
            }
            if(heightMode == MeasureSpec.AT_MOST){
                heightSize = Math.min(heightSize,100);
            }
            setMeasuredDimension(widthSize,heightSize);
        }

        @Override
        protected void onDraw(Canvas canvas) {
            super.onDraw(canvas);
            mWidth = getMeasuredWidth();
            mHeight = getMeasuredHeight();
            canvas.drawLine(mWidth - mWidth / 5, mHeight / 2, mWidth / 5, mHeight / 2, mPlusPaint);
            canvas.save();
            canvas.rotate(90, mWidth / 2, mHeight / 2);
            canvas.drawLine(mWidth / 5, mHeight / 2, mWidth - mWidth / 5, mHeight / 2, mPlusPaint);
            canvas.restore();
        }
    }
}
總結
?這個控件可能不是很完善,大家可以試著擴展一下它,比如:多定制一些屬性,添加加減按鈕不可用時按鈕顯示的顏色(這裡提示一下,可以在我們添加的那個文本監聽器中監聽文本的變化,如果超出范圍,那就改變一下畫筆顏色的那個全局變量,再讓加減按鈕重新繪制即可(調用View的postInvalidate()方法))。
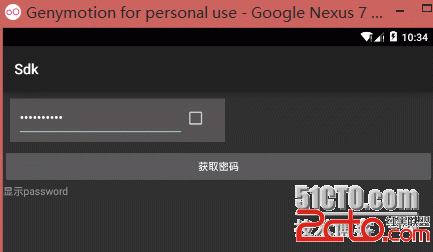 自定義Android組件之組合方式創建密碼框組件
自定義Android組件之組合方式創建密碼框組件 Android中所有控件(也稱組件)都繼承自adnroid.view.View類,android.view.View
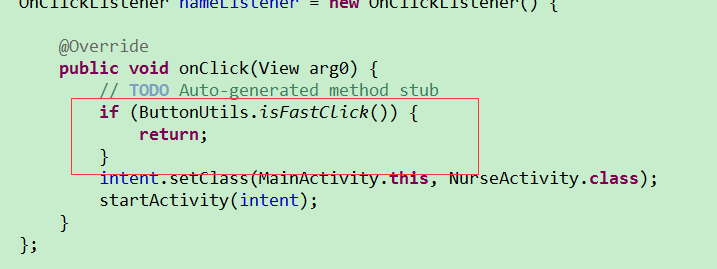 android不同的按鈕一起點擊崩潰解決,android一起
android不同的按鈕一起點擊崩潰解決,android一起public class ButtonUtils { private static long last
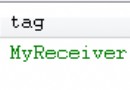 Android--BroadcastReceiver應用詳解
Android--BroadcastReceiver應用詳解 今天我們來講一下Android中BroadcastReceiver的相關知識。 BroadcastRecei
 類似桌面背景壁紙隨手指滑動--第三方開源--BackgroundViewPager,viewpager滑動開源
類似桌面背景壁紙隨手指滑動--第三方開源--BackgroundViewPager,viewpager滑動開源 Android BackgroundView