編輯:關於android開發
首先看演示:
FrameLayout框架布局是最簡單的布局形式。所有添加到這個布局中的視圖都以層疊的方式顯示。第一個添加的控件被放在最底層,最後一個添加到框架布局中的視圖顯示在最頂層,上一層的控件會覆蓋下一層的控件。這種顯示方式有些類似於堆棧。
當我們往裡面添加組件的時候,所有的組件都會放置於這塊區域的左上角;
幀布局的大小由子控件中最大的子控件決定,如果都組件都一樣大的話,同一時刻就只能看到最上面的那個組件了。
FrameLayout根本無法控制他的子控件的位置,子控件可以通過android:layout_gravity屬性來控制自己在父控件中的位置,從而制定組件的對其方式。
FrameLayout布局裡面的控件單獨設置layout_margin類的屬性沒有效果。FrameLayout中的控件layout_margin設置要依賴layout_gravity屬性,否則layout_margin設置無效。layout_gravity有好幾個值可以設置,具體要設置哪一個呢?其實layout_gravity可以理解為設置控件的參考點,控件最終顯示位置最終由layout_gravity和layout_margin共同決定。
如果想要控件正常顯示,可以將控件的layout_gravity設置為top,以屏幕左上角為參考點。
永遠處於幀布局最頂的,直接面對用戶的圖像,,就是不會被覆蓋的圖片
常用屬性:
android:foreground:設置該幀布局容器的前景圖像
android:foregroundGravity:設置前景圖像顯示的位置
幀布局在游戲開發方面用的比較多。當你需要自己寫一個View的時候,在View裡面已經完成了你的邏輯(例如游戲^_^),那麼這個View只需要一個容器放置,就可以使用FrameLayout了。雖然用其他的布局也可以,但是用最簡單的不是更省系統資源麼。
activity代碼
package mm.shandong.com.testframelayout;

import android.support.v7.app.AppCompatActivity;
import android.os.Bundle;
import android.view.MotionEvent;
import android.view.View;
import android.widget.Button;
import android.widget.FrameLayout;

public class TestFrameLayoutActivity extends AppCompatActivity {
    FrameLayout frameLayout;
    Button btn;

    @Override
    protected void onCreate(Bundle savedInstanceState) {
        super.onCreate(savedInstanceState);
        setContentView(R.layout.activity_test_frame_layout);
        btn = (Button) findViewById(R.id.btn);
        frameLayout = (FrameLayout) findViewById(R.id.frameLayout);
        frameLayout.setOnTouchListener(new View.OnTouchListener() {
            @Override
            public boolean onTouch(View view, MotionEvent motionEvent) {
                int x = (int) motionEvent.getX();
                int y = (int) motionEvent.getY();
                int width = btn.getWidth();
                int height = btn.getHeight();
                btn.layout(x, y, x + width, y + height);
                return false;
            }
        });
    }
}
xml代碼
<?xml version="1.0" encoding="utf-8"?>
<LinearLayout xmlns:android="http://schemas.android.com/apk/res/android"
    xmlns:tools="http://schemas.android.com/tools"
    android:layout_width="match_parent"
    android:layout_height="match_parent"
    android:orientation="vertical">

    <TextView
        android:layout_width="match_parent"
        android:layout_height="wrap_content"
        android:text="下面是一個FrameLayout,默認布局" />

    <FrameLayout
        android:layout_width="match_parent"
        android:layout_height="80dp"
        android:background="#ff0000">

        <TextView
            android:layout_width="wrap_content"
            android:layout_height="wrap_content"
            android:text="第一層"
            android:textColor="#00ff00"
            android:textSize="55sp" />

        <TextView
            android:layout_width="wrap_content"
            android:layout_height="wrap_content"
            android:text="第二層"
            android:textColor="#0000ff"
            android:textSize="45sp" />
        <TextView
            android:layout_width="wrap_content"
            android:layout_height="wrap_content"
            android:text="第三層"
            android:textColor="#00ffff"
            android:textSize="35sp" />

        <TextView
            android:layout_width="wrap_content"
            android:layout_height="wrap_content"
            android:text="第四層"
            android:textColor="#ffff00"
            android:textSize="25sp" />
    </FrameLayout>

    <TextView
        android:layout_width="match_parent"
        android:layout_height="wrap_content"
        android:text="下面是一個FrameLayout,通過layout_gravity和margin調節位置,並設置前景圖片和背景顏色" />

    <FrameLayout
        android:layout_width="match_parent"
        android:layout_height="180dp"
        android:background="#ff0000"
        android:foreground="@drawable/red"
        android:foregroundGravity="right|bottom">

        <Button
            android:layout_width="wrap_content"
            android:layout_height="wrap_content"
            android:layout_gravity="top|left"
            android:layout_marginLeft="20dp"
            android:layout_marginTop="0dp"
            android:text="左上 left:20 Top:0"
            android:textColor="#00ff00"
            android:textSize="15sp" />

        <Button
            android:layout_width="wrap_content"
            android:layout_height="wrap_content"
            android:layout_gravity="top|left"
            android:layout_marginLeft="20dp"
            android:layout_marginTop="25dp"
            android:text="左上 left:20 Top:25"
            android:textColor="#00aa00"
            android:textSize="15sp" />

        <Button
            android:layout_width="wrap_content"
            android:layout_height="wrap_content"
            android:layout_gravity="bottom|left"
            android:layout_marginBottom="20dp"
            android:layout_marginLeft="45dp"
            android:text="左下 left:45 Bottom:20"
            android:textColor="#0000ff"
            android:textSize="15sp" />

        <Button
            android:layout_width="wrap_content"
            android:layout_height="wrap_content"
            android:layout_gravity="center"
            android:text="居中"
            android:textColor="#00ffff"
            android:textSize="15sp" />

        <Button
            android:layout_width="wrap_content"
            android:layout_height="wrap_content"
            android:layout_gravity="right|top"
            android:layout_marginTop="30dp"
            android:text="右上 top 30"
            android:textColor="#ffff00"
            android:textSize="15sp" />

        <Button
            android:layout_width="wrap_content"
            android:layout_height="wrap_content"
            android:layout_gravity="right|bottom"
            android:layout_marginBottom="80dp"
            android:text="最上層,仍被遮蓋"
            android:textSize="15sp" />
    </FrameLayout>

    <TextView
        android:layout_width="match_parent"
        android:layout_height="wrap_content"
        android:text="下面是一個FrameLayout,通過layout方法設置控件具體位置,請單擊framelayou" />

    <FrameLayout
        android:id="@+id/frameLayout"
        android:layout_width="match_parent"
        android:layout_height="match_parent"
        android:background="#ff0000">

        <Button
            android:id="@+id/btn"
            android:layout_width="wrap_content"
            android:layout_height="wrap_content"
            android:text="請點擊別處" />
    </FrameLayout>
</LinearLayout>
本人微博:honey_11
Demo下載
最後,以上例子都來源與安卓無憂,請去應用寶或者豌豆莢下載:例子源碼,源碼例子文檔一網打盡
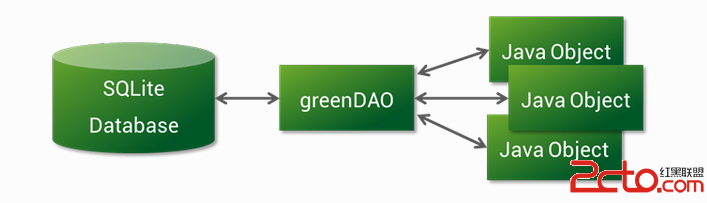 Android 操作數據庫的框架——greenDAO的學習
Android 操作數據庫的框架——greenDAO的學習 greenDAO的使用 簡介 官網給出如下介紹: greenDAO是一個對象關系映射(ORM)的框架,能夠
 Binder中的asInterface解析,binderasinterface
Binder中的asInterface解析,binderasinterface在使用AIDL通信的時候,在Stub類中都會生成一個asInterface函數,以《Andr
 Hive 1.2.1&Spark&Sqoop安裝指南
Hive 1.2.1&Spark&Sqoop安裝指南Hive 1.2.1&Spark&Sqoop安裝指南.pdf目錄目錄11.前言12.約定23.服務端口
 Android-->猜拳小游戲,android--猜拳
Android-->猜拳小游戲,android--猜拳--> 簡單的 頁面跳轉 和 點擊事件 的實現... --> AndroidManif