編輯:關於android開發
很多人在調用圖庫選擇圖片時會在onActivityResult中用Media.getBitmap來獲取返回的圖片,如下:
                        Uri mImageCaptureUri = data.getData();
                        Bitmap photoBmp = null;
                        if (mImageCaptureUri != null) {
                            photoBmp = MediaStore.Images.Media.getBitmap(ac.getContentResolver(), mImageCaptureUri);
                        }
但是Media.getBitmap這個方法獲取已知uri圖片的方式並不可取,咱來看看Media.getBitmap()方法的源碼:
public static final Bitmap getBitmap(ContentResolver cr, Uri url)
        throws FileNotFoundException, IOException {
    InputStream input = cr.openInputStream(url);
    Bitmap bitmap = BitmapFactory.decodeStream(input);
    input.close();
    return bitmap;
}
其實它很簡單很粗暴,返回的是原始大小的bitmap,當圖庫選擇的圖片很大時程序極有可能會報OOM。
為了避免OOM,咱們需要改進該方法,在 BitmapFactory.decodeStream 之前壓縮圖片,以下是我改進後的代碼:
在onActivityResult中調用
    Uri mImageCaptureUri = data.getData();

    Bitmap photoBmp = null;

    if (mImageCaptureUri != null) {

    photoBmp = getBitmapFormUri(ac, mImageCaptureUri);

    }
/**
     * 通過uri獲取圖片並進行壓縮
     *
     * @param uri
     */
    public static Bitmap getBitmapFormUri(Activity ac, Uri uri) throws FileNotFoundException, IOException {
        InputStream input = ac.getContentResolver().openInputStream(uri);
        BitmapFactory.Options onlyBoundsOptions = new BitmapFactory.Options();
        onlyBoundsOptions.inJustDecodeBounds = true;
        onlyBoundsOptions.inDither = true;//optional
        onlyBoundsOptions.inPreferredConfig = Bitmap.Config.ARGB_8888;//optional
        BitmapFactory.decodeStream(input, null, onlyBoundsOptions);
        input.close();
        int originalWidth = onlyBoundsOptions.outWidth;
        int originalHeight = onlyBoundsOptions.outHeight;
        if ((originalWidth == -1) || (originalHeight == -1))
            return null;
        //圖片分辨率以480x800為標准
        float hh = 800f;//這裡設置高度為800f
        float ww = 480f;//這裡設置寬度為480f
        //縮放比。由於是固定比例縮放,只用高或者寬其中一個數據進行計算即可
        int be = 1;//be=1表示不縮放
        if (originalWidth > originalHeight && originalWidth > ww) {//如果寬度大的話根據寬度固定大小縮放
            be = (int) (originalWidth / ww);
        } else if (originalWidth < originalHeight && originalHeight > hh) {//如果高度高的話根據寬度固定大小縮放
            be = (int) (originalHeight / hh);
        }
        if (be <= 0)
            be = 1;
        //比例壓縮
        BitmapFactory.Options bitmapOptions = new BitmapFactory.Options();
        bitmapOptions.inSampleSize = be;//設置縮放比例
        bitmapOptions.inDither = true;//optional
        bitmapOptions.inPreferredConfig = Bitmap.Config.ARGB_8888;//optional
        input = ac.getContentResolver().openInputStream(uri);
        Bitmap bitmap = BitmapFactory.decodeStream(input, null, bitmapOptions);
        input.close();

        return compressImage(bitmap);//再進行質量壓縮
    }
 /**
     * 質量壓縮方法
     *
     * @param image
     * @return
     */
    public static Bitmap compressImage(Bitmap image) {

        ByteArrayOutputStream baos = new ByteArrayOutputStream();
        image.compress(Bitmap.CompressFormat.JPEG, 100, baos);//質量壓縮方法,這裡100表示不壓縮,把壓縮後的數據存放到baos中
        int options = 100;
        while (baos.toByteArray().length / 1024 > 100) {  //循環判斷如果壓縮後圖片是否大於100kb,大於繼續壓縮
            baos.reset();//重置baos即清空baos
            //第一個參數 :圖片格式 ,第二個參數: 圖片質量,100為最高,0為最差  ,第三個參數:保存壓縮後的數據的流
            image.compress(Bitmap.CompressFormat.JPEG, options, baos);//這裡壓縮options%,把壓縮後的數據存放到baos中
            options -= 10;//每次都減少10
        }
        ByteArrayInputStream isBm = new ByteArrayInputStream(baos.toByteArray());//把壓縮後的數據baos存放到ByteArrayInputStream中
        Bitmap bitmap = BitmapFactory.decodeStream(isBm, null, null);//把ByteArrayInputStream數據生成圖片
        return bitmap;
    }
OOM的問題解決了,但是又碰到另外一個問題,用三星手機拍照或者選擇照片後返回來的圖片居然轉了90度。。苦逼的android程序員。。接著改。。
講onActivityResult中的代碼進行改進:
          Uri originalUri = null;
                File file = null;
                if (null != data && data.getData() != null) {
                    originalUri = data.getData();
                    file = getFileFromMediaUri(ac, originalUri);
                }
           Bitmap photoBmp = getBitmapFormUri(ac, Uri.fromFile(file));
            int degree = getBitmapDegree(file.getAbsolutePath());
            /**
             * 把圖片旋轉為正的方向
             */
            Bitmap newbitmap = rotateBitmapByDegree(photoBmp, degree);
/**
     * 通過Uri獲取文件
     * @param ac
     * @param uri
     * @return
     */
    public static File getFileFromMediaUri(Context ac, Uri uri) {
        if(uri.getScheme().toString().compareTo("content") == 0){
            ContentResolver cr = ac.getContentResolver();
            Cursor cursor = cr.query(uri, null, null, null, null);// 根據Uri從數據庫中找
            if (cursor != null) {
                cursor.moveToFirst();
                String filePath = cursor.getString(cursor.getColumnIndex("_data"));// 獲取圖片路徑
                cursor.close();
                if (filePath != null) {
                    return new File(filePath);
                }
            }
        }else if(uri.getScheme().toString().compareTo("file") == 0){
            return new File(uri.toString().replace("file://",""));
        }
            return null;
        }
/**
     * 讀取圖片的旋轉的角度
     *
     * @param path 圖片絕對路徑
     * @return 圖片的旋轉角度
     */
    public static int getBitmapDegree(String path) {
        int degree = 0;
        try {
            // 從指定路徑下讀取圖片,並獲取其EXIF信息
            ExifInterface exifInterface = new ExifInterface(path);
            // 獲取圖片的旋轉信息
            int orientation = exifInterface.getAttributeInt(ExifInterface.TAG_ORIENTATION,
                    ExifInterface.ORIENTATION_NORMAL);
            switch (orientation) {
                case ExifInterface.ORIENTATION_ROTATE_90:
                    degree = 90;
                    break;
                case ExifInterface.ORIENTATION_ROTATE_180:
                    degree = 180;
                    break;
                case ExifInterface.ORIENTATION_ROTATE_270:
                    degree = 270;
                    break;
            }
        } catch (IOException e) {
            e.printStackTrace();
        }
        return degree;
    }
/**
     * 將圖片按照某個角度進行旋轉
     *
     * @param bm     需要旋轉的圖片
     * @param degree 旋轉角度
     * @return 旋轉後的圖片
     */
    public static Bitmap rotateBitmapByDegree(Bitmap bm, int degree) {
        Bitmap returnBm = null;

        // 根據旋轉角度,生成旋轉矩陣
        Matrix matrix = new Matrix();
        matrix.postRotate(degree);
        try {
            // 將原始圖片按照旋轉矩陣進行旋轉,並得到新的圖片
            returnBm = Bitmap.createBitmap(bm, 0, 0, bm.getWidth(), bm.getHeight(), matrix, true);
        } catch (OutOfMemoryError e) {
        }
        if (returnBm == null) {
            returnBm = bm;
        }
        if (bm != returnBm) {
            bm.recycle();
        }
        return returnBm;
    }
好了,問題搞定!
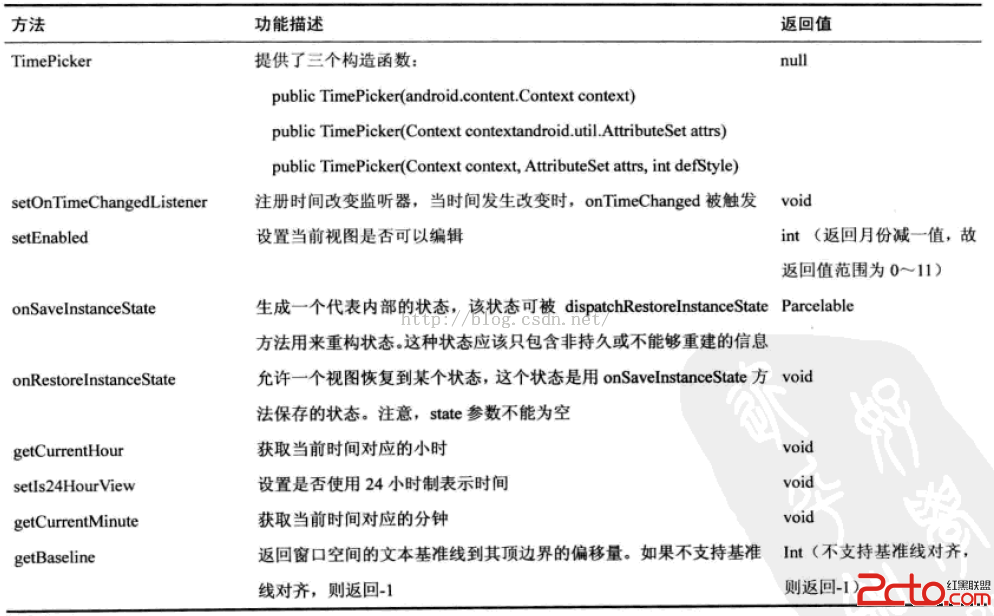 閱讀《Android 從入門到精通》(14)——時間選擇器
閱讀《Android 從入門到精通》(14)——時間選擇器 時間選擇器(TimePicker) java.lang.Object; android.view.View;
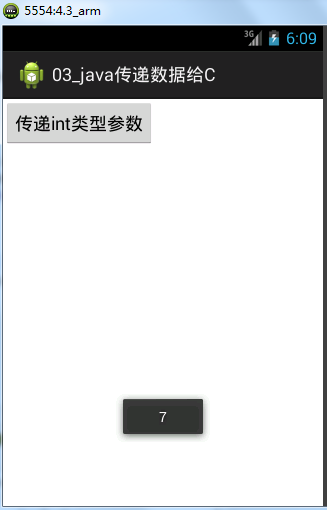 Android java傳遞int類型數據給C,androidint
Android java傳遞int類型數據給C,androidint本文根據《Android jni簡便開發流程》中的開發流程來實現一個java傳遞int類型數據給C 新
 手機APP創建桌面快捷方式,app創建快捷方式
手機APP創建桌面快捷方式,app創建快捷方式 預覽: 需要權限: 1 <uses-permission a
 【微學堂】第22期| Nginx的性能優化
【微學堂】第22期| Nginx的性能優化分享主題:Nginx的性能優化分享時間:2016年11月24日(周四)20:00特邀講師:李強(撒加)運維幫專家顧問團成員,先後