編輯:關於android開發
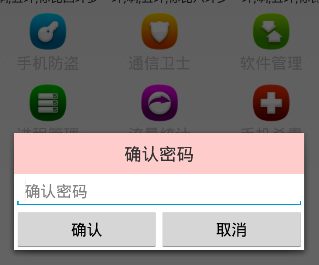
本文接著實現“確認密碼”功能,也即是用戶以前設置過密碼,現在只需要輸入確認密碼
本文地址:http://www.cnblogs.com/wuyudong/p/5940718.html,轉載請注明出處。
布局文件和《Android 手機衛士--設置密碼對話框》中的布局基本類似,所有copy一下,修改一點細節就搞定:
<?xml version="1.0" encoding="utf-8"?>
<LinearLayout xmlns:android="http://schemas.android.com/apk/res/android"
    android:layout_width="match_parent"
    android:layout_height="match_parent"
    android:orientation="vertical">

    <TextView
        style="@style/TitleStyle"
        android:background="#f00"
        android:text="確認密碼"
        />
    <EditText
        android:id="@+id/et_confirm_psd"
        android:layout_width="match_parent"
        android:layout_height="wrap_content"
        android:hint="確認密碼"
        />

    <LinearLayout
        android:layout_width="match_parent"
        android:layout_height="wrap_content">

        <Button
            android:id="@+id/bt_submit"
            android:layout_width="0dp"
            android:layout_height="wrap_content"
            android:layout_weight="1"
            android:text="確認" />

        <Button
            android:id="@+id/bt_cancel"
            android:layout_width="0dp"
            android:layout_height="wrap_content"
            android:layout_weight="1"
            android:text="取消" />
    </LinearLayout>

</LinearLayout>
代碼邏輯也基本類似,簡單的修改一下
    /**
     * 確認密碼對話框
     */
    private void showConfirmPsdDialog() {
        //需要自己去定義對話框的顯示樣式,所以要調用dialog.setView(view);
        Builder builder = new Builder(this);
        final AlertDialog dialog = builder.create();
        final View view = inflate(this, R.layout.dialog_confirm_psd, null);
        //讓對話框顯示一個自己定義的對話框界面效果
        dialog.setView(view);
        dialog.show();

        Button bt_submit = (Button) view.findViewById(R.id.bt_submit);
        Button bt_cancel = (Button) view.findViewById(R.id.bt_cancel);

        bt_submit.setOnClickListener(new OnClickListener() {
            @Override
            public void onClick(View v) {
                EditText et_confirm_psd = (EditText) view.findViewById(R.id.et_confirm_psd);
                String confirmPsd = et_confirm_psd.getText().toString();
                String psd = SpUtil.getString(getApplicationContext(),ConstantValue.MOBILE_SAFE_PSD, "");
                if(!TextUtils.isEmpty(confirmPsd)){
                    //進入用戶手機防盜模塊
                    if(psd.equals(confirmPsd)) {
                        Intent intent = new Intent(getApplicationContext(), testActivity.class);
                        startActivity(intent);
                        //跳轉到新的界面以後需要去隱藏對話框
                        dialog.dismiss();
                    } else {
                        ToastUtil.show(getApplicationContext(),"輸入密碼錯誤");
                    }

                }else{
                    //提示用戶密碼輸入為空的情況
                    ToastUtil.show(getApplicationContext(),"請輸入密碼");
                }
            }
        });
        bt_cancel.setOnClickListener(new OnClickListener() {
            @Override
            public void onClick(View view) {
                dialog.dismiss();
            }
        });
    }
 [android] 手機衛士來電顯示號碼歸屬地,android來電顯示
[android] 手機衛士來電顯示號碼歸屬地,android來電顯示繼續N天前的項目 開啟服務監聽手機來電,查詢數據庫,顯示歸屬地 詳細內容可以參考這篇博文:http:
 RecyclerView,androidrecyclerview
RecyclerView,androidrecyclerview1.簡介 RecyclerView是一種新的視圖組,目標是為任何基於適配器的視圖提供相似的渲染方式。它
 Android 塗鴉最佳實踐
Android 塗鴉最佳實踐 Android中實現手勢畫圖一般都兩種方式,一是直接在View上繪制,而是使用SurfaceView。 兩者還是有一些差別的。簡介下。
 新版飛機大戰游戲安卓源碼項目,飛機大戰安卓
新版飛機大戰游戲安卓源碼項目,飛機大戰安卓 作者nuptboyzhb,源碼newplanegame,新版飛機大戰是一款以真實戰機為模板的飛行射擊類游戲