編輯:關於android開發
源碼:http://www.jinhusns.com/Products/Download/?type=xcj
Android是在Android 3.0 (API level 11)開始引入Fragment的。
可以把Fragment想成Activity中的模塊,這個模塊有自己的布局,有自己的生命周期,單獨處理自己的輸入,在Activity運行的時候可以加載或者移除Fragment模塊。
可以把Fragment設計成可以在多個Activity中復用的模塊。
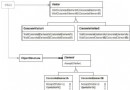
當開發的應用程序同時適用於平板電腦和手機時,可以利用Fragment實現靈活的布局,改善用戶體驗。
如圖:

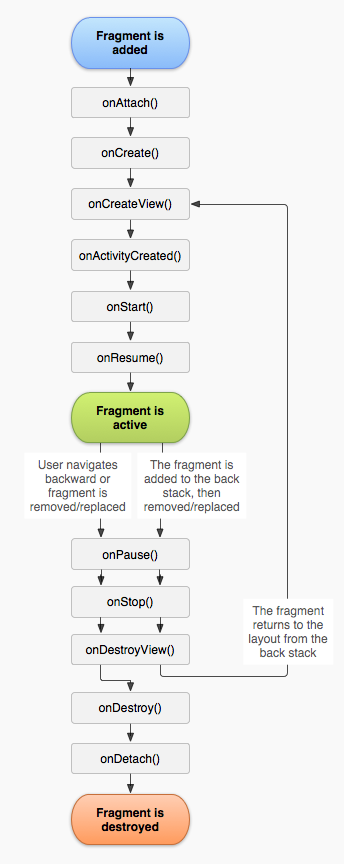
因為Fragment必須嵌入在Acitivity中使用,所以Fragment的生命周期和它所在的Activity是密切相關的。
如果Activity是暫停狀態,其中所有的Fragment都是暫停狀態;如果Activity是stopped狀態,這個Activity中所有的Fragment都不能被啟動;如果Activity被銷毀,那麼它其中的所有Fragment都會被銷毀。
但是,當Activity在活動狀態,可以獨立控制Fragment的狀態,比如加上或者移除Fragment。
當這樣進行fragment transaction(轉換)的時候,可以把fragment放入Activity的back stack中,這樣用戶就可以進行返回操作。
使用Fragment時,需要繼承Fragment或者Fragment的子類(DialogFragment, ListFragment, PreferenceFragment, WebViewFragment),所以Fragment的代碼看起來和Activity的類似。
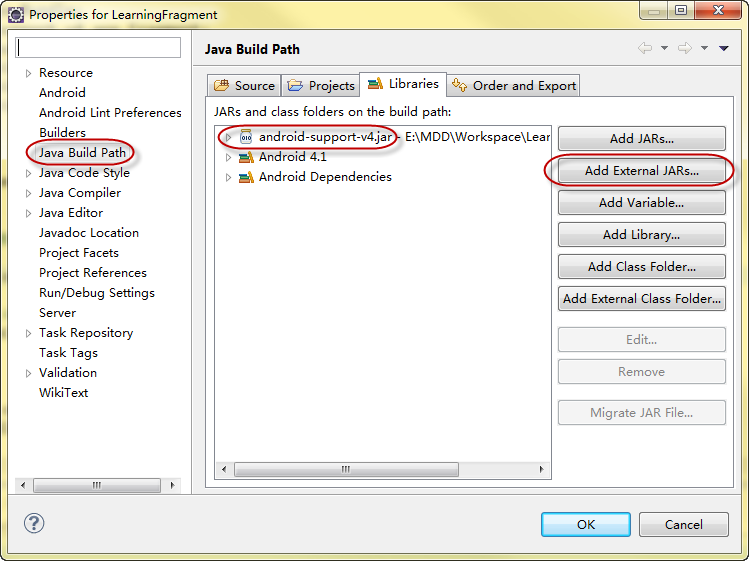
使用Support Library
Support Library是一個提供了API庫函數的JAR文件,這樣就可以在舊版本的Android上使用一些新版本的APIs。
比如android-support-v4.jar.它的完整路徑是:
<sdk>/extras/android/support/v4/android-support-v4.jar.
它就提供了Fragment的APIs,使得在Android 1.6 (API level 4)以上的系統都可以使用Fragment。
為了確定沒有在舊版本系統上使用新版本的APIs,需要如下導入語句:
1.import android.support.v4.app.Fragment;
2.
3.import android.support.v4.app.FragmentManager;
同時應該將上述的包拷入libs項目下的libs文件夾,然後在項目的Properties中添加:右鍵單擊項目,選Properties,左邊選 Java Build Path,然後Add External JARs…,添加android-support-v4.jar.
當創建包含Fragment的Activity時,如果用的是Support Library,那麼繼承的就應該是FragmentActivity而不是Activity。
必須實現的三個回調函數
onCreate()
系統在創建Fragment的時候調用這個方法,這裡應該初始化相關的組件,一些即便是被暫停或者被停止時依然需要保留的東西。
onCreateView()
當第一次繪制Fragment的UI時系統調用這個方法,必須返回一個View,如果Fragment不提供UI也可以返回null。
注意,如果繼承自ListFragment,onCreateView()默認的實現會返回一個ListView,所以不用自己實現。
onPause()
當用戶離開Fragment時第一個調用這個方法,需要提交一些變化,因為用戶很可能不再返回來。
實現Fragment的UI
提供Fragment的UI,必須實現onCreateView()方法。
假設Fragment的布局設置寫在example_fragment.xml資源文件中,那麼onCreateView()方法可以如下寫:
01.public static class ExampleFragment extends Fragment
02.{
03.@Override
04.public View onCreateView(LayoutInflater inflater, ViewGroup container,
05. Bundle savedInstanceState)
06.{
07.// Inflate the layout for this fragment
08.return inflater.inflate(R.layout.example_fragment, container, false);
09.}
10.}
onCreateView()中container參數代表該Fragment在Activity中的父控件;savedInstanceState提供了上一個實例的數據。
inflate()方法的三個參數:
第一個是resource ID,指明了當前的Fragment對應的資源文件;
第二個參數是父容器控件;
第三個布爾值參數表明是否連接該布局和其父容器控件,在這裡的情況設置為false,因為系統已經插入了這個布局到父控件,設置為true將會產生多余的一個View Group。
當Fragment被加入Activity中時,它會處在對應的View Group中。
Fragment有兩種加載方式:一種是在Activity的layout中使用標簽<fragment>聲明;另一種方法是在代碼中把它加入到一個指定的ViewGroup中。
另外,Fragment它可以並不是Activity布局中的任何一部分,它可以是一個不可見的部分。這部分內容先略過。
加載方式1:通過Activity的布局文件將Fragment加入Activity
在Activity的布局文件中,將Fragment作為一個子標簽加入即可。
如:
01.<?xml version="1.0" encoding="utf-8"?>
02.<LinearLayout xmlns:android="http://schemas.android.com/apk/res/android"
03.android:orientation="horizontal"
04.android:layout_width="match_parent"
05.android:layout_height="match_parent">
06.<fragment android:name="com.example.news.ArticleListFragment"
07.android:id="@+id/list"
08.android:layout_weight="1"
09.android:layout_width="0dp"
10.android:layout_height="match_parent" />
11.<fragment android:name="com.example.news.ArticleReaderFragment"
12.android:id="@+id/viewer"
13.android:layout_weight="2"
14.android:layout_width="0dp"
15.android:layout_height="match_parent" />
16.</LinearLayout>
其中android:name屬性填上你自己創建的fragment的完整類名。
當系統創建這個Activity的布局文件時,系統會實例化每一個fragment,並且調用它們的onCreateView()方法,來獲得相應fragment的布局,並將返回值插入fragment標簽所在的地方。
有三種方法為Fragment提供ID:
android:id屬性:唯一的id
android:tag屬性:唯一的字符串
如果上面兩個都沒提供,系統使用容器view的ID。
加載方式2:通過編程的方式將Fragment加入到一個ViewGroup中
當Activity處於Running狀態下的時候,可以在Activity的布局中動態地加入Fragment,只需要指定加入這個Fragment的父View Group即可。
首先,需要一個FragmentTransaction實例:
1.FragmentManager fragmentManager = getFragmentManager()
2.
3.FragmentTransaction fragmentTransaction = fragmentManager.beginTransaction();
(注,如果import android.support.v4.app.FragmentManager;那麼使用的是:FragmentManager fragmentManager = getSupportFragmentManager();)
之後,用add()方法加上Fragment的對象:
1.ExampleFragment fragment = new ExampleFragment();
2.
3.fragmentTransaction.add(R.id.fragment_container, fragment);
4.
5.fragmentTransaction.commit();
其中第一個參數是這個fragment的容器,即父控件組。
最後需要調用commit()方法使得FragmentTransaction實例的改變生效。
 Android應用自定義View繪制方法手冊
Android應用自定義View繪制方法手冊 背景 這篇遲遲難產的文章算是對2015前半年的一個交代吧,那時候有一哥們要求來一發Android Canvas相關總結,這哥
 硅谷新聞1--引導界面GuideActivity,1--guideactivity
硅谷新聞1--引導界面GuideActivity,1--guideactivity1.紅點切換間距 RelativeLayout.LayoutParams params
 Android系統 應用圖標顯示未讀消息數(BadgeNumber) 桌面app圖標的角標顯示
Android系統 應用圖標顯示未讀消息數(BadgeNumber) 桌面app圖標的角標顯示 Android系統 小米,三星,索尼手機發送桌面快鍵提醒數字圖標,在
 《Android源碼設計模式解析與實戰》讀書筆記(十六)
《Android源碼設計模式解析與實戰》讀書筆記(十六) 第十六章、訪問者模式 訪問者模式是一種行為型模式,它是23種設計模式中最復雜的一個,雖然使用頻率不高,但是並