編輯:關於android開發
1、無法使用網絡:Permission denied(maybe missing internet permission)
在AndroidMainifest.xml中增加允許使用網絡選項(在</application>結束標簽之後>):
<uses-permission Android:name="android.permission.INTERNET" />
2、找不到activity類: android.content.ActivityNotFoundException: Unable to find explicit activity class {xxxx}
在AndroidMainifest.xml中增加activity的申明,如:
<activity android:name=".xxxActivity" >
</activity>
3、為什麼我找不到 startSubActivity 方法?
現在,請使用 startActivityForResult 方法來代替舊的startSubActivity方法。
4、無法加載xml中的view,報 java.lang.NullPointerException 異常
忘記加載activity的layout文件:
setContentView(R.layout.main);
5、Unparsed aapt error(s)! Check the console for output
但是你的控制台上找不到錯誤或者 看不懂錯誤的時候,點 Project--------->clean..就會沒問題
http://hovertree.com/menu/android/
6、requestCode和resultCode的區別
在使用startActivityForResult()和onActivityResult()時,會分別用到requestCode和resultCode,有時候極容易將2個參數混淆起來。
requestCode 和 resultCode 混淆說明錯的。 startActivityForResult(Intent intent, Int requestCode) intent 傳給B的,不解釋,看不懂你還是玩玩手機算了,別想開發的事情了 requestCode >=0就好,隨便用於在onActivityResult()區別哪個子模塊回傳的數據,如果還有C.java ,D甚至E子模塊的話,每個區分開不同的requestCode就好。 setResut(int resultCode, Intent intent) resultCode 如果B子模塊可能有幾種不同的結果返回,可以用這個參數予以識別區分。這裡還有個特殊的 RESULT_OK 值,沒有特殊情況用它就好了,sdk有說明的,呵。 intent 繼續不解釋,傳回給A的onActivityResult() onActivityResult(int requestCode, int resultCode, Intent intent) 這裡三個都不用解釋了,與上文對應的東西。如果不對requestCode和resultCode 加以識別區分的話,只要有其他activity setResult到了A onActivityResult()會無差別處理。
7、無法下載文件到SD卡中
在manifest文件中加上:<uses-permission android:name="android.permission.WRITE_EXTERNAL_STORAGE" />
8、讓控件在父容器中居中:
android:layout_gravity="center_vertical"
9、控件兩端對齊:
如下代碼讓位於同一行的兩個控件分別左對齊和右對齊:
<RelativeLayout
xmlns:Android="http://schemas.android.com/apk/res/android"
Android:background="@drawable/top"
Android:layout_width="fill_parent"
Android:layout_height="wrap_content"
><ImageView
Android:id="@+file_browser/imgRefresh"
Android:layout_width="wrap_content"
Android:layout_height="wrap_content"
Android:layout_marginLeft="10px"
Android:src="@drawable/refresh"
Android:layout_centerVertical="true"
>
</ImageView>
<ImageView
Android:id="@+file_browser/imgCheck"
Android:layout_alignParentRight="true"
Android:layout_width="wrap_content"
Android:layout_height="wrap_content"
Android:layout_marginRight="10px"
Android:src="@drawable/close"
Android:layout_centerVertical="true"
>
</ImageView>
</RelativeLayout>
10、android軟鍵盤把控件往上擠的解決辦法:
鍵盤區域外才是屏幕的邊緣,定義布局文件時使用:android:gravity="bottom"的話就會被擠到上部!
解決辦法:
在此工程的androidMainfest.xml文件中對應的Activity中寫入 android:windowSoftInputMode="adjustPan"
或者在配置文件中把布局文件的大小寫死!
11、在布局中使用scrollview:
把原來的布局用<ScrollView xmlns:android="http://schemas.android.com/apk/res/android"
android:layout_width="fill_parent"
android:layout_height="wrap_content"
android:scrollbars="none"></ScrollView>括起來即可實現視圖的滾動。
12、全局變量Application Context
創建一個屬於你自己的android.app.Application的子類,然後在manifest中申明一下這個類,這是android就為此建立一個全局可用的實例,你可以在其他任何地方使用Context.getApplicationContext()方法獲取這個實例,進而獲取其中的狀態(變量)。 下面看一下Demo:
class MyApp extends Application {
private String myState;
public String getState(){
return myState;
}
public void setState(String s){
myState = s;
}
}
class Blah extends Activity {
@Override
public void onCreate(Bundle b){
...
MyApp appState = ((MyApp)getApplicationContext());
String state = appState.getState();
...
}
}
這個效果就是使用靜態變量是一樣的,但是其更符合android的架構體系。 使用這種方法的話需要在AndroidManifest.xml中配置一下:
<application android:name=".MyApp"
android:icon="@drawable/icon"
android:label="@string/app_name">
13、Android模擬器打電話發短信
GPhone的模擬器有個特有的號碼:15555218135,這個就類似我們實體手機的SIM卡號碼啦。要實現撥號,用手機?當然不行!
更簡單,三步:
1.打開終端
2.連接: telnet localhost 5554(5554是你打開模擬器後上面顯示的數字)
3.命令:gsm call 15555218135
look!是不是模擬器上顯示來電了?接聽/掛斷和實體手機一樣。
發短信也一樣簡單,重復上面1,2兩步,第三部命令改一下:
sms send 15555218135 Hello,this is a Message.
14、ListView不能觸發OnItemClickListener監聽器
檢查行所綁定的行布局文件中是否使用了EditText,如果有的話將EditText的focusable 屬性設為false。
推薦:http://www.cnblogs.com/roucheng/p/sdka.html
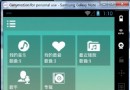
 Android插件化基礎(4),動態啟動插件中的Activity
Android插件化基礎(4),動態啟動插件中的Activity Android插件化基礎(4),動態啟動插件中的Activity Author:鄭海波-莫川 簡介 如何
 Android音樂播放器源碼(歌詞.均衡器.收藏.qq5.0菜單.通知),android.qq5.0
Android音樂播放器源碼(歌詞.均衡器.收藏.qq5.0菜單.通知),android.qq5.0一款Android音樂播放器源碼,基本功能都實現了 qq5.0菜單(歌
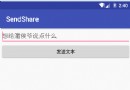 Android中實現APP文本內容的分享發送與接收方法簡述,androidapp
Android中實現APP文本內容的分享發送與接收方法簡述,androidapp謹記(指定選擇器Intent.createChooser()) 開始今天的內容前,先閒聊一
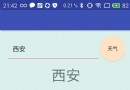 Android 天氣預報(2)
Android 天氣預報(2) 之前實現過了天氣預報的功能 但是真的好丑 真的只是實現功能 所以上一篇博客也沒有貼出圖片 這次 相對於第一個 首先是界面做了調整 其次