編輯:關於android開發
對於SingleTop模式,即使棧中存在活動的實例,但是如果不在棧頂的位置,系統還是會創建該活動的情況下。如果將啟動模式設置為SingleTask模式,那麼在啟動該活動時,系統檢測到棧中存在該活動的實例,就不會再創建該活動了,而只是會將處於該活動上方的所有活動都出棧,使得該活動處於棧頂位置。
同樣的,貼上代碼來檢測一下。創建項目LearnLaunchMode_SingleTask,其各部分代碼如下:
FirstActivity.java:
 1 public class FirstActivity extends ActionBarActivity {
 2     private Button launch_second, launch_third;
 3     @Override
 4     protected void onCreate(Bundle savedInstanceState) {
 5         super.onCreate(savedInstanceState);
 6         setContentView(R.layout.activity_first);
 7
 8         launch_second = (Button) findViewById(R.id.launch_second);
 9         launch_third = (Button) findViewById(R.id.launch_third);
10         launch_second.setOnClickListener(new View.OnClickListener() {
11             @Override
12             public void onClick(View v) {
13                 Intent intent = new Intent().setClass(FirstActivity.this, SecondActivity.class);
14                 startActivity(intent);
15             }
16         });
17         launch_third.setOnClickListener(new View.OnClickListener() {
18             @Override
19             public void onClick(View v) {
20                 Intent intent = new Intent().setClass(FirstActivity.this, ThirdActivity.class);
21                 startActivity(intent);
22             }
23         });
24         Log.i("TAG", this + " is launch");
25     }
26
27     @Override
28     protected void onDestroy() {
29         super.onDestroy();
30         Log.i("TAG", this + " is destroy!");
31     }
32 }
SecondActivity.java:
 1 public class SecondActivity extends Activity {
 2     private Button launch_first, launch_third;
 3     @Override
 4     protected void onCreate(Bundle savedInstanceState) {
 5         super.onCreate(savedInstanceState);
 6         requestWindowFeature(Window.FEATURE_NO_TITLE);
 7         setContentView(R.layout.activity_second);
 8
 9         launch_first = (Button) findViewById(R.id.launch_first);
10         launch_third = (Button) findViewById(R.id.launch_third);
11         launch_first.setOnClickListener(new View.OnClickListener() {
12             @Override
13             public void onClick(View v) {
14                 Intent intent = new Intent().setClass(SecondActivity.this, FirstActivity.class);
15                 startActivity(intent);
16             }
17         });
18         launch_third.setOnClickListener(new View.OnClickListener() {
19             @Override
20             public void onClick(View v) {
21                 Intent intent = new Intent().setClass(SecondActivity.this, ThirdActivity.class);
22                 startActivity(intent);
23             }
24         });
25         Log.i("TAG", this + " is launch");
26     }
27
28     @Override
29     protected void onDestroy() {
30         super.onDestroy();
31         Log.i("TAG", this + " is destroy!");
32     }
33 }
ThirdActivity.java:
 1 public class ThirdActivity extends Activity {
 2     private Button launch_first, launch_second;
 3     @Override
 4     protected void onCreate(Bundle savedInstanceState) {
 5         super.onCreate(savedInstanceState);
 6         requestWindowFeature(Window.FEATURE_NO_TITLE);
 7         setContentView(R.layout.activity_third);
 8
 9         launch_first = (Button) findViewById(R.id.launch_first);
10         launch_second = (Button) findViewById(R.id.launch_second);
11         launch_first.setOnClickListener(new View.OnClickListener() {
12             @Override
13             public void onClick(View v) {
14                 Intent intent = new Intent().setClass(ThirdActivity.this, FirstActivity.class);
15                 startActivity(intent);
16             }
17         });
18         launch_second.setOnClickListener(new View.OnClickListener() {
19             @Override
20             public void onClick(View v) {
21                 Intent intent = new Intent().setClass(ThirdActivity.this, SecondActivity.class);
22                 startActivity(intent);
23             }
24         });
25         Log.i("TAG", this + " is launch");
26     }
27
28     @Override
29     protected void onDestroy() {
30         super.onDestroy();
31         Log.i("TAG", this + " is destroy!");
32     }
33 }
activity_first.xml:
 1 <?xml version="1.0" encoding="utf-8"?>
 2 <LinearLayout
 3     xmlns:android="http://schemas.android.com/apk/res/android"
 4     android:layout_width="match_parent"
 5     android:layout_height="match_parent"
 6     android:orientation="vertical">
 7     <Button
 8         android:id="@+id/launch_second"
 9         android:layout_width="match_parent"
10         android:layout_height="wrap_content"
11         android:text="啟動第二個Activity!" />
12     <Button
13         android:id="@+id/launch_third"
14         android:layout_width="match_parent"
15         android:layout_height="wrap_content"
16         android:text="啟動第三個Activity!" />
17 </LinearLayout>
activity_second.xml:
 1 <?xml version="1.0" encoding="utf-8"?>
 2 <LinearLayout
 3     xmlns:android="http://schemas.android.com/apk/res/android"
 4     android:layout_width="match_parent"
 5     android:layout_height="match_parent"
 6     android:orientation="vertical">
 7     <Button
 8         android:id="@+id/launch_first"
 9         android:layout_width="match_parent"
10         android:layout_height="wrap_content"
11         android:text="啟動第一個Activity!" />
12     <Button
13         android:id="@+id/launch_third"
14         android:layout_width="match_parent"
15         android:layout_height="wrap_content"
16         android:text="啟動第三個Activity!" />
17 </LinearLayout>
activity_third.xml:
 1 <?xml version="1.0" encoding="utf-8"?>
 2 <LinearLayout
 3     xmlns:android="http://schemas.android.com/apk/res/android"
 4     android:layout_width="match_parent"
 5     android:layout_height="match_parent"
 6     android:orientation="vertical">
 7     <Button
 8         android:id="@+id/launch_first"
 9         android:layout_width="match_parent"
10         android:layout_height="wrap_content"
11         android:text="啟動第一個Activity!" />
12     <Button
13         android:id="@+id/launch_second"
14         android:layout_width="match_parent"
15         android:layout_height="wrap_content"
16         android:text="啟動第二個Activity!" />
17 </LinearLayout>
同樣,還需要在AndroidManifest.java中對SecondActivity以及ThirdActivity兩個活動進行注冊,並設置上述三個活動的啟動模式為SingleTask:
 1 <activity
 2     android:name=".FirstActivity"
 3     android:launchMode="singleTask"
 4     android:label="@string/app_name">
 5     <intent-filter>
 6         <action android:name="android.intent.action.MAIN" />
 7         <category android:name="android.intent.category.LAUNCHER" />
 8     </intent-filter>
 9 </activity>
10 <activity android:name=".SecondActivity" android:launchMode="singleTask" />
11 <activity android:name=".ThirdActivity" android:launchMode="singleTask" />
在該程序中,系統先啟動FirstActivity,此時打印信息顯示該活動啟動了;然後我們點擊"啟動第二個Activity!"按鈕,可以看到顯示信息中SecondActivity is launch;再點擊"啟動第三個Activity!",也可以看到第三個活動啟動了。最後再點擊"啟動第一個Activity!"。從時觀察打印信息可以看到;SecondActivity is destroy;以及ThirdActivity is destroy。表示此時SecondActivity與ThirdActivity都已出棧。現在只需要按一次back鍵即可退出程序。其他的各種創建活動的順序就不再做演示了。
綜上所述,可以畫出該啟動模式的原理示意圖如下:
 沉浸式,沉浸式狀態欄
沉浸式,沉浸式狀態欄第一步: protected void onCreate(Bundle savedInstanceState) { super.o
 FFmpeg使用手冊 - FFmpeg 的基本組成
FFmpeg使用手冊 - FFmpeg 的基本組成1 FFmpeg 的基本組成FFmpeg 的基本組成包含Format、Codec、Filter、Devices、Util
 achartengine/MPAndroidChart——圖表實現之Java
achartengine/MPAndroidChart——圖表實現之Java 關於android的圖表,這裡就換作chart吧,如果要自己實現的話,那工
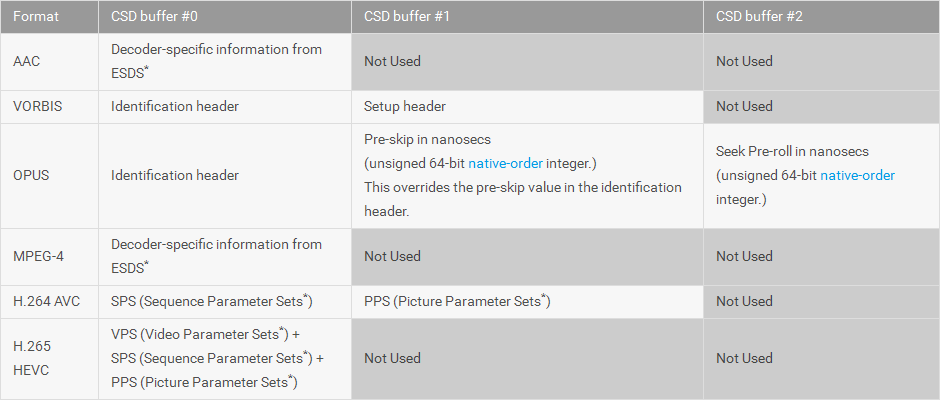 Android多媒體--MediaCodec 中文API文檔,mediacodecapi
Android多媒體--MediaCodec 中文API文檔,mediacodecapi*由於工作需要,需要利用MediaCodec實現Playback及Transcod