編輯:關於android開發
前面的文章已經實現相關的布局,本文接著進行相關的功能實現
本文地址:http://www.cnblogs.com/wuyudong/p/5951794.html,轉載請注明出處。
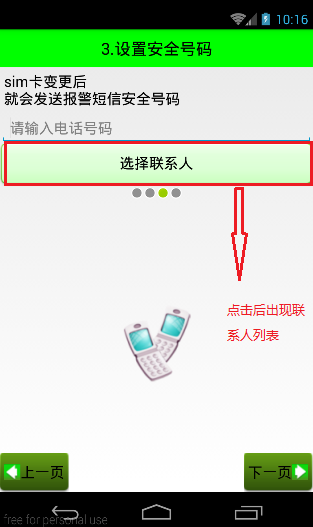
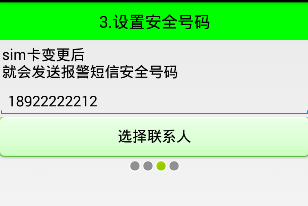
當點擊“選擇聯系人”按鈕後,彈出聯系人列表,讀取系統聯系人分如下幾個步驟:
系統聯系人提供了一個內容提供者,通過內容解析器,匹配Url地址
1,內容解析器
2,Url地址,查看系統聯系人數據庫,內容提供者源碼
先看api文檔的清單文件,後看java類(聯系人數據庫有多張表)
contents://com.android.contacts/表名
3,系統聯系人數據庫中核心表的表結構
raw_contacts 聯系人表: contact_id 聯系人唯一性id值
data 用戶信息表:raw_contact_id作為外鍵,和raw_contacts中contact_id做關聯查詢
獲取data1字段,包含了電話號碼以及聯系人名稱
mimetype_id字段,包含了當前行data1對應的數據類型
mimetypes 類型表: 獲取data表中mimetype_id和mimetypes中_id做關聯查詢,獲取指向的信息類型
電話號碼:vnd.android.cursor.item/phone_v2
用戶名稱:vnd.android.cursor.item/name
4,表的訪問方式
content://com.android.contacts/raw_contacts
content://com.android.contacts/data
下面用代碼實現
    private ListView lv_contact;
    private List<HashMap<String, String>> contactList = new ArrayList<HashMap<String, String>>();
    private MyAdapter mAdapter;

    private Handler mHandler = new Handler() {
        @Override
        public void handleMessage(Message msg) {
            //8,填充數據適配器
            mAdapter = new MyAdapter();
            lv_contact.setAdapter(mAdapter);
        }
    };

    @Override
    protected void onCreate(Bundle savedInstanceState) {
        super.onCreate(savedInstanceState);
        setContentView(R.layout.activity_contact_list);
        initUI();
        initData();
    }

    class MyAdapter extends BaseAdapter{

        @Override
        public int getCount() {
            return contactList.size();
        }

        @Override
        public HashMap<String, String> getItem(int i) {
            return contactList.get(i);
        }

        @Override
        public long getItemId(int i) {
            return i;
        }

        @Override
        public View getView(int i, View view, ViewGroup viewGroup) {
            View v = View.inflate(getApplicationContext(), R.layout.listview_contact_item, null);
            TextView tv_name = (TextView)v.findViewById(R.id.tv_name);
            TextView tv_phone = (TextView)v.findViewById(R.id.tv_phone);
            tv_name.setText(getItem(i).get("name"));
            tv_phone.setText(getItem(i).get("phone"));
            return v;
        }
    }

    /**
     *  獲取聯系人數據的方法
     */
    private void initData() {
        //因為讀取系統聯系人,可能是一個耗時操作,放置到子線程中處理
        new Thread(){
            public void run(){
                //1,獲取內容解析器對象
                ContentResolver contentResolver = getContentResolver();
                //2,做查詢系統聯系人數據庫表過程(讀取聯系人權限)
                Cursor cursor = contentResolver.query(
                        Uri.parse("content://com.android.contacts/raw_contacts"),
                        new String[]{"contact_id"},
                        null, null, null);
                contactList.clear();
                //3,循環游標,直到沒有數據為止
                while (cursor.moveToNext()){
                    String id = cursor.getString(0);
                    //4,根據用戶唯一性id值,查詢data表和mimetype表生成的視圖,獲取data以及mimetype字段
                    Cursor indexCursor = contentResolver.query(
                            Uri.parse("content://com.android.contacts/data"),
                            new String[]{"data1","mimetype"},
                            "raw_contact_id = ?", new String[]{id}, null);
                    //5,循環獲取每一個聯系人的電話號碼以及姓名,數據類型
                    HashMap<String, String> hashMap = new HashMap<String, String>();
                    while (indexCursor.moveToNext()){
                        String data = indexCursor.getString(0);
                        String type = indexCursor.getString(1);

                        //6,區分類型去給hashMap填充數據
                        if(type.equals("vnd.android.cursor.item/phone_v2")) {
                            //數據非空判斷
                            if(!TextUtils.isEmpty(data)) {
                                hashMap.put("phone", data);
                            }
                        }else if(type.equals("vnd.android.cursor.item/name")) {
                            if(!TextUtils.isEmpty(data)) {
                                hashMap.put("name", data);
                            }
                        }
                    }
                    indexCursor.close();
                    contactList.add(hashMap);

                }
                cursor.close();
                //7,消息機制,發送一個空的消息,告知主線程可以去使用子線程已經填充好的數據集合
                mHandler.sendEmptyMessage(0);
            }

        }.start();
    }
實現的效果如下:
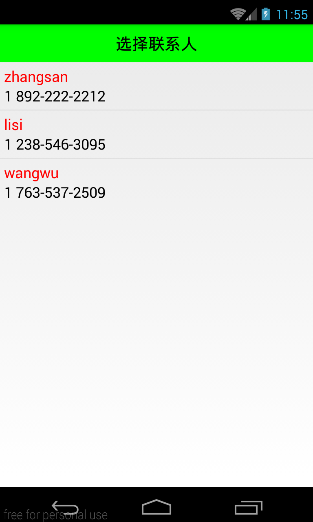
接下來實現點擊聯系人條目,實現回顯,例如雙擊第一個條目,號碼自動添加
代碼如下:
    private void initUI() {
        lv_contact = (ListView) findViewById(R.id.lv_contact);
        lv_contact.setOnItemClickListener(new AdapterView.OnItemClickListener() {
            @Override
            public void onItemClick(AdapterView<?> adapterView, View view, int i, long l) {
                //1,獲取點中條目的索引指向集合中的對象
                if(mAdapter != null) {
                    HashMap<String, String> hashMap = mAdapter.getItem(i);
                    //2,獲取當前條目指向集合對應的電話號碼
                    String phone =  hashMap.get("phone");
                    //3,此電話號碼需要給第三個導航界面使用

                    //4,在結束此界面回到前一個導航界面的時候,需要將數據返回過去
                    Intent intent = new Intent();
                    intent.putExtra("phone", phone);
                    setResult(0, intent);
                    finish();

                }
            }
        });
    }
接著onActivityResult中添加下面的代碼
    @Override
    protected void onActivityResult(int requestCode, int resultCode, Intent data) {
        if(data != null) {
            //1,返回到當前界面的時候,接受結果的方法
            String phone = data.getStringExtra("phone");
            //2,將特殊字符過濾(中劃線轉換成空字符串)
            phone = phone.replace("-", "").replace(" ", "").trim();
            et_phone_number.setText(phone);

            //3,存儲聯系人至sp中
            SpUtil.putString(getApplicationContext(), ConstantValue.CONTACT_PHONE, phone);
        }
        super.onActivityResult(requestCode, resultCode, data);
    }
當填寫號碼後,進入下一頁,再次返回,發現號碼不見了,於是使用sp存儲並從中讀取
    private void initUI() {
        //顯示電話號碼的輸入框
        et_phone_number = (EditText)findViewById(R.id.et_phone_number);
        //獲取聯系人電話號碼回顯過程
        String contact_phone = SpUtil.getString(this, ConstantValue.CONTACT_PHONE, "");
        et_phone_number.setText(contact_phone);
        bt_select_number = (Button) findViewById(R.id.bt_select_number);
       //點擊選擇聯系人的對話框
        bt_select_number.setOnClickListener(new View.OnClickListener() {
            @Override
            public void onClick(View view) {
                Intent intent = new Intent(getApplicationContext(), ContactListActivity.class);
                startActivityForResult(intent, 0);
            }
        });
    }
 Linux內核調試技術——進程D狀態死鎖檢測
Linux內核調試技術——進程D狀態死鎖檢測Linux的進程存在多種狀態,如TASK_RUNNING的運行態、EXIT_DEAD的停止態和TASK_INTERRUPTIB
 Android開發5:應用程序窗口小部件App Widgets的實現,androidwidgets
Android開發5:應用程序窗口小部件App Widgets的實現,androidwidgets 前言 本次主要是實現一個Android應用,實現靜態廣
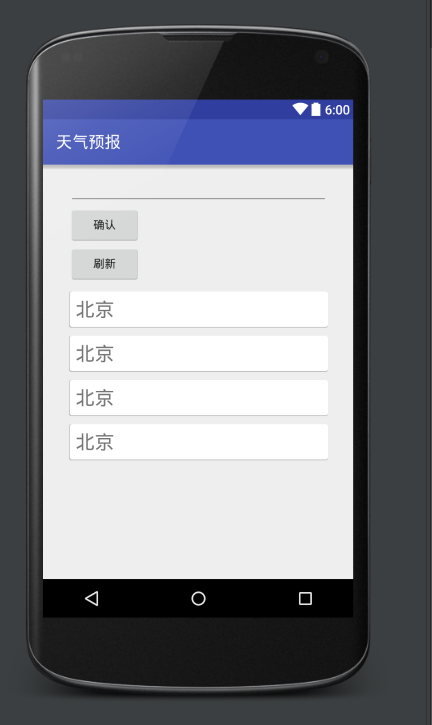 階段一:一個簡單的天氣預報應用的完整實現過程(二),階段天氣預報
階段一:一個簡單的天氣預報應用的完整實現過程(二),階段天氣預報“階段一”是指我第一次系統地學習Android開發。這主要是對我的學習過程作個記錄
 如何取得nginx做反向代理時的真實IP?
如何取得nginx做反向代理時的真實IP?nginx做反向代理時的真實IP.pdf1.編譯對於client->nginxreverseproxy->apach