編輯:關於android開發
本次主要是實現一個Android應用,實現靜態廣播、動態廣播兩種改變 widget內容的方法,即在上篇博文中實驗的基礎上進行修改,所以此次實驗的重點是AppWidget小部件的實現啦~
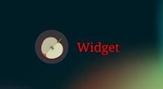
首先,我們簡單說一下Widget是一個啥玩意~
應用程序窗口小部件(Widget)是微小的應用程序視圖,可以被嵌入到其它應用程序中(比如桌面)並接收周期性的更新。你可以通過一個App Widget provider來發布一個Widget。可以容納其它App Widget的應用程序組件被稱為App Widget宿主。
Widget是在桌面上的一塊顯示信息的東西,也通過單擊Widget跳轉到一個程序裡面。而系統自帶的程序,典型的Widget是music,這個Android內置的音樂播放小程序。這個是典型的Widget+app應用。就是一個程序既可以通過Widget啟動,也可以通過App啟動。Widget就是一個AppWidgetProvider+一個UI界面顯示(預先綁定了好多Intent),界面上的信息可以通過程序控制而改變,單擊Widget,上的控件只能激發發送一個Intent,或發出一個Service的啟動通知。而AppWidgetProvider可以攔截這個Intent,而進行相應的處理(比如顯示新的信息)。
為了創建一個App Widget,你需要下面這些:
AppWidgetProviderInfo 對象
描述一個App Widget元數據,比如App Widget的布局,更新頻率,以及AppWidgetProvider 類。這應該在XML裡定義。
AppWidgetProvider 類的實現
定義基本方法以允許你編程來和App Widget連接,這基於廣播事件。通過它,當這個App Widget被更新,啟用,禁用和刪除的時候,你都將接收到廣播通知。
視圖布局
為這個App Widget定義初始布局,在XML中。
另外,你可以實現一個App Widget配置活動。這是一個可選的活動Activity,當用戶添加App Widget時加載並允許他在創建時來修改App Widget的設置。
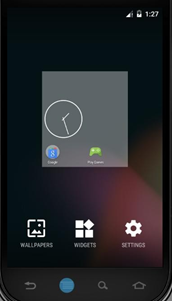
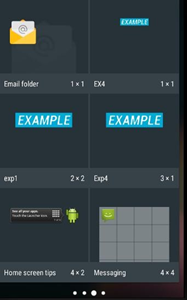
widget 的添加:長按菜單鍵,點擊 widgets 選項。找到對應的 widget 將其拖入桌面。對 於不同的 API 版本顯示會稍有不同。
典型的 Android Widget 有三個主要組件,一個邊框、一個框架和圖形控件以及其他元素。 在 Android Studio 中創建 Widget 類後,會直接生成相關文件。
首先,在應用程序AndroidManifest.xml文件中聲明AppWidgetProvider 類,比如:
<receiver Android:name="ExampleAppWidgetProvider" >
    <intent-filter>
        <action android:name="android.appwidget.action.APPWIDGET_UPDATE" />
    </intent-filter>
    <meta-data android:name="android.appwidget.provider"
               android:resource="@xml/example_appwidget_info" />
</receiver>
<receiver>元素需要android:name屬性,它指定了App Widget使用的AppWidgetProvider 。
<intent-filter> 元素必須包括一個含有android:name屬性的<action>元素。該元素指定AppWidgetProvider接受ACTION_APPWIDGET_UPDATE 廣播。這是唯一你必須顯式聲明的廣播。當需要的時候,AppWidgetManager 會自動發送所有其他App Widget廣播給AppWidgetProvider。
<meta-data> 元素指定了AppWidgetProviderInfo 資源並需要以下屬性:
1. Widget 布局文件 widget_demo.xml,布局中有一個 ImageView,一個 TextView。 要求:文字顏色為紅色,大小為 20dp,整體背景為透明。最後效果如下:

2.增加AppWidgetProviderInfo元數據
AppWidgetProviderInfo定義一個App Widget的基本特性,比如最小布局尺寸,初始布局資源,刷新頻率,以及(可選的)創建時加載的一個配置活動。使用單獨的一個<appwidget-provider>元素在XML資源裡定義AppWidgetProviderInfo 對象並保存到項目的res/xml/目錄下。
Widget 內容提供者文件 widget_demo_info.xml,編輯該文件,設置其大小屬性和布 局,如下圖:
其中,minWidth 為最小寬度,minHeight 為最小高度,initialLayout 為初始布局。
3. 修改 WidgetDemo.java 代碼,重寫 onUpdate 方法,為 Widget 添加事件,使得能夠返 回主頁面。
這裡需要使用到一種用戶程序訪問主屏幕和修改特定區域內容的方法:RemoteView 架 構 。RemoteView 架構允許用戶程序更新主屏幕的 View,點擊 Widget 激活點擊事件,Android 會將其轉發給用戶程序,由 AppWidgetProviders 類處理,使得用戶程序可更新主 屏幕 Widget。
pendingIntent是一種特殊的 Intent。主要的區別在於 Intent 的執行立刻的,而 pendingIntent 的執行不是立刻的。本次使用方法類的靜態方法為 getActivity(Context, int, Intent, int),對應 Intent 的跳轉到一個 activity 組件的操作。
使用AppWidgetProvider類
你必須通過在清單文件中使用<receiver>元素來聲明你的AppWidgetProvider 類實現為一個廣播接收器(參見上面的Declaring an App Widget in the Manifest)。
AppWidgetProvider 類擴展BroadcastReceiver 為一個簡便類來處理App Widget廣播。AppWidgetProvider只接收和這個App Widget相關的事件廣播,比如這個App Widget被更新,刪除,啟用,以及禁用。當這些廣播事件發生時,AppWidgetProvider 將接收到下面的方法調用:
onUpdate(Context, AppWidgetManager, int[])
這個方法調用來間隔性的更新App Widget,間隔時間用AppWidgetProviderInfo 裡的updatePeriodMillis屬性定義(參見添加AppWidgetProviderInfo元數據)。這個方法也會在用戶添加App Widget時被調用,因此它應該執行基礎的設置,比如為視圖定義事件處理器並啟動一個臨時的服務Service,如果需要的話。但是,如果你已經聲明了一個配置活動,這個方法在用戶添加App Widget時將不會被調用,而只在後續更新時被調用。配置活動應該在配置完成時負責執行第一次更新。(參見下面的創建一個App Widget配置活動Creating an App Widget Configuration Activity。)
onDeleted(Context, int[])
當App Widget從宿主中刪除時被調用。
onEnabled(Context)
當一個App Widget實例第一次創建時被調用。比如,如果用戶添加兩個你的App Widget實例,只在第一次被調用。如果你需要打開一個新的數據庫或者執行其他對於所有的App Widget實例只需要發生一次的設置,那麼這裡是完成這個工作的好地方。
onDisabled(Context)
當你的App Widget的最後一個實例被從宿主中刪除時被調用。你應該在onEnabled(Context)中做一些清理工作,比如刪除一個臨時的數據庫。
onReceive(Context, Intent)
這個接收到每個廣播時都會被調用,而且在上面的回調函數之前。你通常不需要實現這個方法,因為缺省的AppWidgetProvider 實現過濾所有App Widget 廣播並恰當的調用上述方法。
注意: 在Android 1.5中, 有一個已知問題,onDeleted()方法在該調用時不被調用。為了規避這個問題,你可以像Group post中描述的那樣實現onReceive() 來接收這個onDeleted()回調。
最重要的AppWidgetProvider 回調函數是onUpdated(), 因為它是在每個App Widget添加進宿主時被調用的(除非你使用一個配置活動)。如果你的App Widget 要接受任何用戶交互事件,那麼你需要在這個回調函數中注冊事件處理器。如果你的App Widget不創建臨時文件或數據庫,或者執行其它需要清理的工作,那麼onUpdated() 可能是你需要定義的唯一的回調函數。
4.重寫 onReceive 方法
在 Widget 類中重寫 onReceive 方法,這裡需要使用到 RemoteView 以及 Bundle。當接 收到對應廣播時進行數據處理。
實現一個 Android 應用,實現靜態廣播、動態廣播兩種改變 widget 內容的方法。在上次實 驗的基礎上進行修改,所以一些關於靜態動態廣播的內容會簡略。
具體要求:
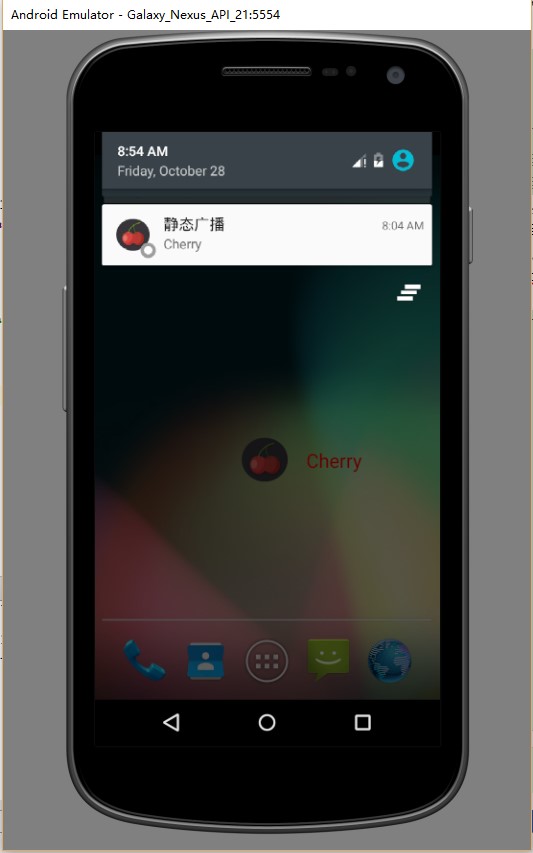
(1)該界面為應用啟動後看到的界面。
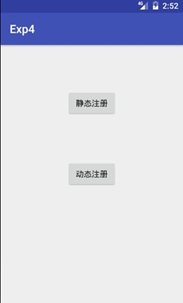
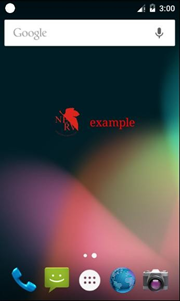
widget 初始情況如下
(2)點擊靜態注冊按鈕,跳轉至如下界面。
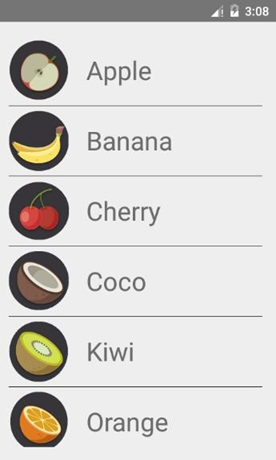
點擊表單項目。如 banana。widget 會發生對應變化。點擊 Widget 上的圖片可以跳轉回主頁面

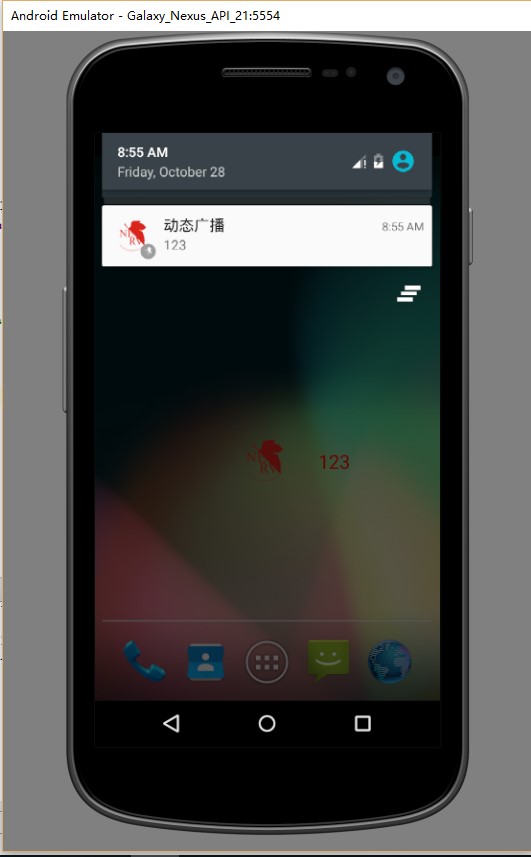
(3)點擊動態注冊按鈕,跳轉至如下界面。 實現以下功能:
a)可以編輯廣播的信息,點擊 Send 按鈕發送廣播。
b)設置一個按鈕進行廣播接收器的注冊與注銷。
c)廣播接收器若已被注冊,發送出的廣播信息能夠及時更新桌面上 Widget 上文字內容及 更新為默認 dynamic 圖片。
d)點擊 Widget 上的圖片可以跳轉回主頁面。
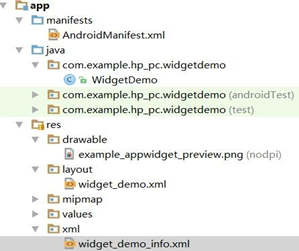
首先,在Android Studio中創建Widget類,直接生成相關文件,其中包括界面布局XML文件、widget的provider文件信息(xml)以及在項目的AndroidMenifest.xml文件中添加了一個receiver標簽,需要我們添加過濾更新事件,並需要指向之前創建的Widget類。
AndroidMenifest.xml文件中,intent-filter中過濾了APPWIDGET_UPDATE事件,這個事件是由系統觸發的更新事件,每個widget必須包含這個事件;meta-data標簽描述的是widget的配置文件指向,該文件描述了widget的一些基本信息(其中由於需要在靜態注冊中實現,intent-filter中也過濾了staticreceiver):
<receiver
            android:name=".MyAppWidget"
            android:enabled="true"
            android:exported="true">
            <intent-filter>
                <action android:name="android.appwidget.action.APPWIDGET_UPDATE"/>
                <action android:name="com.example.yanglh6.myapplication4.staticreceiver" />
            </intent-filter>
            <meta-data
                android:name="android.appwidget.provider"
                android:resource="@xml/my_app_widget_info"/>
</receiver>
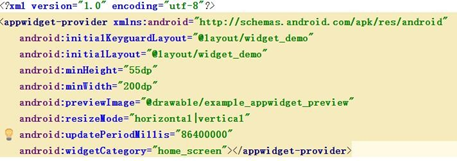
接下來根據要求編寫widget的provider文件信息(xml),minWidth和minHeight是widget的最小寬度和高度,這個值是一個參考值,系統會根據實際情況進行改變,initialLayout屬性指明widge的視圖布局文件,updatePeriodMillis屬性是widget每隔多久更新一次的時間,單位為毫秒:
<?xml version="1.0" encoding="utf-8"?>
<appwidget-provider xmlns:android="http://schemas.android.com/apk/res/android"
    android:initialKeyguardLayout="@layout/my_app_widget"
    android:initialLayout="@layout/my_app_widget"
    android:minHeight="55dp"
    android:minWidth="200dp"
    android:previewImage="@drawable/example_appwidget_preview"
    android:resizeMode="horizontal|vertical"
    android:updatePeriodMillis="86400000"
    android:widgetCategory="home_screen"></appwidget-provider>
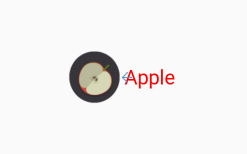
接下來就是界面布局,在這個示例中需要一個ImageView控件和一個TextView控件:
<RelativeLayout xmlns:android="http://schemas.android.com/apk/res/android"
    android:layout_width="match_parent"
    android:layout_height="match_parent"
    android:gravity="center">

    <ImageView
        android:id="@+id/WidgetImage"
        android:layout_width="60dp"
        android:layout_height="60dp"
        android:gravity="center"
        android:src="@mipmap/apple"/>

    <TextView
        android:id="@+id/WidgetName"
        android:layout_width="wrap_content"
        android:layout_height="60dp"
        android:textColor="@color/red"
        android:textSize="20dp"
        android:layout_toRightOf="@+id/WidgetImage"
        android:text="Apple"
        android:gravity="center"/>


</RelativeLayout>
布局文件實現了一個如下圖的布局:
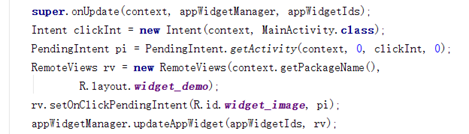
然後在Widget中,重寫onUpdate方法,為Widget添加事件,使得能夠返回主頁面。這裡需要使用到一種用戶程序訪問主屏幕和修改特定區域內容的方法RemoteView架構。RemoteView架構允許用戶程序更新主屏幕的View,點擊 Widget激活點擊事件,Android會將其轉發給用戶程序,由AppWidgetProviders類處理,使得用戶程序可更新主屏幕Widget。
    @Override
    public void onUpdate(Context context, AppWidgetManager appWidgetManager, int[] appWidgetIds) {
        super.onUpdate(context, appWidgetManager, appWidgetIds);
        Intent clickInt = new Intent(context, MainActivity.class);
        PendingIntent pendingIntent = PendingIntent.getActivity(context, 0, clickInt, 0);
        RemoteViews view = new RemoteViews(context.getPackageName(),R.layout.my_app_widget);
        view.setOnClickPendingIntent(R.id.WidgetImage, pendingIntent);
        appWidgetManager.updateAppWidget(appWidgetIds, view);
    }
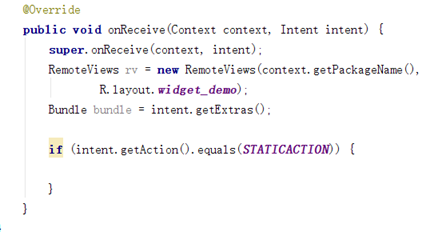
接下來在Widge類中重寫onReceive方法,這裡需要使用到RemoteView以及Bundle。當接收到對應廣播時進行數據處理(由於我們在AndroidMenifest.xml文件中注冊時將APPWIDGET_UPDAT事件和staticreceiver都指向Widge類,所以在這裡我們StaticReceiver類刪掉,將裡面對OnReceive函數重寫的部分添加在Widget類中):
 @Override
    public void onReceive(Context context, Intent intent) {
        Log.i("debug", intent.toString());
        super.onReceive(context, intent);
        RemoteViews view = new RemoteViews(context.getPackageName(),R.layout.my_app_widget);
        Bundle bundle = intent.getExtras();
        String widgetName = bundle.getString("name");
        int widgetImage = bundle.getInt("ItemImage");
        if (intent.getAction().equals("com.example.yanglh6.myapplication4.staticreceiver")) {
            view.setTextViewText(R.id.WidgetName, widgetName);
            view.setImageViewResource(R.id.WidgetImage, widgetImage);
            AppWidgetManager appWidgetManager=AppWidgetManager.getInstance(context);
            appWidgetManager.updateAppWidget(new ComponentName(context, MyAppWidget.class), view);

            Bitmap bitmap= BitmapFactory.decodeResource(context.getResources(),bundle.getInt("ItemImage"));
            int imageId = (int) bundle.get("ItemImage");
            NotificationManager notificationManager = (NotificationManager) context.getSystemService(Context.NOTIFICATION_SERVICE);
            Notification.Builder builder = new Notification.Builder(context);
            builder.setContentTitle("靜態廣播")
                    .setContentText(bundle.getString("name"))
                    .setLargeIcon(bitmap)
                    .setSmallIcon(imageId)
                    .setTicker("您有一條新消息")
                    .setAutoCancel(true);
            Intent Intent1 = new Intent(context, MainActivity.class);

            PendingIntent pendingIntent = PendingIntent.getActivity(context, 0, Intent1, 0);
            builder.setContentIntent(pendingIntent);
            Notification notify = builder.build();
            notificationManager.notify(0, notify);
        }
    }
單獨把Widget部分onReceive方法的重寫列出:
public void onReceive(Context context, Intent intent) {
        Log.i("debug", intent.toString());
        super.onReceive(context, intent);
        RemoteViews view = new RemoteViews(context.getPackageName(),R.layout.my_app_widget);
        Bundle bundle = intent.getExtras();
        String widgetName = bundle.getString("name");
        int widgetImage = bundle.getInt("ItemImage");
        if (intent.getAction().equals("com.example.yanglh6.myapplication4.staticreceiver")) {
            view.setTextViewText(R.id.WidgetName, widgetName);
            view.setImageViewResource(R.id.WidgetImage, widgetImage);
            AppWidgetManager appWidgetManager=AppWidgetManager.getInstance(context);
            appWidgetManager.updateAppWidget(new ComponentName(context, MyAppWidget.class), view);
     }
    }
對於動態注冊來說,不需要在AndroidMenifest.xml添加receiver,但在DynamicActivity中進行注冊:
 dynamicReceiver = new DynamicReceiver();
                    IntentFilter dynamic_filter = new IntentFilter();
                    dynamic_filter.addAction("com.example.yanglh6.myapplication4.dynamicreceiver");
                    registerReceiver(dynamicReceiver, dynamic_filter);
所以動態注冊時只能在DynamicReceiver中對Onreceive函數進行重寫,完成Widget的更新(與靜態注冊類似):
 @Override
    public void onReceive(Context context, Intent intent) {
        if (intent.getAction().equals("com.example.yanglh6.myapplication4.dynamicreceiver")) {
            Bundle bundle = intent.getExtras();
            Bitmap bitmap = BitmapFactory.decodeResource(context.getResources(), bundle.getInt("ItemImage"));
            int imageId = bundle.getInt("ItemImage");
            RemoteViews view = new RemoteViews(context.getPackageName(),R.layout.my_app_widget);
            String widgetName = bundle.getString("name");

            view.setTextViewText(R.id.WidgetName, widgetName);
            view.setImageViewResource(R.id.WidgetImage, imageId);
            AppWidgetManager appWidgetManager=AppWidgetManager.getInstance(context);
            appWidgetManager.updateAppWidget(new ComponentName(context, MyAppWidget.class), view);

            NotificationManager notificationManager = (NotificationManager) context.getSystemService(Context.NOTIFICATION_SERVICE);
            Notification.Builder builder = new Notification.Builder(context);
            builder.setContentTitle("動態廣播")
                    .setContentText(widgetName)
                    .setLargeIcon(bitmap)
                    .setSmallIcon(imageId)
                    .setTicker("您有一條新消息")
                    .setAutoCancel(true);
            Intent mIntent = new Intent(context, MainActivity.class);

            PendingIntent pendingIntent = PendingIntent.getActivity(context, 0, mIntent, 0);
            builder.setContentIntent(pendingIntent);
            Notification notify = builder.build();
            notificationManager.notify(0, notify);
        }
    }
完成實驗~
自己要充分理解AndroidMenifest.xml各部分的含義以及Android的機制,在AndroidMenifest.xml的注冊和指向必須清晰。
對於靜態來說,在sendBroadcast(intent)實現後,在AndroidMenifest.xml找到intent注冊時的receiver並指向對應的廣播接收函數,在這個函數中實現各個事件;對於動態來說,由於在DynamicActivity中進行注冊,在那時可以定義指向的動態廣播接收類。
1、本實驗實驗環境:
操作系統 Windows 10
實驗軟件 Android Studio 2.2.1
虛擬設備:Galaxy_Nexus
API:21
2、貼代碼的時候由於插入代碼框的大小問題,代碼格式不太嚴整,望見諒~
謝謝大家~
 Android源碼之陌陌項目源碼,android源碼項目
Android源碼之陌陌項目源碼,android源碼項目 本源碼是一個老版本的陌陌源碼,翻了翻代碼,發現有完整的登陸注冊功能(基於本地)其余都是靜態
 第二篇 Windows環境下Android Studio安裝和使用教程(圖文詳細步驟),androidstudio
第二篇 Windows環境下Android Studio安裝和使用教程(圖文詳細步驟),androidstudio第二篇 Windows環境下Android
 2015 Android Dev Summit(安卓開發峰會)第一天,androidsummit
2015 Android Dev Summit(安卓開發峰會)第一天,androidsummit今年的Google I/O沒有抽到票,不能到現場參加。不過11月舉行的An
 MD5簡單實例,md5實例
MD5簡單實例,md5實例如圖當點擊按鈕時,會先判斷是否第一次登陸,如果是第一次登陸登陸則會彈出設置密碼的彈窗,若果登陸過則彈出登陸彈窗 其中輸入的密碼會用MD5加密下