編輯:關於android開發
啦啦啦~本學期要開始學習Android開發啦~
博主在開始學習前是完完全全的小白,只有在平時完成老師要求的實驗的過程中一步一步學習~從此篇博文起,博主將開始發布Android開發有關的博文,希望能在學習中和各位共同探討,一起交流,共同進步~
話不多說,首先進入我們的正題~Android開發一基本UI界面設計——布局和組件(Android Studio的配置安裝使用等在以後為各位補上~)
Android的組件分為布局和控件。布局,就是讓控件在裡面按一定的次序排列好的一種組件,本身並不提供內容。控件,就是顯示內容的組件,比如顯示一張圖片,顯示文字等等。在Android中,共有五種布局方式,分別是:FrameLayout(框架布局),LinearLayout (線性布局),AbsoluteLayout(絕對布局),RelativeLayout(相對布局),TableLayout(表格布局)。
(1)FrameLayout 框架布局,放入其中的所有元素都被放置在最左上的區域,而且無法為這些元素指定一個確切的位置,下一個子元素會重疊覆蓋上一個子元素,適合浏覽單張圖片。
(2)LinearLayout 線性布局,是應用程序中最常用的布局方式,主要提供控件水平或者垂直排列的模型,每個子組件都是以垂直或水平的方式來定位.(默認是垂直)
(3)AbsoluteLayout 絕對定位布局,采用坐標軸的方式定位組件,左上角是(0,0)點,往右x軸遞增,往下Y軸遞增,組件定位屬性為android:layout_x 和 android:layout_y來確定坐標。
(4)RelativeLayout 相對布局,根據另外一個組件或是頂層父組件來確定下一個組件的位置。和CSS裡面的類似。
(5)TableLayout 表格布局,類似Html裡的Table.使用TableRow來布局,其中TableRow代表一行,TableRow的每一個視圖組件代表一個單元格。
在這其中,線性布局和相對布局是最常用的布局方式(本篇主要講線性布局,相對布局在接下來的文章中會有具體敘述和應用~)
線性布局是程序中最常見的一種布局方式,簡單來說,直著排,橫著排都可以,還可以嵌套,正因為如此(方便且簡單),此布局運用的非常多。
線性布局可以分為水平線性布局和垂直線性布局兩種, 通過android:orientation屬性可以設置線性布局的方向。
在線性布局中主要存在以下屬性:
android:orientation 定義布局內的方向水平或垂直(horizontal/vertical )
android:layout_weight 子元素對未占用空間【水平或垂直】分配權重值,其值越小,權重越大。
android:layout_width - 寬(1.fill_parent: 父元素決定,2.wrap_content: 本身的內容決定)
android:layout_height - 高(3.高直接指定一個 px 值);
android:gravity - 內容的排列形式(常用 top, bottom, left, right, center,Left|center_)
在講線性布局相關的組件前,我們先講一下可以在線性布局中嵌套使用的另一種常用布局方式:
即表格布局,當需要布局內的組件像表格一樣排列時,使用 TableLayout 比較方便。表格布局采用行、列 的形式來管理 UI 組件,TableLayout 並不需要明確地聲明包含多少行、多少列,而是通過添加 TableRow、其他組件來控制表格的行數和列數。每次向 TableLayout 中添加一個 TableRow,該 TableRow 就是一個表格行,TableRow 也是容器,因此它也可以不斷地添加其他組件,每添加一個子組件該表格就增加一列。
如果直接向 TableLayout 中添加組件,那麼這個組件將直接占用一行。 在表格布局中,列的寬度由該列中最寬的那個單元格決定,整個表格布局的寬度則取決於父容器的寬度。(默認總是占滿父容器本身)
三個重要的 xml 屬性:
collapseColumns:設置需要被隱藏的列的列序號,多個列序號之間用逗號隔開;
shrinkColumns:設置允許被收縮的列序號,多個列序號之間用逗號隔開;
stretchColumns:設置允許被拉伸的列序號,多個列序號之間用逗號隔開。
注意,列序號從0開始計數。
現在正式講一下線性布局中可能用到的組件:
用於顯示文字內容的控件,通過設置 text 的值來顯示要顯示的內容,常用的屬性有 textColor,用於設置文字的顏色;textSize,用於設置文字大小。示例:
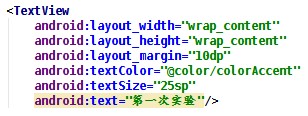
效果圖:

關於@color/colorAccent 這種形式的資源引用後面會講。
用於接受用戶輸入的輸入框,常用屬性除了和TextView相同的 textColor和 textSize之外,還有inputType,用於設置輸入框中文本的類型,如果設置為textPassword,會使輸入的文字變為小點(·); hint,用於設置當輸入框為空時的提示內容。以一個密碼輸入框做示例:
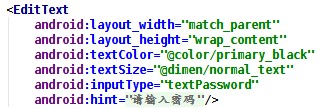
效果如下
未輸入前:
輸入之後:
顯示圖片的控件,通過設置 src 來設置要顯示的圖片
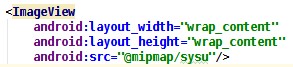

sysu.jpg
關於 ImageView 的 src 和 background 屬性的區別,自行查閱資料。
RadioButton是單選按鈕,一組單選按鈕需要包括在一個RadioGroup中,並且需要對RadioGroup和其包括的每一個RadioButton都設置id,RadioButton才能正常工作。示例:
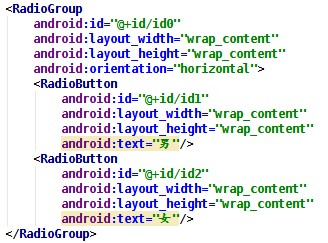
可通過設置 checked 屬性來使某個 RadioButton 被選中。
組件的介紹就到這裡,下面簡單介紹以下幾個重要的通用屬性:
這兩個屬性分別指定所屬組件的寬度和高度,屬性值可以是具體的距離,如:20dp,更常見的是指定為 match_parent 或者 wrap_content,match_parent 指的是組件的寬度或高度與父組件的寬度或高度一致,如果組件沒有父組件,那麼組件的寬度或高度與屏幕的寬度或高度一致。wrap_content 指組件的寬度或高 度剛好可以包裹住組件內的子組件即可。
這兩個屬性的基本屬性值有五種:top、bottom、center、left、right,可以使用組合屬性,如 left|bottom 表示左下角。區別在於 layout_gravity 用於指定設置該屬性的組件相對於父組件的位置,gravity 用於指定設置該屬性的組件下的子組件的位置。
layout_margin 指定外邊距,padding 指定內邊距,這兩個屬性配合上四個方向還各有四個屬性,如layout_marginTop,paddingTop等。
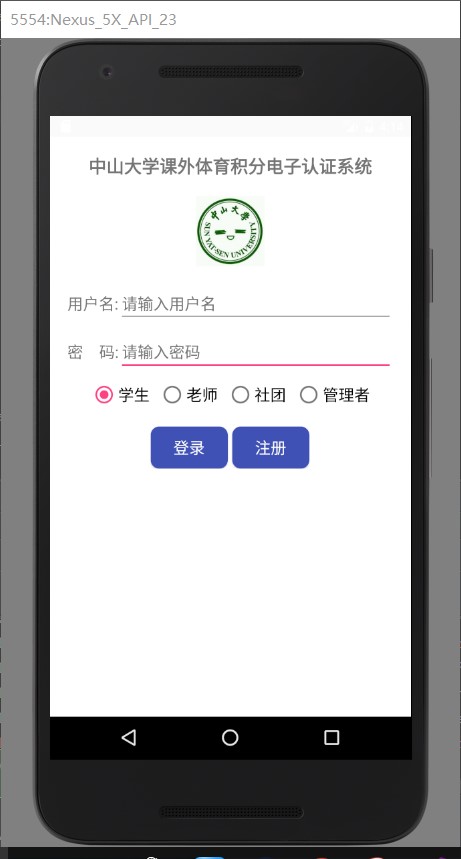
接下來我們來看一看本次實驗的要求:
實現一個 Android 應用,界面呈現如下效果:
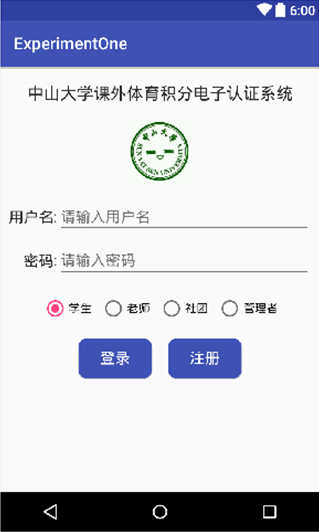
這裡我們需要使用LinearLayout 即線性布局(布局內組件按線性排列的布局)。
運用android:orientation="vertical"將整體布局設置為縱向。使用TextView組件(用於顯示文字內容的控件,通過設置 text的值來顯示要顯示的內容)顯示標題信息,按照要求設置好文本屬性,接著使用ImageView組件(顯示圖片的控件,通過設置 src來設置要顯示的圖片)將圖片素材添加進去。
在添加輸入框時我們需要使用TextView和EditText(用於接受用戶輸入的輸入框)組件。在這裡使用嵌套,使用兩個橫向的線性結構,將兩行輸入框設置好。將密碼輸入框的inputType屬性設置為"textPassword",防止輸入密碼時可見。
在設置單選按鈕時我們使用RadioButton和 RadioGroup組件(RadioButton是單選按鈕,一組單選按鈕需要包括在一個RadioGroup中,並且需要對RadioGroup和其包括的每一個 RadioButton都設置id,RadioButton才能正常工作),按照要求設置四個單選按鈕將第一個按鈕的checked屬性設置為"true"。
主界面代碼如下:
<?xml version="1.0" encoding="utf-8"?>
<LinearLayout xmlns:android="http://schemas.android.com/apk/res/android"
    android:layout_width="match_parent"
    android:layout_height="match_parent"
    android:background="@color/colorWhite"
    android:orientation="vertical">

    <TextView
        android:layout_width="wrap_content"
        android:layout_height="wrap_content"
        android:id="@+id/SYSU"
        android:layout_gravity="center"
        android:layout_marginTop="20dp"
        android:text="課外體育積分電子認證系統"
        android:textSize="20sp"
        android:textStyle="bold" />

    <ImageView
        android:layout_width="80dp"
        android:layout_height="80dp"
        android:id="@+id/Image"
        android:layout_gravity="center"
        android:layout_marginBottom="20dp"
        android:layout_marginTop="20dp"
        android:contentDescription="@string/app_name"
        android:src="@mipmap/sysu" />

    <TableLayout
        android:layout_width="match_parent"
        android:layout_height="wrap_content"
        android:stretchColumns="1"
        android:layout_marginRight="20dp"
        android:layout_marginLeft="20dp">
        <TableRow>
            <TextView
                android:layout_width="wrap_content"
                android:layout_height="wrap_content"
                android:id="@+id/username1"
                android:text="@string/username1"
                android:textSize="@dimen/etWordSp"/>
            <EditText
                android:layout_width="match_parent"
                android:layout_height="wrap_content"
                android:inputType="textPersonName"
                android:hint="@string/username2"
                android:id="@+id/editText"/>
        </TableRow>
        <TableRow
            android:layout_marginTop="10dp">
            <TextView
                android:layout_width="wrap_content"
                android:layout_height="wrap_content"
                android:id="@+id/password1"
                android:text="@string/password1"
                android:gravity="end"
                android:textSize="@dimen/etWordSp"/>
            <EditText
                android:layout_width="match_parent"
                android:layout_height="wrap_content"
                android:inputType="textPassword"
                android:hint="@string/password2"
                android:id="@+id/editText2"/>
        </TableRow>
    </TableLayout>

    <RadioGroup
        android:layout_width="wrap_content"
        android:layout_height="wrap_content"
        android:layout_gravity="center"
        android:layout_marginTop="10dp"
        android:orientation="horizontal">

        <RadioButton
            style="@style/radioButtonStyle"
            android:id="@+id/radio1"
            android:checked="true"
            android:text="@string/student" />

        <RadioButton
            style="@style/radioButtonStyle"
            android:id="@+id/radio2"
            android:text="@string/teacher" />

        <RadioButton
            style="@style/radioButtonStyle"
            android:id="@+id/radio3"
            android:text="@string/corporation" />

        <RadioButton
            android:layout_width="wrap_content"
            android:layout_height="wrap_content"
            android:id="@+id/radio4"
            android:text="@string/manager"
            android:textSize="@dimen/etWordSp" />

    </RadioGroup>

    <LinearLayout xmlns:android="http://schemas.android.com/apk/res/android"
        android:layout_width="wrap_content"
        android:layout_height="wrap_content"
        android:layout_gravity="center"
        android:layout_marginTop="20dp"
        android:orientation="horizontal">

        <Button
            style="@style/Button"
            android:layout_marginRight="5dp"
            android:text="@string/signIn" />

        <Button
            style="@style/Button"
            android:text="@string/register" />

    </LinearLayout>

</LinearLayout>
最後在設置按鈕時,我們需要設置自定義背景邊框來實現登錄按鈕的背景:

當需要將一個 button設置為圓角矩形時,光設置 button的屬性是達不到效果的,需要定義一個背景邊框來達到這個效果。這種自定義的背景邊框定義在drawable文件夾下——在drawable文件夾下新建一個Drawable resource file,填寫file name,然後把自動生成的 selector標簽改為shape,shape下有多個屬性,padding,radius,solid等等,按照教程 http://blog.csdn.net/sysukehan/article/details/52022307 將其中的屬性設置好,在Button中設置background為@drawable/shape.xml來引用這個自定義的背景(android:background="@drawable/shape")。
<?xml version="1.0" encoding="utf-8"?>
<shape xmlns:android="http://schemas.android.com/apk/res/android"
    android:shape="rectangle" >

    <solid android:color="#3F51B5" />
    <corners android:radius="10dip" />
    <padding
        android:bottom="5dp"
        android:left="10dp"
        android:right="10dp"
        android:top="5dp" />
</shape>
此外,Android項目中不建議使用硬編碼來使用資源,建議將各類資源定義在 res文件夾中的 values文件夾下,字符串資源定義在strings.xml中,顏色資源定義在colors.xml中,距離,字體大小資源定義在 dimens.xml中。圖片資源例外,是存放在res文件夾中的mipmap文件夾下或者drawable文件夾下。style定義在 res/values/styles.xml文件中,也是一種資源。例如當多個TextView具有相同的 layout_height,layout_width,textSize,textColor設定時,如果每次都要把這些屬性設定一次會很煩,而且如果全部需要修改的話(改變字體大小)也不方便,因此可以把這些屬性統一定義為一個style,這樣使用的時候只要直接引用這個style即可。在這裡我們設置兩個style,即radioButtonStyle和Button。
strings.xml
<resources>
    <string name="app_name">My Application1</string>
    <string name="action_settings">Settings</string>
    <string name="signIn">登錄</string>
    <string name="register">注冊</string>
    <string name="student">學生</string>
    <string name="teacher">老師</string>
    <string name="corporation">社團</string>
    <string name="manager">管理者</string>
    <string name="username1">用戶名:</string>
    <string name="username2">請輸入用戶名</string>
    <string name="password1">密碼:</string>
    <string name="password2">請輸入密碼</string>
</resources>
styles.xml
    <style name="radioButtonStyle">
        <item name="android:layout_width">wrap_content</item>
        <item name="android:layout_height">wrap_content</item>
        <item name="android:layout_marginRight">10dp</item>
        <item name="android:textSize">@dimen/etWordSp</item>
    </style>

    <style name="Button">
        <item name="android:layout_width">wrap_content</item>
        <item name="android:layout_height">wrap_content</item>
        <item name="android:textSize">@dimen/etWordSp</item>
        <item name="android:textColor">@color/colorWhite</item>
        <item name="android:background">@drawable/shape</item>
    </style>
Android 項目中不建議使用硬編碼來使用資源,建議將各類資源定義在 res 文件夾中的 values 文件夾下, 字符串資源定義在 strings.xml 中,顏色資源定義在 colors.xml 中,距離、字體大小資源定義在 dimens.xml 中。圖片資源例外,是存放在 res 文件夾中的 mipmap 文件夾下或者 drawable 文件夾下。給個示例看一下怎麼定義:
colors.xml
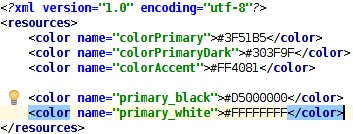
通過鍵值對來定義,使用的時候用@color/colorAccent 即可引用到對應資源,注意是@color 不是@colors,這裡和文件名是不相同的。其它資源的引用也一樣。
style 定義在 res/values/styles.xml 文件中,也是一種資源。例如當多個 TextView 具有相同的 layout_height,layout_width,textSize,textColor 設定時,如果每次都要把這些屬性設定一次會很煩,而 且如果全部需要修改的話(改變字體大小)也不方便,因此可以把這些屬性統一定義為一個 style,這樣 使用的時候只要直接引用這個 style 即可。
定義 style 的方法(styles.xml ):
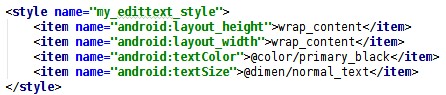
一個自定義 style 下包含多個鍵值對,引用的時候設置 style=“@style/my_edittext_style”即可,注意不要寫成 android:style=“@style/my_edittext_style”。在引用 style 之後,還可以繼續定義屬性,如果有重復,以繼續定義的屬性為准。
首先,需要在 res/layout 文件夾下寫好布局文件

然後創建一個 java 文件

在該文件中將布局引入
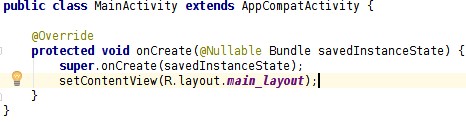
然後在注冊文件中注冊,將該 Activity 設置為應用啟動時第一個加載的 Activity

然後就可以運行了。
1、本實驗實驗環境:
操作系統 Windows 10
實驗軟件 Android Studio 2.2.1
虛擬設備:Nexus_5X
API:23
2、貼代碼的時候由於插入代碼框的大小問題,代碼格式不太嚴整,望見諒~
 Andriod小項目——在線音樂播放器
Andriod小項目——在線音樂播放器 Andriod小項目——在線音樂播放器 Android在線音樂播放器 從大一開始就已經開始自學Java
 Android應用開發教程之十一:應用程序PreferenceActivity
1.PreferenceActivity 介紹 PreferenceActivity 繼承ListActivity 它是以一個列表的形式在展現內容
 AIDL使用中報錯找不到自定義數據類型的解決辦法,
AIDL使用中報錯找不到自定義數據類型的解決辦法,在研究Android多進程編程的時候,照書敲了一個AIDL的例子。其中,用Android Studio自動生成了AIDL
 使用SharePreferences存取數據(慕課筆記 ),sharepreferences
使用SharePreferences存取數據(慕課筆記 ),sharepreferences0.視頻地址:http://www.imooc.com/video/3265
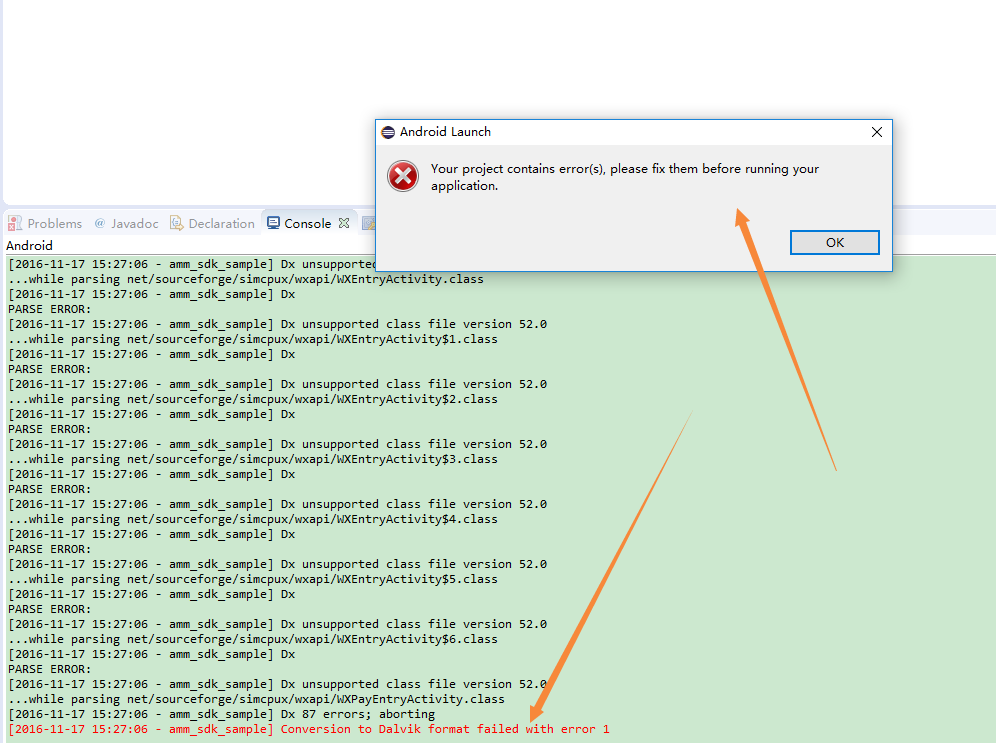 Android——eclipse下運行android項目報錯 Conversion to Dalvik format failed with error 1解決,androiddalvik
Android——eclipse下運行android項目報錯 Conve