編輯:關於android開發
本篇文章會從源碼(基於Android 6.0)角度分析Android中View的繪制流程,側重於對整體流程的分析,對一些難以理解的點加以重點闡述,目的是把View繪制的整個流程把握好,而對於特定實現細節則可以日後再對相應源碼進行研讀。
在進行實際的分析之前,我們先來看下面這張圖:
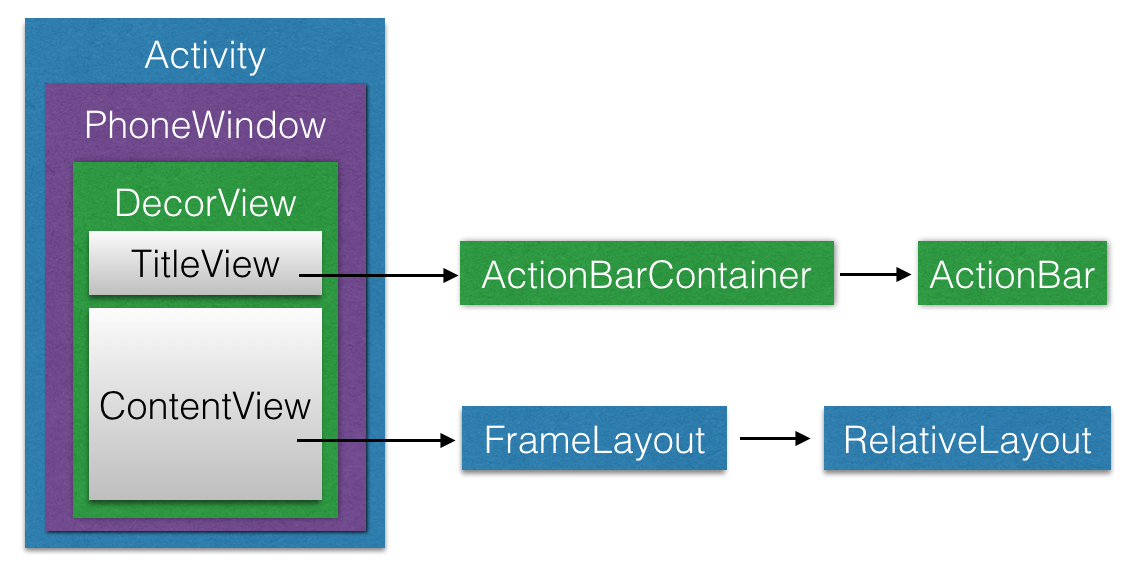
我們來對上圖做出簡單解釋:DecorView是一個應用窗口的根容器,它本質上是一個FrameLayout。DecorView有唯一一個子View,它是一個垂直LinearLayout,包含兩個子元素,一個是TitleView(ActionBar的容器),另一個是ContentView(窗口內容的容器)。關於ContentView,它是一個FrameLayout(android.R.id.content),我們平常用的setContentView就是設置它的子View。上圖還表達了每個Activity都與一個Window(具體來說是PhoneWindow)相關聯,用戶界面則由Window所承載。
Window即窗口,這個概念在Android Framework中的實現為android.view.Window這個抽象類,這個抽象類是對Android系統中的窗口的抽象。在介紹這個類之前,我們先來看看究竟什麼是窗口呢?
實際上,窗口是一個宏觀的思想,它是屏幕上用於繪制各種UI元素及響應用戶輸入事件的一個矩形區域。通常具備以下兩個特點:
在Android系統中,窗口是獨占一個Surface實例的顯示區域,每個窗口的Surface由WindowManagerService分配。我們可以把Surface看作一塊畫布,應用可以通過Canvas或OpenGL在其上面作畫。畫好之後,通過SurfaceFlinger將多塊Surface按照特定的順序(即Z-order)進行混合,而後輸出到FrameBuffer中,這樣用戶界面就得以顯示。
android.view.Window這個抽象類可以看做Android中對窗口這一宏觀概念所做的約定,而PhoneWindow這個類是Framework為我們提供的Android窗口概念的具體實現。接下來我們先來介紹一下android.view.Window這個抽象類。
這個抽象類包含了三個核心組件:
下面我們來看一下Android中Window的具體實現(也是唯一實現)——PhoneWindow。
前面我們提到了,PhoneWindow這個類是Framework為我們提供的Android窗口的具體實現。我們平時調用setContentView()方法設置Activity的用戶界面時,實際上就完成了對所關聯的PhoneWindow的ViewTree的設置。我們還可以通過Activity類的requestWindowFeature()方法來定制Activity關聯PhoneWindow的外觀,這個方法實際上做的是把我們所請求的窗口外觀特性存儲到了PhoneWindow的mFeatures成員中,在窗口繪制階段生成外觀模板時,會根據mFeatures的值繪制特定外觀。
在分析setContentView()方法前,我們需要明確:這個方法只是完成了Activity的ContentView的創建,而並沒有執行View的繪制流程。
當我們自定義Activity繼承自android.app.Activity時候,調用的setContentView()方法是Activity類的,源碼如下:
public void setContentView(@LayoutRes int layoutResID) {
  getWindow().setContentView(layoutResID);
  . . .
}
getWindow()方法會返回Activity所關聯的PhoneWindow,也就是說,實際上調用到了PhoneWindow的setContentView()方法,源碼如下:
@Override
public void setContentView(int layoutResID) {
  if (mContentParent == null) {
    // mContentParent即為上面提到的ContentView的父容器,若為空則調用installDecor()生成
    installDecor();
  } else if (!hasFeature(FEATURE_CONTENT_TRANSITIONS)) {
    // 具有FEATURE_CONTENT_TRANSITIONS特性表示開啟了Transition
    // mContentParent不為null,則移除decorView的所有子View
    mContentParent.removeAllViews();
  }
  if (hasFeature(FEATURE_CONTENT_TRANSITIONS)) {
    // 開啟了Transition,做相應的處理,我們不討論這種情況
    // 感興趣的同學可以參考源碼
    . . .
  } else {
    // 一般情況會來到這裡,調用mLayoutInflater.inflate()方法來填充布局
    // 填充布局也就是把我們設置的ContentView加入到mContentParent中
    mLayoutInflater.inflate(layoutResID, mContentParent);
  }
  . . .
  // cb即為該Window所關聯的Activity
  final Callback cb = getCallback();
  if (cb != null && !isDestroyed()) {
    // 調用onContentChanged()回調方法通知Activity窗口內容發生了改變
    cb.onContentChanged();
  }

  . . .
}
在上面我們看到了,PhoneWindow的setContentView()方法中調用了LayoutInflater的inflate()方法來填充布局,這個方法的源碼如下:
public View inflate(@LayoutRes int resource, @Nullable ViewGroup root) {
  return inflate(resource, root, root != null);
}

public View inflate(@LayoutRes int resource, @Nullable ViewGroup root, boolean attachToRoot) {
  final Resources res = getContext().getResources();
  . . .
  final XmlResourceParser parser = res.getLayout(resource);
  try {
    return inflate(parser, root, attachToRoot);
  } finally {
    parser.close();
  }
}
在PhoneWindow的setContentView()方法中傳入了decorView作為LayoutInflater.inflate()的root參數,我們可以看到,通過層層調用,最終調用的是inflate(XmlPullParser, ViewGroup, boolean)方法來填充布局。這個方法的源碼如下:
public View inflate(XmlPullParser parser, @Nullable ViewGroup root, boolean attachToRoot) {
  synchronized (mConstructorArgs) {
    . . .
    final Context inflaterContext = mContext;
    final AttributeSet attrs = Xml.asAttributeSet(parser);
    Context lastContext = (Context) mConstructorArgs[0];
    mConstructorArgs[0] = inflaterContext;

    View result = root;

    try {
      // Look for the root node.
      int type;
      // 一直讀取xml文件,直到遇到開始標記
      while ((type = parser.next()) != XmlPullParser.START_TAG &&
          type != XmlPullParser.END_DOCUMENT) {
        // Empty
       }
      // 最先遇到的不是開始標記,報錯
      if (type != XmlPullParser.START_TAG) {
        throw new InflateException(parser.getPositionDescription()
+ ": No start tag found!");
      }

      final String name = parser.getName();
      . . .
      // 單獨處理<merge>標簽,不熟悉的同學請參考官方文檔的說明
      if (TAG_MERGE.equals(name)) {
        // 若包含<merge>標簽,父容器(即root參數)不可為空且attachRoot須為true,否則報錯
        if (root == null || !attachToRoot) {
          throw new InflateException("<merge /> can be used only with a valid "
+ "ViewGroup root and attachToRoot=true");
        }

        // 遞歸地填充布局
        rInflate(parser, root, inflaterContext, attrs, false);
     } else {
        // temp為xml布局文件的根View
        final View temp = createViewFromTag(root, name, inflaterContext, attrs);
        ViewGroup.LayoutParams params = null;
        if (root != null) {
          . . .
          // 獲取父容器的布局參數(LayoutParams)
          params = root.generateLayoutParams(attrs);
          if (!attachToRoot) {
            // 若attachToRoot參數為false,則我們只會將父容器的布局參數設置給根View
            temp.setLayoutParams(params);
          }

        }

        // 遞歸加載根View的所有子View
        rInflateChildren(parser, temp, attrs, true);
        . . .

        if (root != null && attachToRoot) {
          // 若父容器不為空且attachToRoot為true,則將父容器作為根View的父View包裹上來
          root.addView(temp, params);
        }

        // 若root為空或是attachToRoot為false,則以根View作為返回值
        if (root == null || !attachToRoot) {
           result = temp;
        }
      }

    } catch (XmlPullParserException e) {
      . . .
    } catch (Exception e) {
      . . .
    } finally {

      . . .
    }
    return result;
  }
}
在上面的源碼中,首先對於布局文件中的<merge>標簽進行單獨處理,調用rInflate()方法來遞歸填充布局。這個方法的源碼如下:
void rInflate(XmlPullParser parser, View parent, Context context,
    AttributeSet attrs, boolean finishInflate) throws XmlPullParserException, IOException {
    // 獲取當前標記的深度,根標記的深度為0
    final int depth = parser.getDepth();
    int type;
    while (((type = parser.next()) != XmlPullParser.END_TAG ||
        parser.getDepth() > depth) && type != XmlPullParser.END_DOCUMENT) {
      // 不是開始標記則繼續下一次迭代
      if (type != XmlPullParser.START_TAG) {
        continue;
      }
      final String name = parser.getName();
      // 對一些特殊標記做單獨處理
      if (TAG_REQUEST_FOCUS.equals(name)) {
        parseRequestFocus(parser, parent);
      } else if (TAG_TAG.equals(name)) {
        parseViewTag(parser, parent, attrs);
      } else if (TAG_INCLUDE.equals(name)) {
        if (parser.getDepth() == 0) {
          throw new InflateException("<include /> cannot be the root element");
        }
        // 對<include>做處理
        parseInclude(parser, context, parent, attrs);
      } else if (TAG_MERGE.equals(name)) {
        throw new InflateException("<merge /> must be the root element");
      } else {
        // 對一般標記的處理
        final View view = createViewFromTag(parent, name, context, attrs);
        final ViewGroup viewGroup = (ViewGroup) parent;
        final ViewGroup.LayoutParams params=viewGroup.generateLayoutParams(attrs);
        // 遞歸地加載子View
        rInflateChildren(parser, view, attrs, true);
        viewGroup.addView(view, params);
      }
    }

    if (finishInflate) {
        parent.onFinishInflate();
    }
}
我們可以看到,上面的inflate()和rInflate()方法中都調用了rInflateChildren()方法,這個方法的源碼如下:
final void rInflateChildren(XmlPullParser parser, View parent, AttributeSet attrs, boolean finishInflate) throws XmlPullParserException, IOException {
    rInflate(parser, parent, parent.getContext(), attrs, finishInflate);
}
從源碼中我們可以知道,rInflateChildren()方法實際上調用了rInflate()方法。
到這裡,setContentView()的整體執行流程我們就分析完了,至此我們已經完成了Activity的ContentView的創建與設置工作。接下來,我們開始進入正題,分析View的繪制流程。
在介紹View的繪制前,首先我們需要知道是誰負責執行View繪制的整個流程。實際上,View的繪制是由ViewRoot來負責的。每個應用程序窗口的decorView都有一個與之關聯的ViewRoot對象,這種關聯關系是由WindowManager來維護的。
那麼decorView與ViewRoot的關聯關系是在什麼時候建立的呢?答案是Activity啟動時,ActivityThread.handleResumeActivity()方法中建立了它們兩者的關聯關系。這裡我們不具體分析它們建立關聯的時機與方式,感興趣的同學可以參考相關源碼。下面我們直入主題,分析一下ViewRoot是如何完成View的繪制的。
當建立好了decorView與ViewRoot的關聯後,ViewRoot類的requestLayout()方法會被調用,以完成應用程序用戶界面的初次布局。實際被調用的是ViewRootImpl類的requestLayout()方法,這個方法的源碼如下:
@Override
public void requestLayout() {
  if (!mHandlingLayoutInLayoutRequest) {
    // 檢查發起布局請求的線程是否為主線程
    checkThread();
    mLayoutRequested = true;
    scheduleTraversals();
  }
}
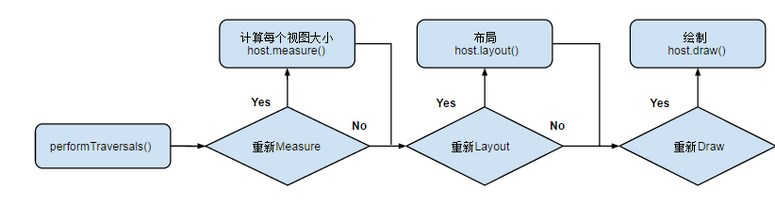
上面的方法中調用了scheduleTraversals()方法來調度一次完成的繪制流程,該方法會向主線程發送一個“遍歷”消息,最終會導致ViewRootImpl的performTraversals()方法被調用。下面,我們以performTraversals()為起點,來分析View的整個繪制流程。
View的整個繪制流程可以分為以下三個階段:
此階段的目的是計算出控件樹中的各個控件要顯示其內容的話,需要多大尺寸。起點是ViewRootImpl的measureHierarchy()方法,這個方法的源碼如下:
private boolean measureHierarchy(final View host, final WindowManager.LayoutParams lp, final Resources res,
    final int desiredWindowWidth, final int desiredWindowHeight) {
  // 傳入的desiredWindowXxx為窗口尺寸
  int childWidthMeasureSpec;
  int childHeightMeasureSpec;
  boolean windowSizeMayChange = false;
  . . .
  boolean goodMeasure = false;

  if (!goodMeasure) {
    childWidthMeasureSpec = getRootMeasureSpec(desiredWindowWidth, lp.width);
    childHeightMeasureSpec = getRootMeasureSpec(desiredWindowHeight, lp.height);
    performMeasure(childWidthMeasureSpec, childHeightMeasureSpec);

    if (mWidth != host.getMeasuredWidth() || mHeight != host.getMeasuredHeight()) {
      windowSizeMayChange = true;
    }
  }
  return windowSizeMayChange;
}
上面的代碼中調用getRootMeasureSpec()方法來獲取根MeasureSpec,這個根MeasureSpec代表了對decorView的寬高的約束信息。繼續分析之前,我們先來簡單地介紹下MeasureSpec的概念。
MeasureSpec是一個32位整數,由SpecMode和SpecSize兩部分組成,其中,高2位為SpecMode,低30位為SpecSize。SpecMode為測量模式,SpecSize為相應測量模式下的測量尺寸。View(包括普通View和ViewGroup)的SpecMode由本View的LayoutParams結合父View的MeasureSpec生成。
SpecMode的取值可為以下三種:
傳入performMeasure()方法的MeasureSpec的SpecMode為EXACTLY,SpecSize為窗口尺寸。
performMeasure()方法的源碼如下:
private void performMeasure(int childWidthMeasureSpec, int childHeightMeasureSpec) {
  . . .
  try {
    mView.measure(childWidthMeasureSpec, childHeightMeasureSpec);
  } finally {
    . . .
  }
}
上面代碼中的mView即為decorView,也就是說會轉向對View.measure()方法的調用,這個方法的源碼如下:
/**
 * 調用這個方法來算出一個View應該為多大。參數為父View對其寬高的約束信息。
 * 實際的測量工作在onMeasure()方法中進行
 */
public final void measure(int widthMeasureSpec, int heightMeasureSpec) {
  . . .
  // 判斷是否需要重新布局

  // 若mPrivateFlags中包含PFLAG_FORCE_LAYOUT標記,則強制重新布局
  // 比如調用View.requestLayout()會在mPrivateFlags中加入此標記
  final boolean forceLayout = (mPrivateFlags & PFLAG_FORCE_LAYOUT) == PFLAG_FORCE_LAYOUT;
  final boolean specChanged = widthMeasureSpec != mOldWidthMeasureSpec
      || heightMeasureSpec != mOldHeightMeasureSpec;
  final boolean isSpecExactly = MeasureSpec.getMode(widthMeasureSpec) == MeasureSpec.EXACTLY
      && MeasureSpec.getMode(heightMeasureSpec) == MeasureSpec.EXACTLY;
  final boolean matchesSpecSize = getMeasuredWidth() == MeasureSpec.getSize(widthMeasureSpec)
      && getMeasuredHeight() == MeasureSpec.getSize(heightMeasureSpec);
  final boolean needsLayout = specChanged
      && (sAlwaysRemeasureExactly || !isSpecExactly || !matchesSpecSize);

  // 需要重新布局
  if (forceLayout || needsLayout) {
    . . .
    // 先嘗試從緩從中獲取,若forceLayout為true或是緩存中不存在或是
    // 忽略緩存,則調用onMeasure()重新進行測量工作
    int cacheIndex = forceLayout ? -1 : mMeasureCache.indexOfKey(key);
    if (cacheIndex < 0 || sIgnoreMeasureCache) {
      // measure ourselves, this should set the measured dimension flag back
      onMeasure(widthMeasureSpec, heightMeasureSpec);
      . . .
    } else {
      // 緩存命中,直接從緩存中取值即可,不必再測量
      long value = mMeasureCache.valueAt(cacheIndex);
      // Casting a long to int drops the high 32 bits, no mask needed
      setMeasuredDimensionRaw((int) (value >> 32), (int) value);
      . . .
    }
    . . .
  }
  mOldWidthMeasureSpec = widthMeasureSpec;
  mOldHeightMeasureSpec = heightMeasureSpec;
  mMeasureCache.put(key, ((long) mMeasuredWidth) << 32 |
      (long) mMeasuredHeight & 0xffffffffL); // suppress sign extension
}
從measure()方法的源碼中我們可以知道,只有以下兩種情況之一,才會進行實際的測量工作:
對於decorView來說,實際執行測量工作的是FrameLayout的onMeasure()方法,該方法的源碼如下:
@Override
protected void onMeasure(int widthMeasureSpec, int heightMeasureSpec) {
  int count = getChildCount();
  . . .
  int maxHeight = 0;
  int maxWidth = 0;

  int childState = 0;
  for (int i = 0; i < count; i++) {
    final View child = getChildAt(i);
    if (mMeasureAllChildren || child.getVisibility() != GONE) {
      measureChildWithMargins(child, widthMeasureSpec, 0, heightMeasureSpec, 0);
      final LayoutParams lp = (LayoutParams) child.getLayoutParams();
      maxWidth = Math.max(maxWidth,
          child.getMeasuredWidth() + lp.leftMargin + lp.rightMargin);
      maxHeight = Math.max(maxHeight,
          child.getMeasuredHeight() + lp.topMargin + lp.bottomMargin);
      childState = combineMeasuredStates(childState, child.getMeasuredState());

      . . .
    }
  }

  // Account for padding too
  maxWidth += getPaddingLeftWithForeground() + getPaddingRightWithForeground();
  maxHeight += getPaddingTopWithForeground() + getPaddingBottomWithForeground();

  // Check against our minimum height and width
  maxHeight = Math.max(maxHeight, getSuggestedMinimumHeight());
  maxWidth = Math.max(maxWidth, getSuggestedMinimumWidth());

  // Check against our foreground's minimum height and width
  final Drawable drawable = getForeground();
  if (drawable != null) {
    maxHeight = Math.max(maxHeight, drawable.getMinimumHeight());
    maxWidth = Math.max(maxWidth, drawable.getMinimumWidth());
  }

  setMeasuredDimension(resolveSizeAndState(maxWidth, widthMeasureSpec, childState),
        resolveSizeAndState(maxHeight, heightMeasureSpec,
        childState << MEASURED_HEIGHT_STATE_SHIFT));
  . . .
}
FrameLayout是ViewGroup的子類,後者有一個View[]類型的成員變量mChildren,代表了其子View集合。通過getChildAt(i)能獲取指定索引處的子View,通過getChildCount()可以獲得子View的總數。
在上面的源碼中,首先調用measureChildWithMargins()方法對所有子View進行了一遍測量,並計算出所有子View的最大寬度和最大高度。而後將得到的最大高度和寬度加上padding,這裡的padding包括了父View的padding和前景區域的padding。然後會檢查是否設置了最小寬高,並與其比較,將兩者中較大的設為最終的最大寬高。最後,若設置了前景圖像,我們還要檢查前景圖像的最小寬高。
經過了以上一系列步驟後,我們就得到了maxHeight和maxWidth的最終值,表示當前容器View用這個尺寸就能夠正常顯示其所有子View(同時考慮了padding和margin)。而後我們需要調用resolveSizeAndState()方法來結合傳來的MeasureSpec來獲取最終的測量寬高,並保存到mMeasuredWidth與mMeasuredHeight成員變量中。
從以上代碼的執行流程中,我們可以看到,容器View通過measureChildWithMargins()方法對所有子View進行測量後,才能得到自身的測量結果。也就是說,對於ViewGroup及其子類來說,要先完成子View的測量,再進行自身的測量(考慮進padding等)。
接下來我們來看下ViewGroup的measureChildWithMargins()方法的實現:
protected void measureChildWithMargins(View child,
  int parentWidthMeasureSpec, int widthUsed,
  int parentHeightMeasureSpec, int heightUsed) {
  final MarginLayoutParams lp = (MarginLayoutParams) child.getLayoutParams();
  final int childWidthMeasureSpec = getChildMeasureSpec(parentWidthMeasureSpec,
      mPaddingLeft + mPaddingRight + lp.leftMargin + lp.rightMargin + widthUsed, lp.width);
  final int childHeightMeasureSpec = getChildMeasureSpec(parentHeightMeasureSpec
      mPaddingTop + mPaddingBottom + lp.topMargin + lp.bottomMargin + heightUsed, lp.height);

  child.measure(childWidthMeasureSpec, childHeightMeasureSpec);

}
由以上代碼我們可以知道,對於ViewGroup來說,它會調用child.measure()來完成子View的測量。傳入ViewGroup的MeasureSpec是它的父View用於約束其測量的,那麼ViewGroup本身也需要生成一個childMeasureSpec來限制它的子View的測量工作。這個childMeasureSpec就由getChildMeasureSpec()方法生成。接下來我們來分析這個方法:
public static int getChildMeasureSpec(int spec, int padding, int childDimension) {
  // spec為父View的MeasureSpec
  // padding為父View在相應方向的已用尺寸加上父View的padding和子View的margin
  // childDimension為子View的LayoutParams的值
  int specMode = MeasureSpec.getMode(spec);
  int specSize = MeasureSpec.getSize(spec);

  // 現在size的值為父View相應方向上的可用大小
  int size = Math.max(0, specSize - padding);

  int resultSize = 0;
  int resultMode = 0;

  switch (specMode) {
    // Parent has imposed an exact size on us
    case MeasureSpec.EXACTLY:
      if (childDimension >= 0) {
        // 表示子View的LayoutParams指定了具體大小值(xx dp)
        resultSize = childDimension;
        resultMode = MeasureSpec.EXACTLY;
      } else if (childDimension == LayoutParams.MATCH_PARENT) {
        // 子View想和父View一樣大
        resultSize = size;
        resultMode = MeasureSpec.EXACTLY;
      } else if (childDimension == LayoutParams.WRAP_CONTENT) {
        // 子View想自己決定其尺寸,但不能比父View大
        resultSize = size;
        resultMode = MeasureSpec.AT_MOST;
      }
      break;

    // Parent has imposed a maximum size on us
    case MeasureSpec.AT_MOST:
      if (childDimension >= 0) {
        // 子View指定了具體大小
        resultSize = childDimension;
        resultMode = MeasureSpec.EXACTLY;
      } else if (childDimension == LayoutParams.MATCH_PARENT) {
        // 子View想跟父View一樣大,但是父View的大小未固定下來
        // 所以指定約束子View不能比父View大
        resultSize = size;
        resultMode = MeasureSpec.AT_MOST;
      } else if (childDimension == LayoutParams.WRAP_CONTENT) {
        // 子View想要自己決定尺寸,但不能比父View大
        resultSize = size;
        resultMode = MeasureSpec.AT_MOST;
      }
      break;

      . . .
  }

  //noinspection ResourceType
  return MeasureSpec.makeMeasureSpec(resultSize, resultMode);
}
上面的方法展現了根據父View的MeasureSpec和子View的LayoutParams生成子View的MeasureSpec的過程, 子View的LayoutParams表示了子View的期待大小。這個產生的MeasureSpec用於指導子View自身的測量結果的確定。
在上面的代碼中,我們可以看到當ParentMeasureSpec的SpecMode為EXACTLY時,表示父View對子View指定了確切的寬高限制。此時根據子View的LayoutParams的不同,分以下三種情況:
當ParentMeasureSpec的SpecMode為AT_MOST時,我們也可以根據子View的LayoutParams的不同來分三種情況討論:
在measureChildWithMargins()方法中,獲取了知道子View測量的MeasureSpec後,接下來就要調用child.measure()方法,並把獲取到的childMeasureSpec傳入。這時便又會調用onMeasure()方法,若此時的子View為ViewGroup的子類,便會調用相應容器類的onMeasure()方法,其他容器View的onMeasure()方法與FrameLayout的onMeasure()方法執行過程相似。
下面會我們回到FrameLayout的onMeasure()方法,當遞歸地執行完所有子View的測量工作後,會調用resolveSizeAndState()方法來根據之前的測量結果確定最終對FrameLayout的測量結果並存儲起來。View類的resolveSizeAndState()方法的源碼如下:
public static int resolveSizeAndState(int size, int measureSpec, int childMeasuredState) {
  final int specMode = MeasureSpec.getMode(measureSpec);
  final int specSize = MeasureSpec.getSize(measureSpec);
  final int result;
  switch (specMode) {
    case MeasureSpec.AT_MOST:
      if (specSize < size) {
        // 父View給定的最大尺寸小於完全顯示內容所需尺寸
        // 則在測量結果上加上MEASURED_STATE_TOO_SMALL
        result = specSize | MEASURED_STATE_TOO_SMALL;
      } else {
       result = size;
      }
      break;

    case MeasureSpec.EXACTLY:
      // 若specMode為EXACTLY,則不考慮size,result直接賦值為specSize
      result = specSize;
      break;

    case MeasureSpec.UNSPECIFIED:
    default:
      result = size;
  }

  return result | (childMeasuredState & MEASURED_STATE_MASK);

}
對於普通View,會調用View類的onMeasure()方法來進行實際的測量工作,該方法的源碼如下:
protected void onMeasure(int widthMeasureSpec, int heightMeasureSpec) {
    setMeasuredDimension(getDefaultSize(getSuggestedMinimumWidth(), widthMeasureSpec),
        getDefaultSize(getSuggestedMinimumHeight(), heightMeasureSpec));
}
對於普通View(非ViewgGroup)來說,只需完成自身的測量工作即可。以上代碼中通過setMeasuredDimension()方法設置測量的結果,具體來說是以getDefaultSize()方法的返回值來作為測量結果。getDefaultSize()方法的源碼如下:
public static int getDefaultSize(int size, int measureSpec) {
  int result = size;
  int specMode = MeasureSpec.getMode(measureSpec);
  int specSize = MeasureSpec.getSize(measureSpec);
  switch (specMode) {
    case MeasureSpec.UNSPECIFIED:
      result = size;
      break;
    case MeasureSpec.AT_MOST:
    case MeasureSpec.EXACTLY:
      result = specSize;
      break;
  }
  return result;
}
由以上代碼我們可以看到,View的getDefaultSize()方法對於AT_MOST和EXACTLY這兩種情況都返回了SpecSize作為result。所以若我們的自定義View直接繼承了View類,我們就要自己對wrap_content (對應了AT_MOST)這種情況進行處理,否則對自定義View指定wrap_content就和match_parent效果一樣了。
layout階段的基本思想也是由根View開始,遞歸地完成整個控件樹的布局(layout)工作。
我們把對decorView的layout()方法的調用作為布局整個控件樹的起點,實際上調用的是View類的layout()方法,源碼如下:
public void layout(int l, int t, int r, int b) {
    // l為本View左邊緣與父View左邊緣的距離
    // t為本View上邊緣與父View上邊緣的距離
    // r為本View右邊緣與父View左邊緣的距離
    // b為本View下邊緣與父View上邊緣的距離
    . . .
    boolean changed = isLayoutModeOptical(mParent) ?            setOpticalFrame(l, t, r, b) : setFrame(l, t, r, b);
    if (changed || (mPrivateFlags & PFLAG_LAYOUT_REQUIRED) == PFLAG_LAYOUT_REQUIRED) {
        onLayout(changed, l, t, r, b);
        . . .

    }
    . . .
}
這個方法會調用setFrame()方法來設置View的mLeft、mTop、mRight和mBottom四個參數,這四個參數描述了View相對其父View的位置(分別賦值為l, t, r, b),在setFrame()方法中會判斷View的位置是否發生了改變,若發生了改變,則需要對子View進行重新布局,對子View的局部是通過onLayout()方法實現了。由於普通View( 非ViewGroup)不含子View,所以View類的onLayout()方法為空。因此接下來,我們看看ViewGroup類的onLayout()方法的實現。
實際上ViewGroup類的onLayout()方法是abstract,這是因為不同的布局管理器有著不同的布局方式。
這裡我們以decorView,也就是FrameLayout的onLayout()方法為例,分析ViewGroup的布局過程:
@Override
protected void onLayout(boolean changed, int left, int top, int right, int bottom) {
  layoutChildren(left, top, right, bottom, false /* no force left gravity */);
}

void layoutChildren(int left, int top, int right, int bottom, boolean forceLeftGravity) {
  final int count = getChildCount();
  final int parentLeft = getPaddingLeftWithForeground();
  final int parentRight = right - left - getPaddingRightWithForeground();
  final int parentTop = getPaddingTopWithForeground();
  final int parentBottom = bottom - top - getPaddingBottomWithForeground();

  for (int i = 0; i < count; i++) {
    final View child = getChildAt(i);
    if (child.getVisibility() != GONE) {
      final LayoutParams lp = (LayoutParams) child.getLayoutParams();
      final int width = child.getMeasuredWidth();
      final int height = child.getMeasuredHeight();
      int childLeft;
      int childTop;
      int gravity = lp.gravity;

      if (gravity == -1) {
        gravity = DEFAULT_CHILD_GRAVITY;
      }

      final int layoutDirection = getLayoutDirection();
      final int absoluteGravity = Gravity.getAbsoluteGravity(gravity, layoutDirection);
      final int verticalGravity = gravity & Gravity.VERTICAL_GRAVITY_MASK;

      switch (absoluteGravity & Gravity.HORIZONTAL_GRAVITY_MASK) {
        case Gravity.CENTER_HORIZONTAL:
          childLeft = parentLeft + (parentRight - parentLeft - width) / 2 +
lp.leftMargin - lp.rightMargin;
          break;

        case Gravity.RIGHT:
          if (!forceLeftGravity) {
            childLeft = parentRight - width - lp.rightMargin;
            break;
          }

        case Gravity.LEFT:
        default:
          childLeft = parentLeft + lp.leftMargin;

      }

      switch (verticalGravity) {
        case Gravity.TOP:
          childTop = parentTop + lp.topMargin;
          break;

        case Gravity.CENTER_VERTICAL:
          childTop = parentTop + (parentBottom - parentTop - height) / 2 +
lp.topMargin - lp.bottomMargin;
          break;

        case Gravity.BOTTOM:
          childTop = parentBottom - height - lp.bottomMargin;
          break;

        default:
          childTop = parentTop + lp.topMargin;
      }
      child.layout(childLeft, childTop, childLeft + width, childTop + height);
    }
  }
}
在上面的方法中,parentLeft表示當前View為其子View顯示區域指定的一個左邊界,也就是子View顯示區域的左邊緣到父View的左邊緣的距離,parentRight、parentTop、parentBottom的含義同理。確定了子View的顯示區域後,接下來,用一個for循環來完成子View的布局。
在確保子View的可見性不為GONE的情況下才會對其進行布局。首先會獲取子View的LayoutParams、layoutDirection等一系列參數。上面代碼中的childLeft代表了最終子View的左邊緣距父View左邊緣的距離,childTop代表了子View的上邊緣距父View的上邊緣的距離。會根據子View的layout_gravity的取值對childLeft和childTop做出不同的調整。最後會調用child.layout()方法對子View的位置參數進行設置,這時便轉到了View.layout()方法的調用,若子View是容器View,則會遞歸地對其子View進行布局。
到這裡,layout階段的大致流程我們就分析完了,這個階段主要就是根據上一階段得到的View的測量寬高來確定View的最終顯示位置。顯然,經過了measure階段和layout階段,我們已經確定好了View的大小和位置,那麼接下來就可以開始繪制View了。
對於本階段的分析,我們以decorView.draw()作為分析的起點,也就是View.draw()方法,它的源碼如下:
public void draw(Canvas canvas) {
  . . .
  // 繪制背景,只有dirtyOpaque為false時才進行繪制,下同
  int saveCount;
  if (!dirtyOpaque) {
    drawBackground(canvas);
  }

  . . .

  // 繪制自身內容
  if (!dirtyOpaque) onDraw(canvas);

  // 繪制子View
  dispatchDraw(canvas);

   . . .
  // 繪制滾動條等
  onDrawForeground(canvas);

}
簡單起見,在上面的代碼中我們省略了實現滑動時漸變邊框效果相關的邏輯。實際上,View類的onDraw()方法為空,因為每個View繪制自身的方式都不盡相同,對於decorView來說,由於它是容器View,所以它本身並沒有什麼要繪制的。dispatchDraw()方法用於繪制子View,顯然普通View(非ViewGroup)並不能包含子View,所以View類中這個方法的實現為空。
ViewGroup類的dispatchDraw()方法中會依次調用drawChild()方法來繪制子View,drawChild()方法的源碼如下:
protected boolean drawChild(Canvas canvas, View child, long drawingTime) {
  return child.draw(canvas, this, drawingTime);
}
這個方法調用了View.draw(Canvas, ViewGroup,long)方法來對子View進行繪制。在draw(Canvas, ViewGroup, long)方法中,首先對canvas進行了一系列變換,以變換到將要被繪制的View的坐標系下。完成對canvas的變換後,便會調用View.draw(Canvas)方法進行實際的繪制工作,此時傳入的canvas為經過變換的,在將被繪制View的坐標系下的canvas。
進入到View.draw(Canvas)方法後,會向之前介紹的一樣,執行以下幾步:
至此,整個View的繪制流程我們就分析完了。若文中有敘述不清晰或是不准確的地方,希望大家能夠指出,謝謝大家:)
這篇講解View的繪制比較全面,解決了很多疑惑,如果想仔細研究View的measure()、layout()、draw(),可以看這篇:http://www.cnblogs.com/jycboy/p/6066654.html。這兩篇看完就會對view的繪制流程很清楚了。
《深入理解Android(卷三)》
《Android開發藝術探索》
公共技術點之View的繪制流程
文/absfree(簡書作者)
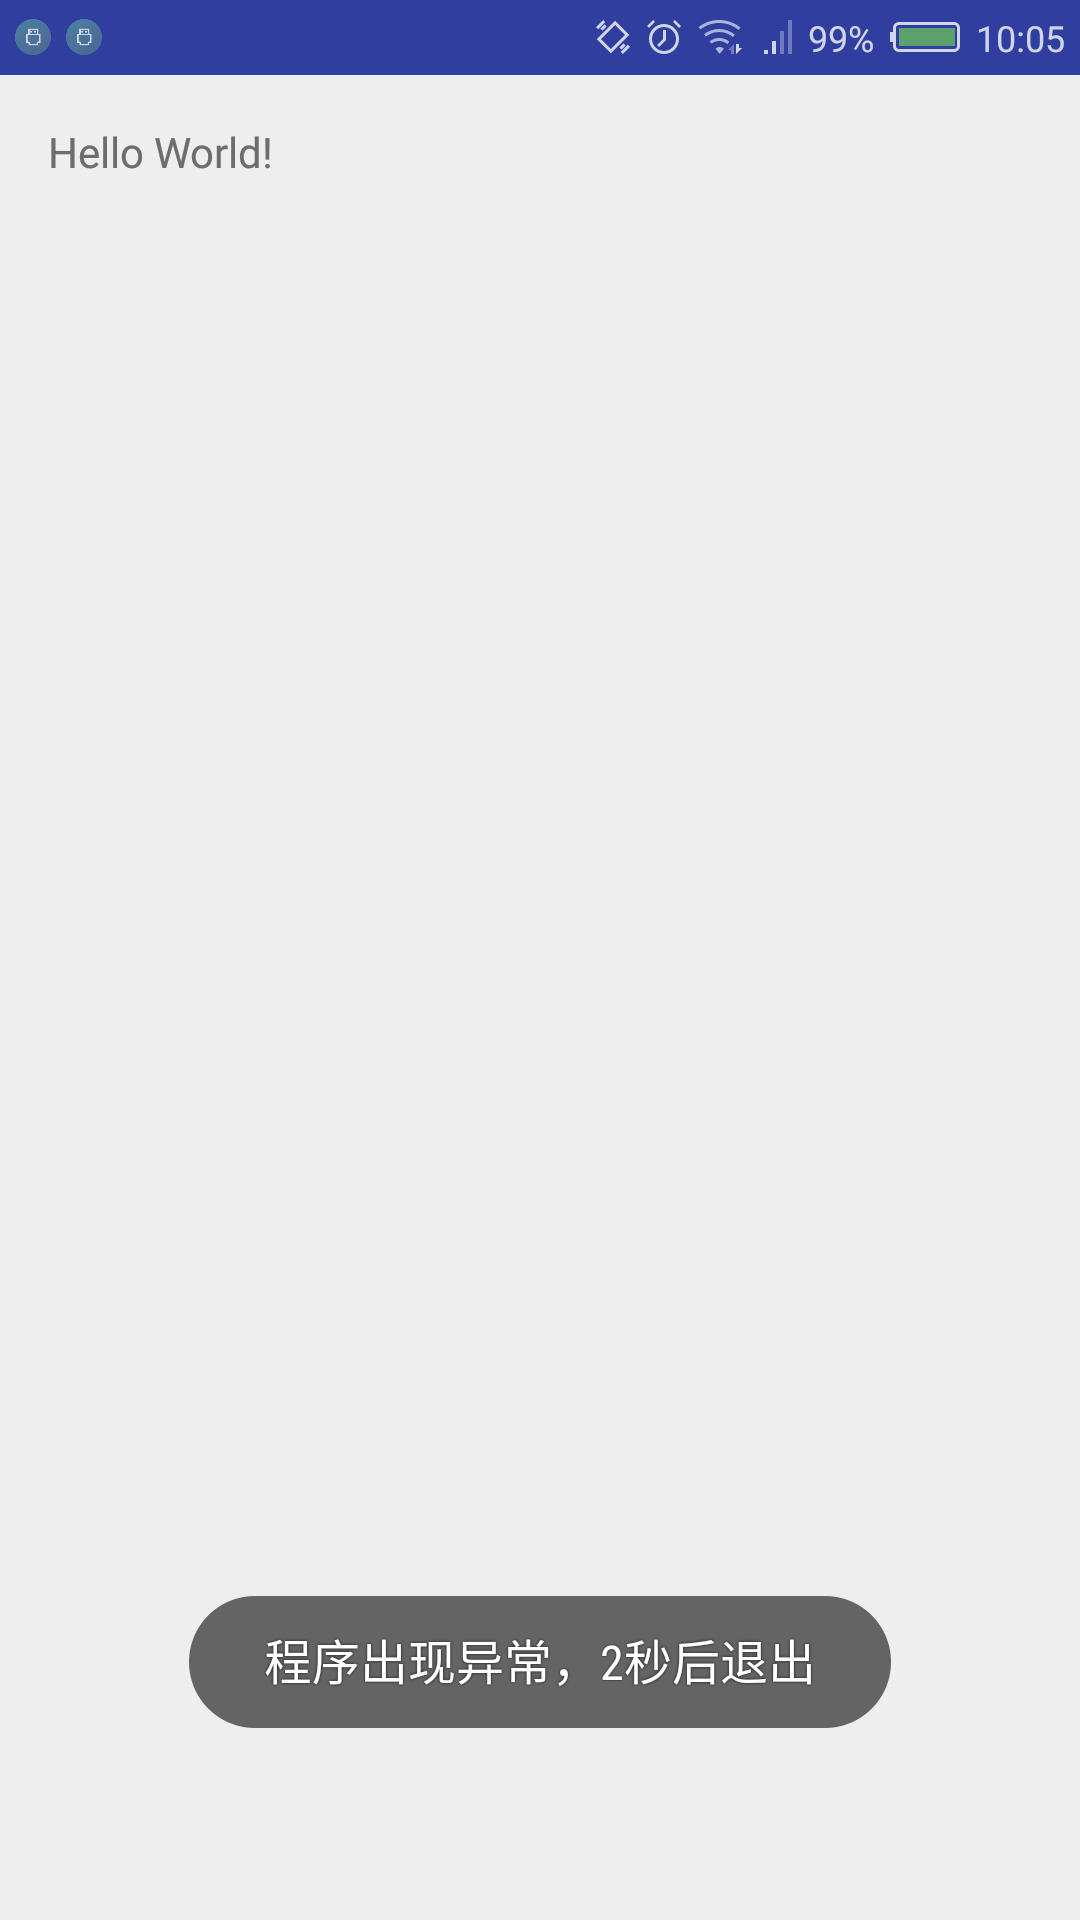 APP級別處理未捕獲異常,APP級別處理捕獲
APP級別處理未捕獲異常,APP級別處理捕獲前言: 項目APP有時候會出現Crash,然後就是彈出系統強制退出的對話框,點擊關閉APP。 有的APP進行了處理,會
 Intent(三)向下一個活動傳遞數據,intent傳遞
Intent(三)向下一個活動傳遞數據,intent傳遞 向下傳遞活動很簡單,可以我采用putExtra()方法的重載,把
 Android性能優化之常見的內存洩漏
Android性能優化之常見的內存洩漏 前言 對於內存洩漏,我想大家在開發中肯定都遇到過,只不過內存洩漏對我們來說並不是可見的,因為它是在堆中活動,而要想檢測程序中是
 安卓--selector簡單使用,安卓--selector
安卓--selector簡單使用,安卓--selectorselector ---選擇器 在App的使用中經常能看到selector的身影 如:一個按鍵看上去白色或者其它