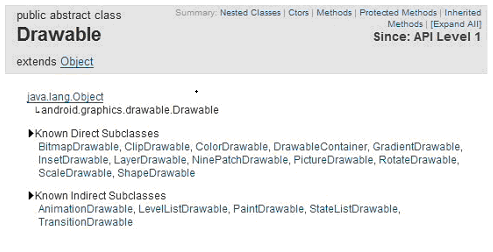
對於任何軟件來說,美觀的界面都是用戶體驗的重要組成部分,它能提高整個軟件的品質,給用戶一個好的印象。界面的美觀一般離不開各種圖形圖像資源。本節就來講一講Android開發中圖形圖像處理的一個最重要的類Drawable。Drawable就是一個可以畫的對象的抽象(有點別扭,你湊合看吧)。
下面是它的繼承關系,可以看到BitmapDrawable、AnimationDrawable等對象都是它的子類。
最簡單的使用Drawable資源的方法是,把圖片放入Android工程的res\drawable目錄下,編程環境會自動在R類裡為此資源創建一個引用。你可以使用此引用訪問該資源對象。譬如對應用程序的圖標,在Java代碼中可以用R.drawable.icon引用到它,在XML中可以用@drawable/icon引用到它。
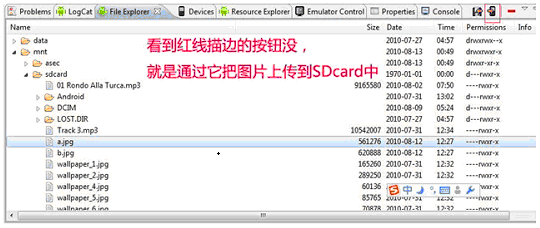
那麼如果圖片資源不在項目中而是在SDCard中時如何使用呢,我們看一下下面的例子學習一下Drawable的使用,並且順便學習一下Bitmap和BitmapFactory的使用。
1、創建項目Lesson23_Drawable,主Acitivity的名字是MainDrawable.java,拷貝a.jpg和b.jpg兩個文件到sdcard中。
2、res\main.xml的內容如下:
XML/HTML代碼
- <?xml version="1.0" encoding="utf-8"?>
- <LINEARLAYOUT xmlns:android="http://schemas.android.com/apk/res/android" android:layout_height="fill_parent" android:layout_width="fill_parent" android:orientation="vertical">
- <TEXTVIEW android:layout_height="wrap_content" android:layout_width="fill_parent" android:text="Drawable的使用-設置壁紙" android:textsize="20sp" />
- <BUTTON type=submit android:layout_height="wrap_content" android:layout_width="wrap_content" android:text="查看圖片A" android:textsize="20sp" android:id="@+id/Button01">
- </BUTTON>
- <BUTTON type=submit android:layout_height="wrap_content" android:layout_width="wrap_content" android:text="查看圖片B" android:textsize="20sp" android:id="@+id/Button02">
- </BUTTON>
- <BUTTON type=submit android:layout_height="wrap_content" android:layout_width="wrap_content" android:text="設置圖片A為壁紙" android:textsize="20sp" android:id="@+id/Button03">
- </BUTTON>
- <BUTTON type=submit android:layout_height="wrap_content" android:layout_width="wrap_content" android:text="設置圖片B為壁紙" android:textsize="20sp" android:id="@+id/Button04">
- </BUTTON>
- <BUTTON type=submit android:layout_height="wrap_content" android:layout_width="wrap_content" android:text="恢復默認壁紙" android:textsize="20sp" android:id="@+id/Button05">
- </BUTTON>
- <IMAGEVIEW android:layout_height="wrap_content" android:layout_width="wrap_content" android:id="@+id/ImageView01">
- </IMAGEVIEW>
- </LINEARLAYOUT>
3、MainDrawable.java的內容如下:
Java代碼
- package android.basic.lesson23;
-
- import java.io.IOException;
-
- import android.app.Activity;
- import android.graphics.BitmapFactory;
- import android.graphics.drawable.Drawable;
- import android.os.Bundle;
- import android.view.View;
- import android.view.View.OnClickListener;
- import android.widget.Button;
- import android.widget.ImageView;
-
- public class MainDrawable extends Activity {
- /** Called when the activity is first created. */
- @Override
- public void onCreate(Bundle savedInstanceState) {
- super.onCreate(savedInstanceState);
- setContentView(R.layout.main);
-
- //定義UI組件
- Button b1 = (Button) findViewById(R.id.Button01);
- Button b2 = (Button) findViewById(R.id.Button02);
- Button b3 = (Button) findViewById(R.id.Button03);
- Button b4 = (Button) findViewById(R.id.Button04);
- Button b5 = (Button) findViewById(R.id.Button05);
- final ImageView iv= (ImageView)findViewById(R.id.ImageView01);
-
- //定義按鈕點擊監聽器
- OnClickListener ocl = new OnClickListener() {
-
- @Override
- public void onClick(View v) {
-
- switch (v.getId()) {
- case R.id.Button01:
- //給ImageView設置圖片,從存儲卡中獲取圖片為Drawable,然後把Drawable設置為ImageView的背景
- iv.setBackgroundDrawable(Drawable.createFromPath("/sdcard/a.jpg"));
- break;
- case R.id.Button02:
- iv.setBackgroundDrawable(Drawable.createFromPath("/sdcard/b.jpg"));
- break;
- case R.id.Button03:
- try {
- //Activity的父類ContextWrapper有這個setWallpaper方法,當然使用此方法需要有android.permission.SET_WALLPAPER權限
- setWallpaper(BitmapFactory.decodeFile("/sdcard/a.jpg"));
- } catch (IOException e1) {
- e1.printStackTrace();
- }
- break;
- case R.id.Button04:
- try {
- setWallpaper(BitmapFactory.decodeFile("/sdcard/b.jpg"));
- } catch (IOException e1) {
- e1.printStackTrace();
- }
- break;
- case R.id.Button05:
- try {
- //Activity的父類ContextWrapper有這個clearWallpaper方法,作用是恢復默認壁紙,當然使用此方法需要有android.permission.SET_WALLPAPER權限
- clearWallpaper();
- } catch (IOException e) {
- e.printStackTrace();
- }
- break;
- }
-
- }
-
- };
-
- //給按鈕們綁定點擊監聽器
- b1.setOnClickListener(ocl);
- b2.setOnClickListener(ocl);
- b3.setOnClickListener(ocl);
- b4.setOnClickListener(ocl);
- b5.setOnClickListener(ocl);
- }
-
- }
4、AndroidManifest.xml的內容如下(設置權限):
XML/HTML代碼
- <?xml version="1.0" encoding="utf-8"?>
- <MANIFEST android:versionname="1.0" android:versioncode="1" xmlns:android="http://schemas.android.com/apk/res/android" package="android.basic.lesson23">
- <APPLICATION android:icon="@drawable/icon" android:label="@string/app_name">
- <ACTIVITY android:name=".MainDrawable" android:label="@string/app_name">
- <INTENT -filter>
- <ACTION android:name="android.intent.action.MAIN" />
- <CATEGORY android:name="android.intent.category.LAUNCHER" />
- </INTENT>
- </ACTIVITY>
-
- </APPLICATION>
- <USES android:minsdkversion="8" -sdk />
-
- <USES android:name="android.permission.SET_WALLPAPER" -permission></USES>
- </MANIFEST>
5、運行程序,查看結果。
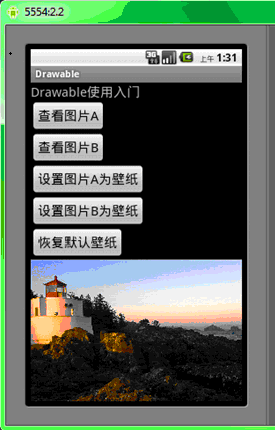
點擊“查看圖片A”按鈕,ImageView載入圖片A並顯示出來:
點擊“設置圖片B為壁紙”按鈕,可以看到圖片B已經成為桌面壁紙:
關於Drawable使用的內容就講到這裡了,大家可以自己多加練習,鞏固一下這些知識。
 android Gui系統之SurfaceFlinger(5),androidgui系統
 優雲mobile專家淺談:Android應用HTTP框架選型,mobileandroid
 Android Studio下載安裝使用教程,androidstudio
 Linux2.6內核進程調度系列--scheduler_tick()函數3.更新普通進程的時間片,