編輯:初級開發
package com.example.android.apis.graphics;
23.TextAlign:

設置Path路徑,貝賽爾曲線
1: //設置Path路徑2: private static void makePath(Path p) {3: p.moveTo(10, 0);4: p.cubicTo(100, -50, 200, 50, 300, 0);//貝賽爾曲線5: }//mPos存的是字符串中每個字符的位置坐標
1: private float[] buildTextPositions(String text, float y, Paint paint) { 2: float[] widths = new float[text.length()]; 3: // initially get the widths for each char 4: int n = paint.getTextWidths(text, widths); 5: // now popuplate the array, interleaving spaces for the Y values X值為字符的寬 6: float[] pos = new float[n * 2]; 7: float accumulatedX = 0; 8: for (int i = 0; i < n; i++) { 9: pos[i * 2 + 0] = accumulatedX;10: pos[i * 2 + 1] = y;11: accumulatedX += widths[i];12: }13: return pos;14: }
onDraw()方法中:
畫 
1: p.setColor(0x80FF0000);2: canvas.drawLine(x, y, x, y + DY * 3, p);//(x,y)為基准線3: p.setColor(Color.BLACK);4: 5: canvas.translate(0, DY);6: p.setTextAlign(Paint.Align.LEFT);7: canvas.drawText(TEXT_L, x, y, p);//以(x,y)點Paint.Align.LEFT,畫畫 
1: p.setColor(0xBB00FF00);2: for (int i = 0; i < pos.length / 2; i++) {3: canvas.drawLine(pos[i * 2 + 0], pos[i * 2 + 1] - DY, pos[i * 2 + 0],4: pos[i * 2 + 1] + DY * 2, p);5: }6: p.setColor(Color.BLACK);7: 8: p.setTextAlign(Paint.Align.LEFT);9: canvas.drawPosText(POSTEXT, pos, p);
畫
1: canvas.drawPath(mPath, mPathPaint); 2: p.setTextAlign(Paint.Align.LEFT); 3: canvas.drawTextOnPath(TEXTONPATH, mPath, 0, 0, p); 4: 5: canvas.translate(0, DY * 1.5f); 6: canvas.drawPath(mPath, mPathPaint); 7: p.setTextAlign(Paint.Align.CENTER); 8: canvas.drawTextOnPath(TEXTONPATH, mPath, 0, 0, p); 9: 10: canvas.translate(0, DY * 1.5f);11: canvas.drawPath(mPath, mPathPaint);12: p.setTextAlign(Paint.Align.RIGHT);13: canvas.drawTextOnPath(TEXTONPATH, mPath, 0, 0, p);
24.Typefaces:

獲得assets/fonts下的字體
1: mFace = Typeface.createFromAsset(getContext().getAssets(),2: "fonts/samplefont.ttf");onDraw()方法
1: @Override2: protected void onDraw(Canvas canvas) {3: canvas.drawColor(Color.WHITE);4: 5: mPaint.setTypeface(null);6: canvas.drawText("Default", 10, 100, mPaint);7: mPaint.setTypeface(mFace);8: canvas.drawText("Custom", 10, 200, mPaint);9: }
25.UnicodeChart:(沒看)

26.Vertices:(沒看) 觸摸一下,圖片走形

27.Xfermodes:

圓形畫法:
1: static Bitmap makeDst(int w, int h) {2: Bitmap bm = Bitmap.createBitmap(w, h, Bitmap.Config.ARGB_8888);3: Canvas c = new Canvas(bm);4: Paint p = new Paint(Paint.ANTI_ALIAS_FLAG);5: p.setColor(0xFFFFCC44);6: c.drawOval(new RectF(0, 0, w * 3 / 4, h * 3 / 4), p);7: return bm;8: }正方形的畫法:
1: static Bitmap makeSrc(int w, int h) {2: Bitmap bm = Bitmap.createBitmap(w, h, Bitmap.Config.ARGB_8888);3: Canvas c = new Canvas(bm);4: Paint p = new Paint(Paint.ANTI_ALIAS_FLAG);5: 6: p.setColor(0xFF66AAFF);7: c.drawRect(w / 3, h / 3, w * 19 / 20, h * 19 / 20, p);8: return bm;9: }背景馬塞克畫法:
1: Bitmap bm = Bitmap.createBitmap(new int[] { 0xFFFFFFFF, 0xFFCCCCCC,2: 0xFFCCCCCC, 0xFFFFFFFF }, 2, 2, Bitmap.Config.RGB_565);3: mBG = new BitmapShader(bm, Shader.TileMode.REPEAT, Shader.TileMode.REPEAT);4: Matrix m = new Matrix();5: m.setScale(6, 6);// 放大6倍6: mBG.setLocalMatrix(m);Xfermode數組:
1: private static final Xfermode[] sModes = { 2: new PorterDuffXfermode(PorterDuff.Mode.CLEAR), 3: new PorterDuffXfermode(PorterDuff.Mode.SRC), 4: new PorterDuffXfermode(PorterDuff.Mode.DST), 5: new PorterDuffXfermode(PorterDuff.Mode.SRC_OVER), 6: new PorterDuffXfermode(PorterDuff.Mode.DST_OVER), 7: new PorterDuffXfermode(PorterDuff.Mode.SRC_IN), 8: new PorterDuffXfermode(PorterDuff.Mode.DST_IN), 9: new PorterDuffXfermode(PorterDuff.Mode.SRC_OUT),10: new PorterDuffXfermode(PorterDuff.Mode.DST_OUT),11: new PorterDuffXfermode(PorterDuff.Mode.SRC_ATOP),12: new PorterDuffXfermode(PorterDuff.Mode.DST_ATOP),13: new PorterDuffXfermode(PorterDuff.Mode.XOR),14: new PorterDuffXfermode(PorterDuff.Mode.DARKEN),15: new PorterDuffXfermode(PorterDuff.Mode.LIGHTEN),16: new PorterDuffXfermode(PorterDuff.Mode.MULTIPLY),17: new PorterDuffXfermode(PorterDuff.Mode.SCREEN) };onDraw()方法:
1: @Override 2: protected void onDraw(Canvas canvas) { 3: canvas.drawColor(Color.WHITE); 4: 5: Paint labelP = new Paint(Paint.ANTI_ALIAS_FLAG); 6: labelP.setTextAlign(Paint.Align.CENTER); 7: 8: Paint paint = new Paint(); 9: paint.setFilterBitmap(false);10: 11: canvas.translate(15, 35);12: 13: int x = 0;14: int y = 0;15: for (int i = 0; i < sModes.length; i++) {16: // draw the border17: paint.setStyle(Paint.Style.STROKE);18: paint.setShader(null);// Pass null to clear any previous shader19: canvas.drawRect(x - 0.5f, y - 0.5f, x + W + 0.5f, y + H + 0.5f, paint);20: 21: // draw the checker-board pattern22: paint.setStyle(Paint.Style.FILL);23: paint.setShader(mBG);24: canvas.drawRect(x, y, x + W, y + H, paint);25: 26: // draw the src/dst example into our offscreen bitmap27: int sc = canvas.saveLayer(x, y, x + W, y + H, null,28: Canvas.MATRIX_SAVE_FLAG | Canvas.CLIP_SAVE_FLAG29: | Canvas.HAS_ALPHA_LAYER_SAVE_FLAG30: | Canvas.FULL_COLOR_LAYER_SAVE_FLAG31: | Canvas.CLIP_TO_LAYER_SAVE_FLAG);32: // canvas.save();33: canvas.translate(x, y);34: canvas.drawBitmap(mDstB, 0, 0, paint);35: paint.setXfermode(sModes[i]);36: canvas.drawBitmap(mSrcB, 0, 0, paint);37: paint.setXfermode(null);// Pass null to clear any previous xfermode38: canvas.restoreToCount(sc);39: // canvas.restore();40: 41: // draw the label42: canvas.drawText(sLabels[i], x + W / 2, y - labelP.getTextSize() / 2,43: labelP);44: 45: x += W + 10;46: 47: // wrap around when we've drawn enough for one row48: if ((i % ROW_MAX) == ROW_MAX - 1) {49: x = 0;50: y += H + 30;51: }52: }53: }注意:上面代碼一定要有這兩句,改成// canvas.save();都不成,會出現 
1: int sc = canvas.saveLayer(x, y, x + W, y + H, null,2: Canvas.MATRIX_SAVE_FLAG | Canvas.CLIP_SAVE_FLAG3: | Canvas.HAS_ALPHA_LAYER_SAVE_FLAG4: | Canvas.FULL_COLOR_LAYER_SAVE_FLAG5: | Canvas.CLIP_TO_LAYER_SAVE_FLAG);6: // canvas.save();1: canvas.restoreToCount(sc);2: // canvas.restore();
三.package com.example.android.apis.vIEw;
1.views/Animation/Shake,點Login按鈕後EditVIEw會有抖動
代碼如下:
1: public class Animation1 extends Activity implements View.OnClickListener {//設置單擊監聽,當然也可以直接在setOnClickListener裡new 2: 3: @Override 4: public void onCreate(Bundle savedInstanceState) { 5: super.onCreate(savedInstanceState); 6: setContentView(R.layout.animation_1); 7: 8: View loginButton = findViewById(R.id.login); 9: loginButton.setOnClickListener(this);10: }11: 12: public void onClick(View v) {//當loginButton被點擊時運行13: Animation shake = AnimationUtils.loadAnimation(this, R.anim.shake);//Loads an Animation object from a resource14: findViewById(R.id.pw).startAnimation(shake);//Start the specifIEd animation now.15: }16: }動畫文件在res/anim下
shake.XML為
1: <?xml version="1.0" encoding="utf-8"?>2: <translate XMLns:android="http://schemas.android.com/apk/res/android" android:fromXDelta="0" android:toXDelta="10" android:duration="1000" android:interpolator="@anim/cycle_7" />此為translate 類型動畫,從“0”移動到“10”,
注意:android:interpolator="@anim/cycle_7"這句為“插入器(竄改者)”
cycle_7.XML如下:
1: <?xml version="1.0" encoding="utf-8"?>2: <cycleInterpolator XMLns:android="http://schemas.android.com/apk/res/android" android:cycles="7" /> cycle為循環,表示shake的動畫在1秒內被循環7次
2.Animation2:最上面是一個ViewFlipper用於4個TextVIEw順序翻轉,最下面是一個Spinner,用於選擇翻轉方式(4種)

先學習下布局:(1個ViewFlipper 下面有4個TextVIEw)
1: <LinearLayout XMLns:android="http://schemas.android.com/apk/res/android" 2: android:orientation="vertical" 3: android:padding="10dip" 4: android:layout_width="fill_parent" 5: android:layout_height="wrap_content"> 6: 7: <ViewFlipper android:id="@+id/flipper" 8: android:layout_width="fill_parent" 9: android:layout_height="wrap_content"10: android:flipInterval="2000"11: android:layout_marginBottom="20dip" >12: <TextView13: android:layout_width="fill_parent"14: android:layout_height="wrap_content"15: android:gravity="center_horizontal"16: android:textSize="26sp"17: android:text="@string/animation_2_text_1"/>18: <TextView19: android:layout_width="fill_parent"20: android:layout_height="wrap_content"21: android:gravity="center_horizontal"22: android:textSize="26sp"23: android:text="@string/animation_2_text_2"/>24: <TextView25: android:layout_width="fill_parent"26: android:layout_height="wrap_content"27: android:gravity="center_horizontal"28: android:textSize="26sp"29: android:text="@string/animation_2_text_3"/>30: <TextView31: android:layout_width="fill_parent"32: android:layout_height="wrap_content"33: android:gravity="center_horizontal"34: android:textSize="26sp"35: android:text="@string/animation_2_text_4"/>36: </ViewFlipper>37: 38: <TextVIEw39: android:layout_width="fill_parent"40: android:layout_height="wrap_content"41: android:layout_marginBottom="5dip"42: android:text="@string/animation_2_instructions"43: />44: 45: <Spinner android:id="@+id/spinner"46: android:layout_width="fill_parent"47: android:layout_height="wrap_content"48: />Spinner被選擇時,setInAnimation,setOutAnimation為Viewanimator的方法用於設置TextVIEw的入場,出場動畫
1: public void onItemSelected(AdapterView parent, VIEw v, int position, long id) { 2: switch (position) { 3: 4: case 0: 5: mFlipper.setInAnimation(AnimationUtils.loadAnimation(this, 6: R.anim.push_up_in)); 7: mFlipper.setOutAnimation(AnimationUtils.loadAnimation(this, 8: R.anim.push_up_out)); 9: break;10: case 1:11: mFlipper.setInAnimation(AnimationUtils.loadAnimation(this,12: R.anim.push_left_in));13: mFlipper.setOutAnimation(AnimationUtils.loadAnimation(this,14: R.anim.push_left_out));15: break;16: case 2:17: mFlipper.setInAnimation(AnimationUtils.loadAnimation(this,18: android.R.anim.fade_in));19: mFlipper.setOutAnimation(AnimationUtils.loadAnimation(this,20: android.R.anim.fade_out));21: break;22: default:23: mFlipper.setInAnimation(AnimationUtils.loadAnimation(this,24: R.anim.hyperspace_in));25: mFlipper.setOutAnimation(AnimationUtils.loadAnimation(this,26: R.anim.hyperspace_out));27: break;28: }29: }res/anim/push_up_in.XML
1: <?xml version="1.0" encoding="utf-8"?>2: <set xmlns:android="http://schemas.android.com/apk/res/android">3: <translate android:fromYDelta="100%p" android:toYDelta="0" android:duration="300"/>4: <alpha android:fromAlpha="0.0" android:toAlpha="1.0" android:duration="300" />5: </set>6: res/anim/push_up_out.XML
1: <?xml version="1.0" encoding="utf-8"?>2: <set xmlns:android="http://schemas.android.com/apk/res/android">3: <translate android:fromYDelta="0" android:toYDelta="-100%p" android:duration="300"/>4: <alpha android:fromAlpha="1.0" android:toAlpha="0.0" android:duration="300" />5: </set>6: res/anim/push_left_in.XML
1: <?xml version="1.0" encoding="utf-8"?>2: <set xmlns:android="http://schemas.android.com/apk/res/android">3: <translate android:fromXDelta="100%p" android:toXDelta="0" android:duration="300"/>4: <alpha android:fromAlpha="0.0" android:toAlpha="1.0" android:duration="300" />5: </set>6: res/anim/ hyperspace_in.XML
1: <?xml version="1.0" encoding="utf-8"?>2: <alpha xmlns:android="http://schemas.android.com/apk/res/android"3: android:fromAlpha="0.0" android:toAlpha="1.0" android:duration="300"4: android:startOffset="1200" />5: res/anim/ hyperspace_out.XML
1: <?xml version="1.0" encoding="utf-8"?> 2: 3: <set XMLns:android="http://schemas.android.com/apk/res/android" 4: android:shareInterpolator="false"> 5: 6: <scale android:interpolator="@android:anim/accelerate_decelerate_interpolator" 7: android:fromXScale="1.0" android:toXScale="1.4" android:fromYScale="1.0" 8: android:toYScale="0.6" android:pivotX="50%" android:pivotY="50%" 9: android:fillAfter="false" android:duration="700" />10: 11: 12: <set android:interpolator="@android:anim/accelerate_interpolator"13: android:startOffset="700">14: 15: <scale android:fromXScale="1.4" android:toXScale="0.0"16: android:fromYScale="0.6" android:toYScale="0.0" android:pivotX="50%"17: android:pivotY="50%" android:duration="400" />18: 19: <rotate android:fromDegrees="0" android:toDegrees="-45"20: android:toYScale="0.0" android:pivotX="50%" android:pivotY="50%"21: android:duration="400" />22: </set>23: 24: </set>以上幾個動畫可以直接用在ImageVIEw上
3.Animation3:
主要是Interpolator的用法。public void setInterpolator (Interpolator i)Sets the acceleration curve for this animation. Defaults to a linear interpolation(設置動畫的加速度效果)

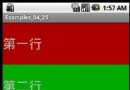
首先在第一個TextVIEw中加入動畫效果:![]()
1: final View target = findViewById(R.id.target);//TextView 2: final View targetParent = (View) target.getParent();//TextView的父vIEw 3: 4: Animation a = new TranslateAnimation(0.0f, targetParent.getWidth()//設置位移動畫 5: - target.getWidth() - targetParent.getPaddingLeft() 6: - targetParent.getPaddingRight(), 0.0f, 0.0f); 7: a.setDuration(1000);//持續1秒 8: a.setStartOffset(300); 9: a.setRepeatMode(Animation.RESTART);//重復10: a.setRepeatCount(Animation.INFINITE);//無限次android自帶的7種Interpolator 效果
1: switch (position) { 2: case 0: 3: a.setInterpolator(AnimationUtils.loadInterpolator(this, 4: android.R.anim.accelerate_interpolator)); 5: break; 6: case 1: 7: a.setInterpolator(AnimationUtils.loadInterpolator(this, 8: android.R.anim.decelerate_interpolator)); 9: break;10: case 2:11: a.setInterpolator(AnimationUtils.loadInterpolator(this,12: android.R.anim.accelerate_decelerate_interpolator));13: break;14: case 3:15: a.setInterpolator(AnimationUtils.loadInterpolator(this,16: android.R.anim.anticipate_interpolator));17: break;18: case 4:19: a.setInterpolator(AnimationUtils.loadInterpolator(this,20: android.R.anim.overshoot_interpolator));21: break;22: case 5:23: a.setInterpolator(AnimationUtils.loadInterpolator(this,24: android.R.anim.anticipate_overshoot_interpolator));25: break;26: case 6:27: a.setInterpolator(AnimationUtils.loadInterpolator(this,28: android.R.anim.bounce_interpolator));29: break;30: }31: 32: target.startAnimation(a);
4. Transition3d:package com.example.android.apis.animation;(沒看全)
圖片切換3D效果的動畫

layout為一個FrameLayout裡放入一個ListView和一個ImageView ,動畫是這兩個VIEw的切換效果
5.AutoComplete1
自動完成TextVIEw,主要實現自動提示國家的英文

![]()
這塊的layout布局
1: <LinearLayout 2: android:orientation="horizontal" 3: android:layout_width="fill_parent" 4: android:layout_height="wrap_content"> 5: 6: <TextView 7: android:layout_width="wrap_content" 8: android:layout_height="wrap_content" 9: android:text="@string/autocomplete_1_country" />10: 11: <AutoCompleteTextVIEw android:id="@+id/edit"12: android:layout_width="fill_parent"13: android:layout_height="wrap_content"/>14: 15: </LinearLayout>在AutoCompeteTextVIEw裡設置個Adapter
1: ArrayAdapter<String> adapter = new ArrayAdapter<String>(this,2: android.R.layout.simple_dropdown_item_1line, COUNTRIES);3: AutoCompleteTextView textView = (AutoCompleteTextView) findViewById(R.id.edit);4: textView.setAdapter(adapter);第二行的COUNTRIES為一個數組:
1: static final String[] COUNTRIES = new String[] { "Afghanistan", "Albania", 2: "Algeria", "American Samoa", "Andorra", "Angola", "Anguilla", 3: "Antarctica", "Antigua and Barbuda", "Argentina", "Armenia", "Aruba", 4: "Australia", "Austria", "Azerbaijan", "Bahrain", "Bangladesh", 5: "BarbaDOS", "Belarus", "Belgium", "Belize", "Benin", "Bermuda", "Bhutan", 6: "Bolivia", "Bosnia and Herzegovina", "Botswana", "Bouvet Island", 7: "Brazil", "British Indian Ocean Territory", "British Virgin Islands", 8: "Brunei", "Bulgaria", "Burkina Faso", "Burundi", "Cote d'Ivoire", 9: "Cambodia", "Cameroon", "Canada", "Cape Verde", "Cayman Islands",10: "Central African Republic", "Chad", "Chile", "China", "Christmas Island",11: "Cocos (Keeling) Islands", "Colombia", "Comoros", "Congo",12: "Cook Islands", "Costa Rica", "Croatia", "Cuba", "Cyprus",13: "Czech Republic", "Democratic Republic of the Congo", "Denmark",14: "Djibouti", "Dominica", "Dominican Republic", "East Timor", "Ecuador",15: "Egypt", "El Salvador", "Equatorial Guinea", "Eritrea", "Estonia",16: "Ethiopia", "Faeroe Islands", "Falkland Islands", "Fiji", "Finland",17: "Former Yugoslav Republic of Macedonia", "France", "French Guiana",18: "French Polynesia", "French Southern Territories", "Gabon", "Georgia",19: "Germany", "Ghana", "Gibraltar", "Greece", "Greenland", "Grenada",20: "Guadeloupe", "Guam", "Guatemala", "Guinea", "Guinea-Bissau", "Guyana",21: "Haiti", "Heard Island and McDonald Islands", "Honduras", "Hong Kong",22: "Hungary", "Iceland", "India", "Indonesia", "Iran", "Iraq", "Ireland",23: "Israel", "Italy", "Jamaica", "Japan", "Jordan", "Kazakhstan", "Kenya",24: "Kiribati", "Kuwait", "Kyrgyzstan", "Laos", "Latvia", "Lebanon",25: "Lesotho", "Liberia", "Libya", "Liechtenstein", "Lithuania",26: "Luxembourg", "Macau", "Madagascar", "Malawi", "Malaysia", "Maldives",27: "Mali", "Malta", "Marshall Islands", "Martinique", "Mauritania",28: "Mauritius", "Mayotte", "Mexico", "Micronesia", "Moldova", "Monaco",29: "Mongolia", "Montserrat", "Morocco", "Mozambique", "Myanmar", "Namibia",30: "Nauru", "Nepal", "Netherlands", "Netherlands Antilles", "New Caledonia",31: "New Zealand", "Nicaragua", "Niger", "Nigeria", "Niue", "Norfolk Island",32: "North Korea", "Northern Marianas", "Norway", "Oman", "Pakistan",33: "Palau", "Panama", "Papua New Guinea", "Paraguay", "Peru", "Philippines",34: "Pitcairn Islands", "Poland", "Portugal", "Puerto Rico", "Qatar",35: "Reunion", "Romania", "Russia", "Rwanda", "Sqo Tome and Principe",36: "Saint Helena", "Saint Kitts and Nevis", "Saint Lucia",37: "Saint Pierre and Miquelon", "Saint Vincent and the Grenadines", "Samoa",38: "San Marino", "Saudi Arabia", "Senegal", "Seychelles", "Sierra Leone",39: "Singapore", "Slovakia", "Slovenia", "Solomon Islands", "Somalia",40: "South Africa", "South Georgia and the South Sandwich Islands",41: "South Korea", "Spain", "Sri Lanka", "Sudan", "Suriname",42: "Svalbard and Jan Mayen", "Swaziland", "Sweden", "Switzerland", "Syria",43: "Taiwan", "Tajikistan", "Tanzania", "Thailand", "The Bahamas",44: "The Gambia", "Togo", "Tokelau", "Tonga", "Trinidad and Tobago",45: "Tunisia", "Turkey", "Turkmenistan", "Turks and Caicos Islands",46: "Tuvalu", "Virgin Islands", "Uganda", "Ukraine", "United Arab Emirates",47: "United Kingdom", "United States",48: "United States Minor Outlying Islands", "Uruguay", "Uzbekistan",49: "Vanuatu", "Vatican City", "Venezuela", "VIEtnam", "Wallis and Futuna",50: "Western Sahara", "Yemen", "Yugoslavia", "Zambia", "Zimbabwe" };
6.AutoComplete2

和AutoComplete1只是布局不一樣,注意第5行的android:gravity=”bottom”
1: <LinearLayout XMLns:android="http://schemas.android.com/apk/res/android" 2: android:orIEntation="vertical" 3: android:layout_width="fill_parent" 4: android:layout_height="fill_parent" 5: android:gravity="bottom"> 6: 7: <Button 8: android:layout_width="wrap_content" 9: android:layout_height="wrap_content"10: android:text="@string/autocomplete_2_focus" />11: 12: <LinearLayout
7.AutoComplete6(沒看出和上面的有什麼不同的功能)

布局要注意:為MutiAutoCompleteTextVIEw
1: <TextView2: android:layout_width="wrap_content"3: android:layout_height="wrap_content"4: android:text="@string/autocomplete_7_country" />5: 6: <MultiAutoCompleteTextVIEw android:id="@+id/edit"7: android:layout_width="fill_parent"8: android:layout_height="wrap_content"/>設置Adapter
1: ArrayAdapter<String> adapter = new ArrayAdapter<String>(this,2: android.R.layout.simple_dropdown_item_1line, COUNTRIES);3: MultiAutoCompleteTextView textView = (MultiAutoCompleteTextView) findViewById(R.id.edit);4: textView.setAdapter(adapter);5: textView.setTokenizer(new MultiAutoCompleteTextVIEw.CommaTokenizer());
8.Baseline1:

直接加載的layout布局:
1: <TextVIEw 2: android:layout_width="wrap_content" 3: android:layout_height="wrap_content" 4: android:layout_marginRight="30dip" 5: android:text="@string/baseline_1_label" /> 6: 7: <Button 8: android:layout_width="wrap_content" 9: android:layout_height="wrap_content"10: android:layout_marginRight="30dip"11: android:text="@string/baseline_1_button" />第4行和第10行的
android:layout_marginRight="30dip"
為此TextVIEw右邊有30像素的空白
9.Baseline3

布局:
注意:第11行的android:layout_gravity="center_vertical"表示在父VIEw的中心
1: <LinearLayout 2: android:orientation="horizontal" 3: android:layout_width="fill_parent" 4: android:layout_weight="1.0" 5: android:layout_height="0dip"> 6: 7: <TextView 8: android:layout_width="wrap_content" 9: android:layout_height="wrap_content"10: android:layout_marginRight="3dip"11: android:layout_gravity="center_vertical"12: android:text="@string/baseline_3_label" />13: 14: <Button15: android:layout_width="wrap_content"16: android:layout_height="wrap_content"17: android:layout_marginRight="3dip"18: android:layout_gravity="center_vertical"19: android:text="@string/baseline_3_button" />20: 21: <TextVIEw22: android:layout_width="wrap_content"23: android:layout_height="wrap_content"24: android:layout_gravity="center_vertical"25: android:textSize="20sp"26: android:text="@string/baseline_3_bigger" />27: 28: </LinearLayout>
10.Baseline4

此布局就是父View的Layout為android:orientation="horizontal"水平布局,然後子vIEw再應用android:layout_gravity="center_vertical"和android:gravity="bottom"
11.Baseline6(沒明白效果)

布局:
1: <RelativeLayout XMLns:android="http://schemas.android.com/apk/res/android" 2: android:layout_width="fill_parent" 3: android:layout_height="fill_parent"> 4: 5: <EditText android:id="@+id/anchor" 6: android:layout_width="fill_parent" 7: android:layout_height="fill_parent" 8: android:textSize="20sp" 9: android:text="@string/baseline_6_multi_line" />10: 11: <TextVIEw12: android:layout_width="wrap_content"13: android:layout_height="wrap_content"14: android:layout_alignBaseline="@id/anchor"15: android:layout_alignRight="@id/anchor"16: android:text="@string/baseline_6_baseline" />17: 18: </RelativeLayout>
12.Baseline7

布局:
注意:TextVIEw android:id="@+id/anchor"的android:layout_alignParentTop="true"和android:layout_alignParentLeft="true"設置它為父VIEW的左上角
第16行android:layout_alignBaseline="@id/anchor",設置此VIEw在anchor的一條線上
1: <RelativeLayout XMLns:android="http://schemas.android.com/apk/res/android" 2: android:layout_width="fill_parent" 3: android:layout_height="fill_parent"> 4: 5: <TextView android:id="@+id/anchor" 6: android:layout_width="wrap_content" 7: android:layout_height="wrap_content" 8: android:layout_alignParentTop="true" 9: android:layout_alignParentLeft="true"10: android:textStyle="bold"11: android:text="@string/baseline_7_fat" />12: 13: <TextVIEw14: android:layout_width="wrap_content"15: android:layout_alignParentRight="true"16: android:layout_alignBaseline="@id/anchor"17: android:layout_height="wrap_content"18: android:text="@string/baseline_7_lean" />19: 20: </RelativeLayout>
13.Buttons1:

主要是布局:
第二個按鈕為小按鈕,第14行style="?android:attr/buttonStyleSmall"
第三個按鈕為開關按鈕,ToggleButton
1: <LinearLayout 2: android:layout_width="wrap_content" 3: android:layout_height="wrap_content" 4: android:orIEntation="vertical"> 5: 6: <!-- Regular sized buttons --> 7: <Button android:id="@+id/button_normal" 8: android:text="@string/buttons_1_normal" 9: android:layout_width="wrap_content"10: android:layout_height="wrap_content" />11: 12: <!-- Small buttons -->13: <Button android:id="@+id/button_small"14: style="?android:attr/buttonStyleSmall"15: android:text="@string/buttons_1_small"16: android:layout_width="wrap_content"17: android:layout_height="wrap_content" />18: 19: <ToggleButton android:id="@+id/button_toggle"20: android:text="@string/buttons_1_toggle"21: android:layout_width="wrap_content"22: android:layout_height="wrap_content" />23: 24: </LinearLayout>
14.ChronometerDemo 計時器

布局:
1: <Chronometer android:id="@+id/chronometer" 2: android:format="@string/chronometer_initial_format" 3: android:layout_width="wrap_content" android:layout_height="wrap_content" 4: android:layout_weight="0" android:paddingBottom="30dip" 5: android:paddingTop="30dip" /> 6: 7: <Button android:id="@+id/start" android:layout_width="wrap_content" 8: android:layout_height="wrap_content" android:text="@string/chronometer_start"> 9: <requestFocus />10: </Button>對Chronometer控件的操作:
設置監聽:
1: button = (Button) findViewById(R.id.start); 2: button.setOnClickListener(mStartListener); 3: 4: button = (Button) findViewById(R.id.stop); 5: button.setOnClickListener(mStopListener); 6: 7: button = (Button) findViewById(R.id.reset); 8: button.setOnClickListener(mResetListener); 9: 10: button = (Button) findViewById(R.id.set_format);11: button.setOnClickListener(mSetFormatListener);12: 13: button = (Button) findVIEwById(R.id.clear_format);14: button.setOnClickListener(mClearFormatListener);監聽事件:
1: View.OnClickListener mStartListener = new OnClickListener() { 2: public void onClick(View v) { 3: mChronometer.start(); 4: } 5: }; 6: 7: View.OnClickListener mStopListener = new OnClickListener() { 8: public void onClick(View v) { 9: mChronometer.stop();10: }11: };12: 13: View.OnClickListener mResetListener = new OnClickListener() {14: public void onClick(View v) {15: mChronometer.setBase(SystemClock.elapsedRealtime());16: }17: };18: 19: View.OnClickListener mSetFormatListener = new OnClickListener() {20: public void onClick(View v) {21: mChronometer.setFormat("Formatted time (%s)");22: }23: };24: 25: View.OnClickListener mClearFormatListener = new OnClickListener() {26: public void onClick(VIEw v) {27: mChronometer.setFormat(null);28: }29: };
15.Controls1:

![]()
此圖的布局:
1: <CheckBox android:id="@+id/star"2: style="?android:attr/starStyle"3: android:layout_width="wrap_content"4: android:layout_height="wrap_content"5: android:text="@string/controls_1_star" />注意這幾個布局: 
1: <TextView 2: android:layout_width="fill_parent" 3: android:layout_height="wrap_content" 4: android:layout_marginTop="5dip" 5: android:text="@string/textColorPrimary" 6: android:textAppearance="?android:attr/textAppearanceLarge" 7: android:focusable="true" 8: /> 9: 10: <TextView11: android:layout_width="fill_parent"12: android:layout_height="wrap_content"13: android:layout_marginTop="5dip"14: android:text="@string/textColorSecondary"15: android:textAppearance="?android:attr/textAppearanceLarge"16: android:textColor="?android:attr/textColorSecondary"17: android:focusable="true"18: />19: 20: <TextView21: android:layout_width="fill_parent"22: android:layout_height="wrap_content"23: android:layout_marginTop="5dip"24: android:text="@string/textColorTertiary"25: android:textAppearance="?android:attr/textAppearanceLarge"26: android:textColor="?android:attr/textColorTertiary"27: android:focusable="true"28: />29: 30: <TextView31: style="?android:attr/listSeparatorTextViewStyle"32: android:text="@string/listSeparatorTextVIEwStyle"33: android:layout_marginTop="5dip"34: />
 Android AIDL全攻略一
Android的服務開發中我們可能都是Activity和Service同進程處理,但想象過系統提供的各種ServiceManager嗎? 比如 SensorManage
 增加android模擬器的內存大小
以Windows平台的SDK為例,這裡Android開發網的模擬器配置路徑為 C:\Users\Administrator\.android\avd\2.3.3.avd
 Android系列之淺談AndroidGallery控件使用方法詳解
android Gallery控件的主要功能就是實現圖片的浏覽,下面通過代碼來解釋:android Gallery控件:即圖片浏覽控件< Gallery andr
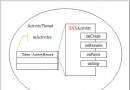 activity manager與activity關系、狀態信息及activity啟動、resume過程
外特性空間的Activity 我們先來看看,Android應用開發人員接觸的外特性空間中的Activity,對於AMS (activ