編輯:初級開發
1.下載android sdk
下載地址如下:
http://dl.google.com/android/android-sdk-Windows-1.5_r2.zip
http://dl.google.com/android/android-sdk-Linux_x86-1.5_r2.zip
2.下載eclipse 3.4.2
按官方文檔說,android sdk 可以運行在eclipse 3.3以上的IDE中,ubuntu源中的eclipse版本過低,建議使用eclipse 3.4.2,其下載地址為:
http://download.actuatechina.com/eclipse/eclipse/downloads/drops/R-3.4.2-200902111700/eclipse-SDK-3.4.2-Linux-gtk.tar.gz
3.安裝eclipse 3.4.2
先將eclipse解壓:
$tar xzvf eclipse-SDK-3.4.2-Linux-gtk.tar.gz
將解壓出的eclipse文件夾移動到目標目錄中去,在這裡我設定的安裝目標為:/usr/local下。
$sudo mv eclipse /usr/local/
4.安裝android sdk
解壓android sdk包:
$unzip android-sdk-Linux_x86-1.5_r2.zip
移動到目標目錄:<在這裡我將解壓出的sdk文件夾目錄改成了android-sdk>
$mv android-sdk-Linux_x86-1.5_r2 android-sdk
$sudo mv android-sdk /usr/local/
5.配置環境變量:
修改~/.bashrc文件,加入android sdk與eclipse的環境變量。
$vi ~/.bashrc
在文件的最後加入
export PATH=/usr/local/android-sdk/tools:/usr/local/eclipse:$PATH
保存並退出vi
使配置信息生效
$source ~/.bashrc
6.android avd配置信息的生成
android avd的創建格式為:android create avd -n your-avd-name -t your-targets
其中:-n的參數為我們要創建的avd的名字;-t的參數為Available Android targets的id,我們可以使用命令:android list查尋其具體信息。
$android list
Available android targets:
id: 1
Name: android 1.1
Type: Platform
API level: 2
Skins: HVGA-P, HVGA (default), QVGA-P, HVGA-L, QVGA-L
id: 2
Name: android 1.5
Type: Platform
API level: 3
Skins: HVGA-P, HVGA (default), QVGA-P, HVGA-L, QVGA-L
id: 3
Name: Google APIs
Type: Add-On
Vendor: Google Inc.
Description: android + Google APIs
Based on android 1.5 (API level 3)
LibrarIEs:
* com.google.android.maps (maps.jar)
API for Google Maps
Skins: QVGA-P, HVGA-L, HVGA (default), QVGA-L, HVGA-P
Available android Virtual Devices:
下面我們就以創建一個android 1.5的avd為例:
$android create avd -n android-sdk-15 -t 2
Android 1.5 is a basic android platform.
Do you wish to create a custom hardware profile [no]yes
Device ram size: The amount of physical RAM on the device, in megabytes.
hw.ramSize [96]:128
Touch-screen support: Whether there is a touch screen or not on the device.
hw.touchScreen [yes]:yes
Track-ball support: Whether there is a trackball on the device.
hw.trackBall [yes]:yes
Keyboard support: Whether the device has a QWERTY keyboard.
hw.keyboard [yes]:yes
DPad support: Whether the device has DPad keys
hw.dPad [yes]:yes
GSM modem support: Whether there is a GSM modem in the device.
hw.gsmModem [yes]:yes
Camera support: Whether the device has a camera.
hw.camera [no]:
Camera support: Whether the device has a camera.
hw.camera [no]:yes
Maximum horizontal camera pixels
hw.camera.maxHorizontalPixels [640]:854
Maximum vertical camera pixels
hw.camera.maxVerticalPixels [480]:480
GPS support: Whether there is a GPS in the device.
hw.gps [yes]:yes
Battery support: Whether the device can run on a battery.
hw.battery [yes]:yes
Accelerometer: Whether there is an accelerometer in the device.
hw.accelerometer [yes]:yes
Audio recording support: Whether the device can record audio
hw.audioInput [yes]:yes
Audio playback support: Whether the device can play audio
hw.audioOutput [yes]:yes
SD Card support: Whether the device supports insertion/removal of virtual SD Cards.
hw.sdCard [yes]:yes
Cache partition support: Whether we use a /cache partition on the device.
disk.cachePartition [yes]:yes
Cache partition size
disk.cachePartition.size [66MB]:100MB
Created AVD ''android-sdk-15'' based on android 1.5
這樣我們就創建了一個基於1.5的avd,上面的具體意思我想大家都能看懂,就不多說了。下在我們就可以測試一下android emulator了:
$emulator @android-sdk-15 -show-kernel
這樣就可以啟動android emulator了:
加入參數-show-kernel是為了在終端上打印android kernel的信息。
注:
如果你要把他放進usr/local/目錄中的話,那就要注意權限的問題.
因為初使androidSDK的?候是需要更sdk 的,這?你的權限並不是 root所以無法用androidSDK自?的更新器.
所以,最好androidSDK不要放到usr/local裡面去 .
*如果用sudo去執行 android update sdk命令,應該就不會出現 權限問題了吧,(沒有實驗過)
 終於在XP host的VirtualBox Ubuntu系統下掛載成功Host下的文件夾
准備在虛擬機下的Ubuntu系統編譯Android源代碼,但是發現在線下載源代碼老是出現問題,幸好在Windows下已經下載成功了android源代碼,於是就想在Ubu
 Google發布Android版Google Reader程序
在經過長時間的等待之後我們在今天終於看見了看見了全新的Google Reader軟件,當然更為難能可貴的是這款軟件竟然是Google官方推出的,目前廣大的用戶已經可以在
 Android開發教程之高煥堂-上課講義(7)
三、範例程式:Activity與Service間之溝通先執行ac01:這個ac01立即啟動myService,定時連續傳來數字,如下:數字連續增加下去。其程式碼為:/*
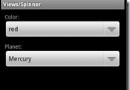 Android ApiDemo ——Graphics和View (5)
70.Spinner1 注意:源碼第7行ArrayAdapter用R.array.colors數組來設置 1: @Overr