編輯:Android技術基礎
BitmapShader(Bitmap bitmap, Shader.TileMode tileX, Shader.TileMode tileY)
使用一張位圖作為紋理來對某一區域進行填充,參數依次:
- bitmap:用來作為填充的位圖;
- tileX:X軸方向上位圖的銜接形式;
- tileY:Y軸方向上位圖的銜接形式;
而這個Shader.TileMode有三種:
- CLAMP就是如果渲染器超出原始邊界范圍,則會復制邊緣顏色對超出范圍的區域進行著色
- REPEAT則是平鋪形式重復渲染
- MIRROR則是在橫向和縱向上以鏡像的方式重復渲染位圖。
ComposeShader(Shader shaderA, Shader shaderB, PorterDuff.Mode mode)
渲染效果的疊加,看到PorterDuff就知道什麼了吧?比如將BitmapShader與LinearGradient的混合渲染 效果等。參數依次:
- shaderA:第一種渲染效果
- shaderB:第二種渲染效果
- mode:兩種渲染效果的疊加模式
LinearGradient(float x0, float y0, float x1, float y1, int[] colors, float[] positions, Shader.TileMode tile);
實現某一區域內顏色的線性漸變效果,參數依次是:
- x0:漸變的起始點x坐標
- y0:漸變的起始點y坐標
- x1:漸變的終點x坐標
- y1:漸變的終點y坐標
- colors:漸變的顏色數組
- positions:顏色數組的相對位置
- tile:平鋪方式
public RadialGradient (float x, float y, float radius, int[] colors, float[] positions, Shader.TileMode tile);
實現某一區域內顏色的環形漸變效果,參數依次是:
- x:環形的圓心x坐標
- y:環形的圓心y坐標
- radius:環形的半徑
- colors:環形漸變的顏色數組
- positions:指定顏色數組的相對位置
- tile:平鋪方式
public SweepGradient (float cx, float cy, int[] colors, float[] positions)
掃描渲染,就是以某個點位中心旋轉一周所形成的效果!參數依次是:
- cx:掃描的中心x坐標
- cy:掃描的中心y坐標
- colors:梯度漸變的顏色數組
- positions:指定顏色數組的相對位置
可能從文字上我們可以簡單的知道下他們對應的一個大概作用,但是我們還是寫個代碼來 驗證下他們所起的作用,畢竟有碼(圖)有真相嗎~
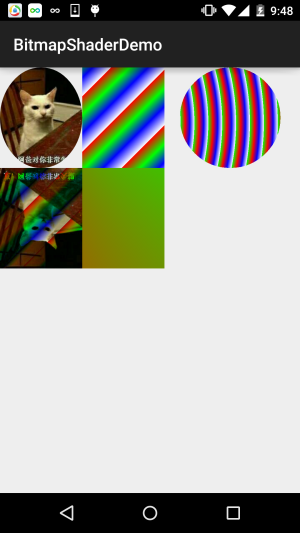
運行效果圖:
實現代碼:
BitmapShaderView.java:
/**
 * Created by Jay on 2015/11/4 0030.
 */
public class BitmapShaderView extends View {


    private Bitmap mBitmap = null;
    private ShapeDrawable sDrawable = null;
    private Paint mPaint = null;
    private int bitW = 0, bitH = 0;     //Bitmap寬高

    private Shader mBitmapShader = null;   //Bitmap渲染
    private Shader mLinearGradient = null; //線性漸變渲染
    private Shader mComposeShader = null; //混合渲染
    private Shader mRadialGradient = null; //環形漸變渲染
    private Shader mSweepGradient = null; //梯度渲染


    public BitmapShaderView(Context context) {
        this(context, null);
    }

    public BitmapShaderView(Context context, AttributeSet attrs) {
        super(context, attrs);
        init();
    }

    public BitmapShaderView(Context context, AttributeSet attrs, int defStyleAttr) {
        super(context, attrs, defStyleAttr);
    }


    private void init() {

        mBitmap = BitmapFactory.decodeResource(getResources(), R.mipmap.img_cat);
        bitW = mBitmap.getWidth();
        bitH = mBitmap.getHeight();
        mPaint = new Paint();

        //創建BitmapShader
        mBitmapShader = new BitmapShader(mBitmap, Shader.TileMode.MIRROR, Shader.TileMode.MIRROR);

        //創建LinearGradient並設置漸變的顏色數組
        mLinearGradient = new LinearGradient(0, 0, 100, 100,
                new int[]{Color.RED, Color.GREEN, Color.BLUE, Color.WHITE},
                null, Shader.TileMode.REPEAT);

        //混合渲染,這裡使用了BitmapShader和LinearGradient進行混合,可以試試其他~
        mComposeShader = new ComposeShader(mBitmapShader, mLinearGradient, PorterDuff.Mode.DARKEN);

        //環形漸變渲染
        mRadialGradient = new RadialGradient(50, 200, 50,
                new int[]{Color.GREEN, Color.RED, Color.BLUE, Color.WHITE},
                null, Shader.TileMode.REPEAT);

        //梯度渲染
        mSweepGradient = new SweepGradient(30, 30, new int[]{Color.GREEN, Color.RED,
                Color.BLUE, Color.WHITE}, null);

    }

    @Override
    protected void onDraw(Canvas canvas) {
        super.onDraw(canvas);

        //將圖片裁剪為橢圓形
        sDrawable = new ShapeDrawable(new OvalShape());
        sDrawable.getPaint().setShader(mBitmapShader);
        sDrawable.setBounds(0, 0, bitW, bitH);
        sDrawable.draw(canvas);

        //繪制線性漸變的矩形
        mPaint.setShader(mLinearGradient);
        canvas.drawRect(bitW, 0, bitW * 2, bitH, mPaint);

        //繪制混合渲染效果
        mPaint.setShader(mComposeShader);
        canvas.drawRect(0, bitH, bitW , bitH * 2, mPaint);

        //繪制環形漸變
        mPaint.setShader(mRadialGradient);
        canvas.drawCircle(bitW * 2.8f, bitH / 2, bitH / 2, mPaint);

        //繪制梯度漸變
        mPaint.setShader(mSweepGradient);
        canvas.drawRect(bitW, bitH, bitW * 2, bitH * 2, mPaint);


    }
}
就那麼一百來行代碼,就不用解釋了吧,如果覺得有疑惑的,動手試試~
BitmapShaderDemo.zip
本節給大家介紹了Paint的另一個API:Shader(圖像渲染),又讓我們的畫筆增添了一種選擇~ 如果你看到代碼有疑惑,不懂把代碼粘下,改改參數,就懂了~ 好的,本節就到這裡,謝謝~
 10.12 傳感器專題(4)——其他傳感器了解
本節引言:在上一節的結尾說了,傳感器部分因為筆者沒怎麼玩過,本節就簡單的把剩下的幾個常用的傳感器介紹一遍,當作科普,以後用到再慢慢研究~1.磁場傳感
 第56章、錄制音頻(從零開始學Android)
我們可以使用MediaRecorder輕松完成音頻錄音,注意模擬器不支持,需要真機測試。具體步驟如下:(1)創建一個android.media.MediaRecorder
 1.11 反編譯APK獲取代碼&資源
本節引言反編譯Apk,看上去好像好像很高端的樣子,其實不然,就是通過某些反編譯軟件,對我們的APK進行反編譯,從而獲取程序的源代碼,圖片,XML資源
 5.2.1 Fragment實例精講——底部導航欄的實現(方法1)
本節引言:在上一節中我們對Fragment進行了一個初步的了解,學習了概念,生命周期,Fragment管理與Fragment事務,以及動態與靜態加載