編輯:關於Android編程
首先也簡單介紹下圖像的RGBA模型,R指紅色(Red),G指綠色(Green),B指藍色(Blue)及A指透明度(Alpha),由這四種元素搭配組合成了各種各樣的顏色。
處理工具類及方法:
public class ImageTools {
/**
* 對圖片進行處理
* @description:
* @date 2015-8-12 下午8:45:05
*/
public static Bitmap getColorImage(Bitmap bitmap, float sx, float bhd, float ld) {// 參數分別是色相,飽和度和亮度
Bitmap bmp = bitmap.createBitmap(bitmap.getWidth(), bitmap.getHeight(), Bitmap.Config.ARGB_8888);
Canvas canvas = new Canvas(bmp);
Paint paint = new Paint(Paint.ANTI_ALIAS_FLAG);
ColorMatrix sxMatrix = new ColorMatrix();// 設置色調
sxMatrix.setRotate(0, sx);
sxMatrix.setRotate(1, sx);
sxMatrix.setRotate(2, sx);
ColorMatrix bhdMatrix = new ColorMatrix();// 設置飽和度
bhdMatrix.setSaturation(bhd);
ColorMatrix ldMatrix = new ColorMatrix();// 設置亮度
ldMatrix.setScale(ld, ld, ld, 1);
ColorMatrix mixMatrix = new ColorMatrix();// 設置整體效果
mixMatrix.postConcat(sxMatrix);
mixMatrix.postConcat(bhdMatrix);
mixMatrix.postConcat(ldMatrix);
paint.setColorFilter(new ColorMatrixColorFilter(mixMatrix));// 用顏色過濾器過濾
canvas.drawBitmap(bmp, 0, 0, paint);// 重新畫圖
return bmp;
}
}
在Activity中選擇要處理的ImageView及對應的Bitmap,調用工具類中方法即可:
private ImageView colorIv;
private SeekBar sxBar, bhdBar, ldBar;
private static int MIN_COLOR = 100;
private static int MAX_COLOR = 255;
private float sx, bhd, ld;
private Bitmap bmp;
@Override
protected void onCreate(Bundle savedInstanceState) {
super.onCreate(savedInstanceState);
setContentView(R.layout.color_main);
initViews();
}
private void initViews() {
bmp=BitmapFactory.decodeResource(getResources(), R.drawable.ic_launcher);
colorIv = (ImageView) findViewById(R.id.color_iv);
colorIv.setImageBitmap(bmp);
sxBar = (SeekBar) findViewById(R.id.sx_seekbar);
bhdBar = (SeekBar) findViewById(R.id.bhd_seekbar);
ldBar = (SeekBar) findViewById(R.id.ld_seekbar);
sxBar.setOnSeekBarChangeListener(this);
sxBar.setMax(MAX_COLOR);// 設置最大值
sxBar.setProgress(MIN_COLOR);// 設置初始值(當前值)
bhdBar.setOnSeekBarChangeListener(this);
bhdBar.setMax(MAX_COLOR);
bhdBar.setProgress(MIN_COLOR);
ldBar.setOnSeekBarChangeListener(this);
ldBar.setMax(MAX_COLOR);
ldBar.setProgress(MIN_COLOR);
}
@Override
public void onProgressChanged(SeekBar seekBar, int progress, boolean fromUser) {
switch (seekBar.getId()) {
case R.id.sx_seekbar:
sx = (progress - MIN_COLOR) * 1.0f / MIN_COLOR * 180;
break;
case R.id.bhd_seekbar:
bhd = progress * 1.0f / MIN_COLOR;
break;
case R.id.ld_seekbar:
ld = progress * 1.0f / MIN_COLOR;
break;
}
colorIv.setImageBitmap(ImageTools.getColorImage(bmp, sx, bhd, ld));
}
@Override
public void onStartTrackingTouch(SeekBar seekBar) {
}
@Override
public void onStopTrackingTouch(SeekBar seekBar) {
}
xml布局文件:
android:layout_width=match_parent
android:layout_height=match_parent >
android:layout_width=300dp
android:layout_height=300dp
android:layout_centerHorizontal=true
android:layout_marginBottom=15dp
android:layout_marginTop=15dp />
android:layout_width=match_parent
android:layout_height=wrap_content
android:layout_below=@id/color_iv
/>
android:layout_width=match_parent
android:layout_height=wrap_content
android:layout_below=@id/sx_seekbar
android:layout_marginTop=10dp />
android:layout_width=match_parent
android:layout_height=wrap_content
android:layout_below=@id/bhd_seekbar
android:layout_marginTop=10dp />
 Android下拉刷新上拉加載更多左滑動刪除
一、前言老規矩,別的不說,這demo是找了很相關知識集合而成的,可以說對我這種小白來說是絞盡腦汁!程序員講的是無圖無真相!現在大家一睹為快!二、比較關鍵的還是scroll
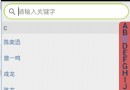
 Android學習筆記之Spinner下拉列表使用案例
(1)兩種方法提沖Spinner中的數據源:通過list集合,或者是通過xml文件進行配置 (2)布局代碼如下: (2) packa
 uboot移植
1.windows共享文件夾裡 下載、解壓三星官方uboot源碼 2.復制到linux下的目錄 3.在共享文件夾裡面建立SourceInsight 工
 Android 開源在線音樂播放器
封面圖: 簡介 波尼音樂是一款開源Android在線音樂播放器。 播放本地音樂與在線音樂 在線音樂排行榜,如熱歌榜、新歌榜等 高仿雲音樂的黑膠唱片專輯封