編輯:關於Android編程
只要繼承了UIResponder的對象就可作為事件的響應者,實際上UIControl繼承了UIView,UIView又繼承了UIResponder,由此可見,所有的對象都可作為事件的響應者。
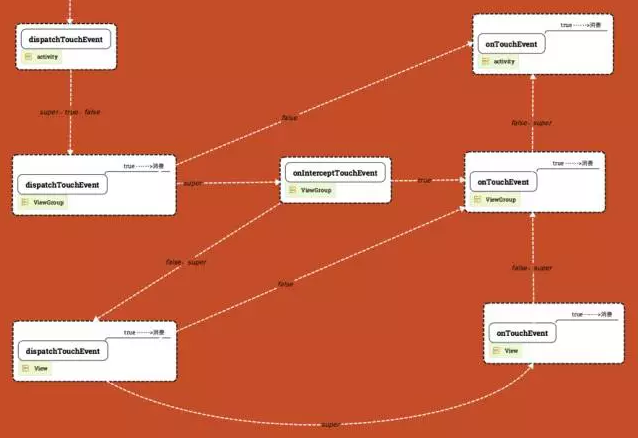
當用戶與某個控件交互時,該控件將作為“第一響應者(First Responder)”,第一響應者將作為響應者鏈的開始,該事件首先被發送給第一響應者(也就是用戶觸摸屏幕的控件)。事件將沿著響應者鏈一直向下傳播,直到被某個響應者處理。事件響應者鏈的典型傳播路線如下:
First Responder —> First Responder的視圖控制器(如果有)—>父容器(如果有)—>父容器的視圖控制器(如果有)—>UIWindow—>UIApplication—>應用程序委托對象
如果某個響應者“截獲”了某個事件,那麼該響應者要根據條件決定是否處理該事件。當響應者無法處理該事件時,則需要在處理方法中手動傳遞該事件。例如如下代碼:
- (void)handleTapEvent:(UITapGestureRecognizer *)event{
    if (YES) {
        //處理事件
    }else{
        OtherTapView* view = (OtherTapView *)self.nextResponder;
        [view handleTapEvent:event];
    }
}
如果希望自定義控件可以響應用戶的觸碰事件,則可以通過通過UIResponder的如下四個方法實現:
①、- (void)touchesBegan:(NSSet )touches withEvent:(UIEvent )event;//當用戶手指開始接觸控件或窗口事件時激發該方法; ②、- (void)touchesMoved:(NSSet )touches withEvent:(UIEvent )event;//當用戶手指在控件上移動時激發該方法; ③、- (void)touchesEnded:(NSSet )touches withEvent:(UIEvent )event;//當用戶手指結束觸碰控件激發該方法; ④、- (void)touchesCancelled:(NSSet )touches withEvent:(UIEvent )event;//當系統事件(比如內存底事件)終止了觸碰事件時激發該方法。
- (void)touchesBegan:(NSSet *)touches withEvent:(UIEvent *)event{
     NSLog(@"%ld",[touches count]);
     NSLog(@"%ld",[[touches anyObject]tapCount]);
     CGPoint point = [[touches anyObject] locationInView:self.view];
}
注意:
①、第一個NSSet類型的參數代表了用戶同時觸碰控件的多個手指,如果該用戶用3個手指觸碰該控件,那麼該touches參數中將會包含3個UITouch對象; ②、UITouch對象代表一個觸碰事件,該對象提供了一個tapCount屬性,該屬性用於返回用戶觸碰屏幕的次數,比如用戶只是輕輕的觸碰屏幕一次,那麼該屬性將返回1.如果該屬性返回3,則代表用戶快速觸碰了3次屏幕. ③、UITouch還提供了locationInView:方法來獲取該觸碰事件在UIView控件中的碰觸位置.UIGestureRecognizer提供了如下子類:
①、UITapGestureRecognizer:處理用戶點擊手勢的手勢處理器; ②、UIPinchGestureRecognizer:處理用戶捏合手勢的手勢處理器; ③、UIRotationGestureRecognizer:處理用戶旋轉手勢的手勢處理器; ④、UISwipeGestureRecognizer:處理用戶滑動手勢的手勢處理器; ⑤、UIPanGestureRecognizer:處理用戶拖動手勢的手勢處理器; ⑥、UILongPressGestureRecognizer:處理用戶長按手勢的手勢處理器;使用手勢處理器處理用戶觸碰手勢的編程步驟如下:
、根據程序要處理的手勢創建對象的手勢處理器對象。創建手勢處理器時需要制定target和action參數—當該控件上發生觸碰手勢後,該target對象的action方法將會被激發。 、如果該UI控件不允許交互,則將該UI控件的userInteractionEnable屬性設為YES;如果希望該控件可支持多點觸碰,還需要將multipleTouchEnable設為YES. 、調用UI控件的addGestureRecognizer:方法添加該手勢處理器;UIGestureRecognizer作為所有手勢處理器的基類,它提供了如下常用的方法和屬性:
(1)、- (CGPoint)locationInView:(UIView*)view;返回該手勢在view控件中的觸碰位置; (2)、- (CGPoint)locationOfTouch:(NSUInteger)touchIndex inView:(UIView*)view;返回該手勢中第touchIndex個觸碰點在view控件中的位置; (3)、- (NSUInteger)numberOfTouches;返回該手勢包含觸碰點的數量(也就是用戶用了幾個手指進行觸碰); (4)、@property(nonatomic,readonly) UIView *view;返回激發該手勢的UI控件; (5)、@property(nonatomic, getter=isEnabled) BOOL enabled;用戶設置和返回該手勢處理器是否可用; (6)、@property(nonatomic,readonly) UIGestureRecognizerState state;獲取該手勢所處的狀態,該狀態分為如下幾種:
typedef NS_ENUM(NSInteger, UIGestureRecognizerState) {
    UIGestureRecognizerStatePossible,
    UIGestureRecognizerStateBegan,
    UIGestureRecognizerStateChanged,
    UIGestureRecognizerStateEnded,
    UIGestureRecognizerStateCancelled,
    UIGestureRecognizerStateFailed,
    UIGestureRecognizerStateRecognized = UIGestureRecognizerStateEnded
};
UITapGestureRecognizer還提供了如下兩個屬性:
(1)、@property (nonatomic) NSUInteger numberOfTapsRequired;指定該手勢處理器只處理幾次觸碰事件; (2)、@property (nonatomic) NSUInteger numberOfTouchesRequired;指定該手勢處理器只處理幾個手指的觸碰事件.實例:
- (void)viewDidLoad {
    [super viewDidLoad];
    gv = [[UIView alloc]initWithFrame:CGRectMake(10, 200, self.view.frame.size.width - 20, 200)];
    gv.layer.borderWidth = 2;
    gv.layer.cornerRadius = 6;
    //設置gv控件支持用戶交互
    gv.userInteractionEnabled = YES;
    //設置gv控件支持多點觸碰
    gv.multipleTouchEnabled = YES;
    [self.view addSubview:gv];
    label = [[UILabel alloc]initWithFrame:CGRectMake(20, 50, gv.frame.size.width - 40, 40)];
    [gv addSubview:label];
    self.view.backgroundColor = [UIColor lightGrayColor];
    for (int i = 0; i < 6; i ++) {
        //創建手勢處理器,指定使用該控制器的handleTap:方法處理手勢
        UITapGestureRecognizer* gesture = [[UITapGestureRecognizer alloc]initWithTarget:self action:@selector(handleTap:)];
        //設置該點擊手勢處理器只處理i次連擊事件
        gesture.numberOfTapsRequired = i;
        //設置該點擊手勢處理器只處理兩個手指的觸碰事件
        gesture.numberOfTouchesRequired = 2;
        //為gv控件添加手勢處理器
        [gv addGestureRecognizer:gesture];
    }
}
- (void)handleTap:(UITapGestureRecognizer *)gesture{
    NSInteger touchNum = gesture.numberOfTouches;
    NSUInteger tapNum = gesture.numberOfTapsRequired;
    label.text = [NSString stringWithFormat:@"用戶使用%ld個手指進行觸碰,觸碰次數為:%ld",touchNum,tapNum];
    //指定2秒後清除label的文本
    [label performSelector:@selector(setText:) withObject:@"" afterDelay:5];
}
UIPinchGestureRecognizer定義了如下兩個屬性來獲取捏合相關信息:
(1)、@property (nonatomic) CGFloat scale;獲取捏合的比例; (2)、@property (nonatomic,readonly) CGFloat velocity;獲取捏合的速度;實例:
- (void)viewDidLoad {
    [super viewDidLoad];
    gv = [[UIView alloc]initWithFrame:CGRectMake(10, 200, self.view.frame.size.width - 20, 200)];
    gv.layer.borderWidth = 2;
    gv.layer.cornerRadius = 6;
    //設置gv控件支持用戶交互
    gv.userInteractionEnabled = YES;
    //設置gv控件支持多點觸碰
    gv.multipleTouchEnabled = YES;
    [self.view addSubview:gv];
    label = [[UILabel alloc]initWithFrame:CGRectMake(20, 50, gv.frame.size.width - 40, 80)];
    label.numberOfLines = 2;
    [gv addSubview:label];
    self.view.backgroundColor = [UIColor lightGrayColor];
    UIPinchGestureRecognizer* gesture = [[UIPinchGestureRecognizer alloc]initWithTarget:self action:@selector(handlePinch:)];
    //為gv控件添加手勢處理器
    [gv addGestureRecognizer:gesture];
}
- (void)handlePinch:(UIPinchGestureRecognizer *)gesture{
    //獲取用戶捏合的速度和比例
    CGFloat velocity = gesture.velocity;
    CGFloat scale = gesture.scale;
    label.text = [NSString stringWithFormat:@"用戶捏合的速度為:%g,比例為:%g",velocity,scale];
    //指定2秒後清除label的文本
    [label performSelector:@selector(setText:) withObject:@"" afterDelay:5];
}
- (void)viewDidLoad {
    [super viewDidLoad];
    [UIApplication sharedApplication].statusBarHidden = YES;
    srcImage = [UIImage imageNamed:@"妞.png"];
    //設置圖片直接顯示在中間(不進行任何縮放)
    self.view.contentMode = UIViewContentModeCenter;
    self.view.backgroundColor = [UIColor lightGrayColor];
    gv = [[UIImageView alloc]initWithFrame:CGRectMake(10, 200, self.view.frame.size.width - 20, 200)];
    currentSize = CGSizeMake(self.view.frame.size.width - 20, 200);
    gv.layer.borderWidth = 2;
    gv.layer.cornerRadius = 6;
    //設置gv控件支持用戶交互
    gv.userInteractionEnabled = YES;
    //設置gv控件支持多點觸碰
    gv.multipleTouchEnabled = YES;
    [self.view addSubview:gv];
    gv.image = srcImage;
    //創建UIPinchGestureRecognizer手勢處理器,該手勢處理器激發scaleImage:方法
    UIPinchGestureRecognizer* gesture = [[UIPinchGestureRecognizer alloc]initWithTarget:self action:@selector(scaleImage:)];
    [gv addGestureRecognizer:gesture];
}
//imageView進行縮放
- (void)scaleImage:(UIPinchGestureRecognizer *)gesture{
    gv.bounds = CGRectMake(0, 0, currentSize.width * gesture.scale, currentSize.height * gesture.scale);
    if (gesture.state == UIGestureRecognizerStateEnded) {
        currentSize = CGSizeMake(currentSize.width * gesture.scale, currentSize.height * gesture.scale);
    }
}
UIRotationGestureRecognizer定義了如下兩個屬性來獲取旋轉相關信息:
(1)、@property (nonatomic)CGFloat rotation;獲取旋轉角度; (2)、@property (nonatomic,readonly) CGFloat velocity;獲取旋轉速度;實例:通過旋轉手勢旋轉圖片
- (void)viewDidLoad {
    [super viewDidLoad];
    srcImage = [UIImage imageNamed:@"妞.png"];
    //設置圖片直接顯示在中間(不進行任何縮放)
    self.view.backgroundColor = [UIColor lightGrayColor];
    gv = [[UIImageView alloc]initWithFrame:CGRectMake(10, 200, self.view.frame.size.width - 20, 200)];
    currentSize = CGSizeMake(self.view.frame.size.width - 20, 200);
    gv.layer.borderWidth = 2;
    gv.layer.cornerRadius = 6;
    //設置gv控件支持用戶交互
    gv.userInteractionEnabled = YES;
    //設置gv控件支持多點觸碰
    gv.multipleTouchEnabled = YES;
    [self.view addSubview:gv];
    gv.image = srcImage;
    //創建UIPinchGestureRecognizer手勢處理器,該手勢處理器激發scaleImage:方法
    UIRotationGestureRecognizer* gesture = [[UIRotationGestureRecognizer alloc]initWithTarget:self action:@selector(rotateImage:)];
    [gv addGestureRecognizer:gesture];
}
- (void)rotateImage:(UIRotationGestureRecognizer *)gesture{
    //根據當前縮放的比例計算縮放後的目標圖片大小
    gv.transform = CGAffineTransformMakeRotation(imageRotate + gesture.rotation);
    if (gesture.state == UIGestureRecognizerStateEnded) {
        imageRotate += gesture.rotation;
    }
}
UISwipeGestureRecognizer定義了如下兩個屬性來設置相關信息:
(1)、@property(nonatomic) NSUInteger numberOfTouchesRequired;指定該手勢處理器只處理幾個手指的觸碰事件; (2)、@property(nonatomic) UISwipeGestureRecognizerDirection direction;指定該手勢處理器處理該方向的輕掃.該屬性支持:
typedef NS_OPTIONS(NSUInteger, UISwipeGestureRecognizerDirection) {
    UISwipeGestureRecognizerDirectionRight = 1 << 0,
    UISwipeGestureRecognizerDirectionLeft  = 1 << 1,
    UISwipeGestureRecognizerDirectionUp    = 1 << 2,
    UISwipeGestureRecognizerDirectionDown  = 1 << 3
};
實例:
- (void)viewDidLoad {
    [super viewDidLoad];
    //設置圖片直接顯示在中間(不進行任何縮放)
    self.view.backgroundColor = [UIColor lightGrayColor];
    gv = [[UIImageView alloc]initWithFrame:CGRectMake(10, 200, self.view.frame.size.width - 20, 200)];
    gv.layer.borderWidth = 2;
    gv.layer.cornerRadius = 6;
    //設置gv控件支持用戶交互
    gv.userInteractionEnabled = YES;
    //設置gv控件支持多點觸碰
    gv.multipleTouchEnabled = YES;
    [self.view addSubview:gv];
    label = [[UILabel alloc]initWithFrame:CGRectMake(20, 50, gv.frame.size.width - 40, 80)];
    label.numberOfLines = 2;
    [gv addSubview:label];
    for (int i = 0 ; i < 4; i ++) {
        //創建手勢處理器,指定使用該控制器的handleSwipe:方法處理輕掃手勢
        UISwipeGestureRecognizer* gesture = [[UISwipeGestureRecognizer alloc]initWithTarget:self action:@selector(handleSwipe:)];
        //設置該手勢處理器只處理i個手指的輕掃手勢
        gesture.numberOfTouchesRequired = 1;
        //指定該手勢處理器只處理1 << i方向的輕掃手勢
        gesture.direction = 1 << i;
        [gv addGestureRecognizer:gesture];
    }
}
- (void)handleSwipe:(UISwipeGestureRecognizer *)gesture{
    //獲取手勢的方向
    NSUInteger direction = gesture.direction;
    //根據手勢方向的值得到方向字符串
    NSString* dirStr = direction == UISwipeGestureRecognizerDirectionRight?@"向右":(direction == UISwipeGestureRecognizerDirectionLeft?@"向左":(direction == UISwipeGestureRecognizerDirectionUp?@"向上":@"向下"));
    NSLog(@"dirStr = %@",dirStr);
    NSUInteger touchNum = gesture.numberOfTouchesRequired;
    label.text = [NSString stringWithFormat:@"用戶使用%ld個手指進行輕掃,方向為%@",touchNum,dirStr];
    //指定5秒後清除label的文本
    [label performSelector:@selector(setText:) withObject:@"" afterDelay:5];
}
UIPanGestureRecognizer定義了如下的方法來獲取拖動相關信息:
(1)、@property (nonatomic) NSUInteger minimumNumberOfTouches;設置移動手勢處理器最少需要幾個手指拖動; (2)、@property (nonatomic) NSUInteger maximumNumberOfTouches;設置移動手勢處理器最多支持幾個手指拖動; (3)、- (CGPoint)translationInView:(UIView *)view;獲取該拖動手勢在指定控件上的位移.該方法返回一個CGPoint結構體數據,該結構體中x變量的值代表水平方向的位移,y變量的值代表了垂直方向的位移; (4)、- (CGPoint)velocityInView:(UIView *)view; 獲取該拖動手勢在指定控件上的拖動速度.該方法返回一個CGPoint結構體數據,該結構體中x變量的值代表了水平方向的速度,y變量的值代表了垂直方向的速度.例如:
- (void)viewDidLoad {
    [super viewDidLoad];
    //設置圖片直接顯示在中間(不進行任何縮放)
    self.view.backgroundColor = [UIColor lightGrayColor];
    gv = [[UIImageView alloc]initWithFrame:CGRectMake(10, 200, self.view.frame.size.width - 20, 200)];
    gv.layer.borderWidth = 2;
    gv.layer.cornerRadius = 6;
    //設置gv控件支持用戶交互
    gv.userInteractionEnabled = YES;
    //設置gv控件支持多點觸碰
    gv.multipleTouchEnabled = YES;
    [self.view addSubview:gv];
    label = [[UILabel alloc]initWithFrame:CGRectMake(20, 50, gv.frame.size.width - 40, 80)];
    label.numberOfLines = 3;
    [gv addSubview:label];
    //創建手勢處理器,指定使用該控制器的handlePan:方法處理手勢
    UIPanGestureRecognizer* gesture = [[UIPanGestureRecognizer alloc]initWithTarget:self action:@selector(handlePan:)];
    //設置該手勢處理器最少需要1個手指
    gesture.minimumNumberOfTouches = 1;
    //設置該手勢處理器最多需要2個手指
    gesture.maximumNumberOfTouches = 2;
    [gv addGestureRecognizer:gesture];
}
//實現手勢處理器的方法,該方法應該生命一個形參
//當該方法被激發時,手勢處理器會作為參數傳給該方法的參數
- (void)handlePan:(UIPanGestureRecognizer *)gesture{
    CGPoint velocity = [gesture velocityInView:gv];
    CGPoint translation = [gesture translationInView:gv];
    label.text = [NSString stringWithFormat:@"水平速度為:%g,垂直速度為:%g,水平距離為:%g,垂直距離為:%g",velocity.x,velocity.y,translation.x,translation.y];
}
UILongGestureRecognizer定義了如下屬性來設置該手勢處理器的相關信息:
(1)、@property (nonatomic) CFTimeInterval minimumPressDuration;指定用戶至少在屏幕上按下多少秒才會觸發該長安手指,該屬性默認值為0.5; (2)、@property (nonatomic) NSUInteger numberOfTapsRequired;指定必須使用幾個手指在屏幕上長按才會觸發該手勢; (3)、@property (nonatomic) CGFloat allowableMovement;指定該長按手勢允許用戶移動手指的最大距離,如果用戶手指按下時移動超過了該距離,則長按手勢失效.實例:
- (void)viewDidLoad {
    [super viewDidLoad];
    self.view.backgroundColor = [UIColor lightGrayColor];
    //創建一個NSMutableArray集合 用於保存過個按鈕
    bnArray = [[NSMutableArray alloc]init];
    //創建一個手勢處理器 用於檢測.處理長按手勢
    UILongPressGestureRecognizer* gesture = [[UILongPressGestureRecognizer alloc]initWithTarget:self action:@selector(longPress:)];
    //為該控件添加手勢處理器
    [self.view addGestureRecognizer:gesture];
}
- (void)longPress:(UILongPressGestureRecognizer *)gesture{
    //創建一個按鈕
    UIButton* bn = [UIButton buttonWithType:UIButtonTypeRoundedRect];
    //獲取NSArray中已經包含了幾個按鈕
    NSInteger count = bnArray.count;
    //計算當前添加的按鈕位於第幾行第幾列
    NSInteger row = count/3;
    NSInteger col = count%3;
    //為按鈕設置文本
    [bn setTitle:[NSString stringWithFormat:@"按鈕%ld",bnIndex] forState:UIControlStateNormal];
    //設置該bn按鈕的大小和位置
    bn.frame = CGRectMake(MARGINE + col * CELL_WIDTH, row * CELL_HEIGHT + MARGINE, BUTTON_WIDTH, BUTTON_HEIHGT);
    //為該按鈕添加事件處理方法
    [bn addTarget:self action:@selector(remove:) forControlEvents:UIControlEventTouchUpInside];
    [bnArray addObject:bn];
    //將按鈕添加到應用界面的UIView控件中
    [self.view addSubview:bn];
    bnIndex ++;
}
- (void)remove:(id)sender{
    //刪除事件源控件(激發該事件的按鈕)
    [sender removeFromSuperview];
    //將觸發該事件的按鈕從NSMutableArray集合中刪除
    [bnArray removeObject:sender];
    [self rearrange];
}
- (void)rearrange{
    //重新計算每個按鈕的大小和位置
    for (int i = 0; i < bnArray.count ; i ++) {
        NSInteger row = i/3;
        NSInteger col = i%3;
        UIButton* bn = [bnArray objectAtIndex:i];
        bn.frame = CGRectMake(MARGINE +  col * CELL_WIDTH, row * CELL_HEIGHT + MARGINE, BUTTON_WIDTH, BUTTON_HEIHGT);
    }
}
開發自定義手勢處理器的步驟比較簡單,按如下步驟操作即可:
①、創建繼承UIGestureRecognizer的子類;
②、重寫UIGestureRecognizer基類的觸碰相關的4個方法.通過在這些方法中識別用戶手指劃過的痕跡—當用戶手指劃過的痕跡符合手勢要求時,程序將該手勢state設為UIGestureRecognizerStateEnaded即可.
待定
手勢識別是具有互斥的原則的,比如單擊和雙擊,如果它識別出一種手勢,其後的手勢將不被識別。所以對於關聯手勢,要做特殊處理以幫助程序甄別,應該把當前手勢歸結到哪一類手勢裡面。
比如,單擊和雙擊並存時,如果不做處理,它就只能發送出單擊的消息。為了能夠識別出雙擊手勢,就需要做一個特殊處理邏輯,即先判斷手勢是否是雙擊,在雙擊失效的情況下作為單擊手勢處理。使用
[A requireGestureRecognizerToFail:B]函數,它可以指定當A手勢發生時,即便A已經滿足條件了,也不會立刻觸發,會等到指定的手勢B確定失敗之後才觸發。
- (void)requireGestureRecognizerToFail:(UIGestureRecognizer *)otherGestureRecognizer;

//例如
[singleRecognizer requireGestureRecognizerToFail:doubleRecognizer];
1、
// called when a gesture recognizer attempts to transition out of UIGestureRecognizerStatePossible. returning NO causes it to transition to UIGestureRecognizerStateFailed
- (BOOL)gestureRecognizerShouldBegin:(UIGestureRecognizer *)gestureRecognizer;
手勢可能發生的條件,比如某些特殊情況下,不想讓此手勢發生,就return NO。
2、
// called when the recognition of one of gestureRecognizer or otherGestureRecognizer would be blocked by the other
// return YES to allow both to recognize simultaneously. the default implementation returns NO (by default no two gestures can be recognized simultaneously)
//
// note: returning YES is guaranteed to allow simultaneous recognition. returning NO is not guaranteed to prevent simultaneous recognition, as the other gesture's delegate may return YES
- (BOOL)gestureRecognizer:(UIGestureRecognizer *)gestureRecognizer shouldRecognizeSimultaneouslyWithGestureRecognizer:(UIGestureRecognizer *)otherGestureRecognizer;
gestureRecognizer可能被otherGestureRecognizer手勢識別引起阻塞,返回YES為允許同時識別。默認返回NO(默認情況下同一種手勢只能識別一個)
3、
// called before touchesBegan:withEvent: is called on the gesture recognizer for a new touch. return NO to prevent the gesture recognizer from seeing this touch
- (BOOL)gestureRecognizer:(UIGestureRecognizer *)gestureRecognizer shouldReceiveTouch:(UITouch *)touch;
方法touchesBegan:withEvent:執行前將調用該方法,返回YES執行手勢事件;返回NO,將不響應手勢事件。
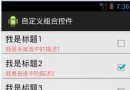
 Android高仿京東垂直循環滾動新聞欄
實現思路其實很簡單,就是一個自定義的LinearLayout,並且textView能夠循環垂直滾動,而且條目可以點擊,顯示區域最多顯示2個條目,並且還有交替的屬性垂直移動
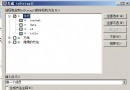
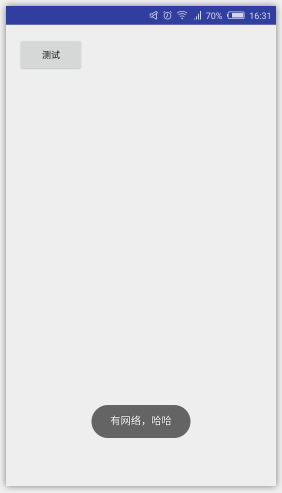 如何判斷軟件程序是否聯網 聯網狀態提示信息Android實現
在項目中,經常需要判斷是否有網絡連接。最近學習了如何判斷軟件是否聯網,如果沒有聯網,彈出提示信息,連接網絡。效果:(1)聯網情況下: (2)不聯網情況下:(3)
 Android中Intent習慣用法
Android中的Intent是一個非常重要的類,如果對Intent不是特別了解,可以參見《詳解Android中Intent的使用方法》。如果對Intent Filter
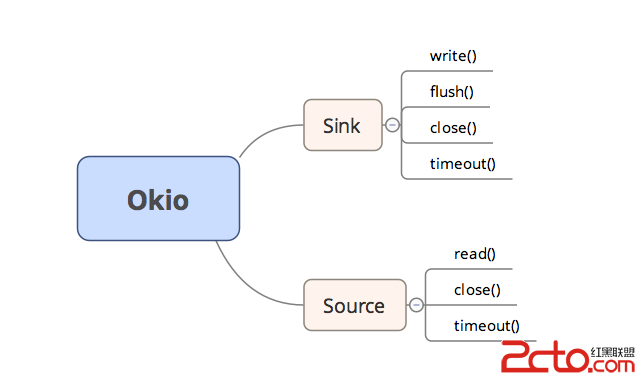 Android 善用Okio簡化處理I/O操作
Okio庫是一個由square公司開發的,它補充了java.io和java.nio的不足,以便能夠更加方便,快速的訪問、存儲和處理你的數據。而OkHttp的底層也使用該庫