編輯:關於Android編程
人生的旅途,前途很遠,也很暗。然而不要怕,不怕的人的面前才有路。——魯迅
自從上一篇博客發布後,已經有很長時間沒有更新博客了,一直忙著支付通的事情,在此給大家道個歉。
先貼個圖:

你不要驚訝,這就是第一次從網絡獲取圖片的速度,感覺比本地讀取圖片的速度還要快吧。加載100張圖片真的只要2秒時間,你不要不相信,不信你就來看。
在眾多的app當中,緩存可以作為衡量一款產品的好壞,既能節省流量,減少電量消耗,最重要的是用戶體驗好。你想想一款產品每個月消耗你100M以上的流量,你願意用嗎?當然這裡除了游戲以外。那麼怎麼才能做好緩存呢?這裡要介紹兩個重要的概念,一個是內存緩存LruCache,一個是硬盤緩存DiskLruCache,大家對這兩個概念肯定不會陌生。從標題中就可以看出今天還有一個主角就是線程池這個概念我很久以前都聽說過了,但沒具體去研究過,我也只會使用它。
Android常用的線程池有以下幾種,在Executors裡面對應的方法:
獲取實例:
Executors.newSingleThreadExecutor();// 每次只執行一個線程任務的線程池
Executors.newFixedThreadPool(3);// 限制線程池大小為3的線程池
Executors.newCachedThreadPool(); // 一個沒有限制最大線程數的線程池
Executors.newScheduledThreadPool(3);// 一個可以按指定時間可周期性的執行的線程池
我們來看看下面這個例子:
 new Thread(new Runnable() {
           @Override
           public void run() {

           }
       }).start();
在功能上等價於:
        mMyHandler.post(new Runnable() {
            @Override
            public void run() {

            }
        });
還等價於:
        executors.execute(new Runnable() {
            @Override
            public void run() {

            }
        });
我們為啥要使用ExecutorService呢,而不使用Thread和Handler?使用線程池我覺得可以對我們開啟的線程進行跟進,可以復用這點很重要,能夠減少內存消耗,當然也可以指定個數來執行任務的線程池、創建一個可在指定時間裡執行任務的線程池。
如果你想詳情了解的話,請鏈接相關文章。
注意:在你的項目當中依賴了相關retrofit包,DiskLruCache類也包含在其中,免得你 重復導包。
先來看看DiskLruCache的實例方法:
public static DiskLruCache open(File directory, int appVersion, int valueCount, long maxSize)
open()方法接收四個參數,第一個參數指定的是數據的緩存地址,第二個參數指定當前應用程序的版本號,第三個參數指定同一個key可以對應多少個緩存文件,基本都是傳1,第四個參數指定最多可以緩存多少字節的數據,好了我這裡就不再重復講解了。不懂請查看相關文章鏈接。
下面我們一起來看看,文章開頭那個快速加載出圖片的程序是怎麼實現的。我通過自己的嘗試,能使圖片加載那麼迅猛,還是蠻激動的。
就一個ListView,沒什麼好說的。
        lv= (ListView) findViewById(R.id.lv);

        mAdapter=new TestAdapter(Images.imageThumbUrls,R.layout.photo_layout,this,lv);

        lv.setAdapter(mAdapter);
都是比較常規的寫法,這裡主要說下Adapter的參數:
public TestAdapter(String[] datas, int layoutId, Context context, ViewGroup view)
第一個參數代表 圖片地址數組
第二個參數代表 子布局Id
第三個參數代表 上下文 context
第四個參數代表 當前的ListView,請求網絡是異步加載,防止圖片錯位
成員變量:
   /**
     * 圖片緩存技術的核心類,用於緩存所有下載好的圖片,在程序內存達到設定值時會將最少最近使用的圖片移除掉。
     */
    private LruCache mMemoryCache;

    /**
     * 圖片硬盤緩存核心類。
     */
    private DiskLruCache mDiskLruCache;

    /**
     * 線程池下載圖片
     */
    private ExecutorService executors;

    private String[] datas; //數據源
    private int layoutId;   //布局Id
    private Context mContext; //上下文
    private ViewGroup mViewGroup; //對應listview
    private MyHandler mMyHandler; //hanler
對應的初始化:
    public TestAdapter(String[] datas, int layoutId, Context context, ViewGroup view) {
        this.datas = datas;
        this.layoutId = layoutId;
        mContext = context;
        mViewGroup = view;

        //  taskCollection = new HashSet();
        // 獲取應用程序最大可用內存
        int maxMemory = (int) Runtime.getRuntime().maxMemory();
        int cacheSize = maxMemory / 8;
        // 設置圖片緩存大小為程序最大可用內存的1/8
        mMemoryCache = new LruCache(cacheSize) {
            @Override
            protected int sizeOf(String key, Bitmap bitmap) {
                return bitmap.getByteCount();
            }
        };
        try {
            // 獲取圖片緩存路徑
            File cacheDir = getDiskCacheDir(context, "bitmap");
            if (!cacheDir.exists()) {
                cacheDir.mkdirs();
            }
            // 創建DiskLruCache實例,初始化緩存數據
            mDiskLruCache = DiskLruCache
                    .open(cacheDir, getAppVersion(context), 1, 20 * 1024 * 1024);
        } catch (IOException e) {
            e.printStackTrace();
        }

        executors = Executors.newFixedThreadPool(3);
        mMyHandler = new MyHandler(this);

    }
接下來一起來看看getView方法:
    @Override
    public View getView(int position, View convertView, ViewGroup parent) {
        String url = (String) getItem(position);
        View view;
        if (convertView == null) {
            view = LayoutInflater.from(mContext).inflate(layoutId, null);
        } else {
            view = convertView;
        }
        ImageView imageView = (ImageView) view.findViewById(R.id.photo);
        imageView.setTag(url);//防止圖片錯位
        imageView.setImageResource(R.drawable.empty_photo);
        loadBitmaps(imageView, url);
        return view;
    }
loadBitmaps方法:
    public void loadBitmaps(ImageView imageView, String imageUrl) {
        try {
            Bitmap bitmap = getBitmapFromMemoryCache(imageUrl);
            if (bitmap == null) {
                startExecutor(imageUrl);
            } else {
                if (imageView != null && bitmap != null) {
                    imageView.setImageBitmap(bitmap);
                }
            }
        } catch (Exception e) {
            e.printStackTrace();
        }
    }
加載Bitmap對象。此方法會在LruCache中檢查所有屏幕中可見的ImageView的Bitmap對象, 如果發現任何一個ImageView的Bitmap對象不在LruCache緩存中,那麼就會接著去檢測該Bitmap是否在DiskLruCache,如果不在就開啟異步線程去下載圖片,反之就添加到LruCache中並展示出來。DiskLruCache文件轉換成Bitmap是個耗時操作,防止UI線程卡頓,所以在線程池中進行。
startExecutor方法又是怎麼實現的呢:
    public void startExecutor(final String imageUrl) {
        executors.execute(new Runnable() {
            @Override
            public void run() {
                FileDescriptor fileDescriptor = null;
                FileInputStream fileInputStream = null;
                DiskLruCache.Snapshot snapShot = null;
                try {
                    // 生成圖片URL對應的key
                    final String key = hashKeyForDisk(imageUrl);
                    // 查找key對應的緩存
                    snapShot = mDiskLruCache.get(key);
                    if (snapShot == null) {
                        // 如果沒有找到對應的緩存,則准備從網絡上請求數據,並寫入緩存
                        DiskLruCache.Editor editor = mDiskLruCache.edit(key);
                        if (editor != null) {
                            OutputStream outputStream = editor.newOutputStream(0);
                            if (downloadUrlToStream(imageUrl, outputStream)) {
                                editor.commit();
                            } else {
                                editor.abort();
                            }
                        }
                        // 緩存被寫入後,再次查找key對應的緩存
                        snapShot = mDiskLruCache.get(key);
                    }
                    if (snapShot != null) {
                        fileInputStream = (FileInputStream) snapShot.getInputStream(0);
                        fileDescriptor = fileInputStream.getFD();
                    }
                    // 將緩存數據解析成Bitmap對象
                    Bitmap bitmap = null;
                    if (fileDescriptor != null) {
                        bitmap = BitmapFactory.decodeFileDescriptor(fileDescriptor);
                    }
                    if (bitmap != null) {
                        // 將Bitmap對象添加到內存緩存當中
                        addBitmapToMemoryCache(imageUrl, bitmap);
                    }
                    mMyHandler.post(new Runnable() {
                        @Override
                        public void run() {
                            ImageView imageView = (ImageView) mViewGroup.findViewWithTag(imageUrl);
                            Bitmap bitmap = getBitmapFromMemoryCache(imageUrl);
                            if (imageView != null && bitmap != null) {
                                imageView.setImageBitmap(bitmap);
                            }
                        }
                    });
                } catch (IOException e) {
                    e.printStackTrace();
                } finally {
                    if (fileDescriptor == null && fileInputStream != null) {
                        try {
                            fileInputStream.close();
                        } catch (IOException e) {
                        }
                    }
                }

            }
        });
    }
代表比較長,需要耐著性子看。
獲取圖片流:
    /**
     * 建立HTTP請求,並獲取Bitmap對象。
     *
     * @param urlString 圖片的URL地址
     * @return 解析後的Bitmap對象
     */
    private boolean downloadUrlToStream(String urlString, OutputStream outputStream) {
        HttpURLConnection urlConnection = null;
        BufferedOutputStream out = null;
        BufferedInputStream in = null;
        InputStream inputStream = null;
        try {
            in = new BufferedInputStream(new URL(urlString).openStream());
            out = new BufferedOutputStream(outputStream);
            int b;
            while ((b = in.read()) != -1) {
                out.write(b);
            }
            return true;
        } catch (final IOException e) {
            e.printStackTrace();
        } finally {
            if (urlConnection != null) {
                urlConnection.disconnect();
            }
            try {
                if (out != null) {
                    out.close();
                }
                if (in != null) {
                    in.close();
                }
                if (inputStream != null) {
                    inputStream.close();
                }
            } catch (final IOException e) {
                e.printStackTrace();
            }
        }
        return false;
    }
經過測試new URL(urlString).openStream()獲取圖片流的方法最快。這裡獲取流也可以使用retrofit:
        try {
            ResponseBody responseBody = client.getRectService().downBitmaps(urlPath).execute().body();
            if (responseBody != null) {
                return responseBody.byteStream();//返回圖片流
            }
        } catch (IOException e) {
            e.printStackTrace();
        }
由於retrofit內部進行了一些封裝,獲取流的時間較長,這裡不推薦使用。
還可以這樣獲取流:
            final URL url = new URL(urlString);
            urlConnection = (HttpURLConnection) url.openConnection();
            urlConnection.getInputStream();

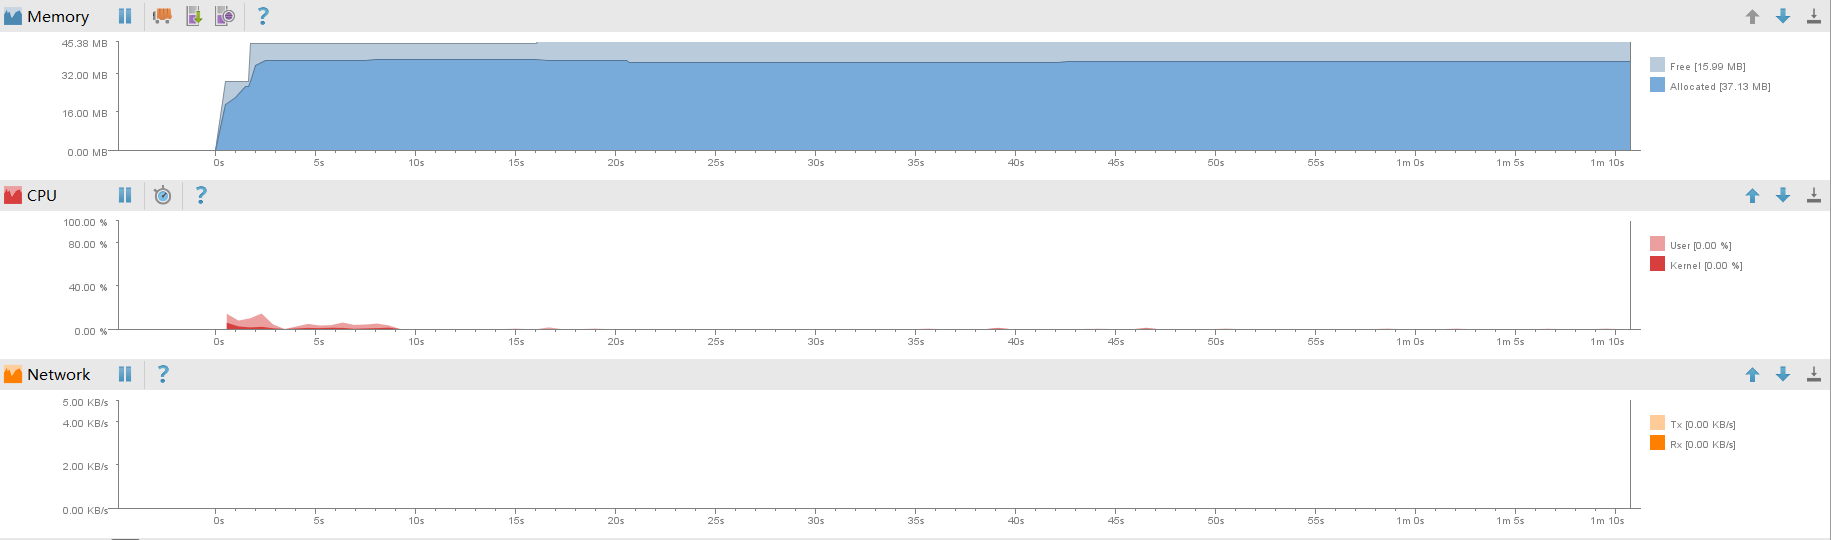
第一個時間是開始加載第一張圖片的時間
第二個時間是加載完最後一張圖片的時間
它們的時間戳就2秒多。
在來看一下 monitors:
 源碼等待上傳到
github。。。
 android-----事件分發機制測試系列(四)
上一篇,我們從源碼的角度分析了View的事件分發過程,這篇我們從實例的角度來看看不同實例下具體的輸出會是什麼樣子的呢?好的,我們開始吧!同樣我們的測試布局文件:
 Android自定義控件系列二:自定義開關按鈕(一)
這一次我們將會實現一個完整純粹的自定義控件,而不是像之前的組合控件一樣,拿系統的控件來實現;計劃分為三部分:自定義控件的基本部分,自定義控件的觸摸事件的處理和自定義控件的
 Android用PopupWindow實現自定義overflow
本文實例為大家分享了PopupWindow實現自定義overflow的具體代碼,供大家參考,具體內容如下當Action Bar的Action放不下時,系統會將其收集在ov
 Android常見UI組件之ListView(二)——定制ListView
Android常見UI組件之ListView(二)——定制ListView 這一篇接上篇,展示ListView中選擇多個項及實現篩選功能~ 1、在位於res/v