編輯:關於Android編程
項目中常用到的圓形進度條有好多個,從網上搜到的自定義進度條多是封裝的比較好的代碼,但是不利於初學者,現在本博客就教給大家如何一步步實現自定義進度條的效果
相關視頻鏈接:
http://edu.csdn.net/course/detail/3719/65396
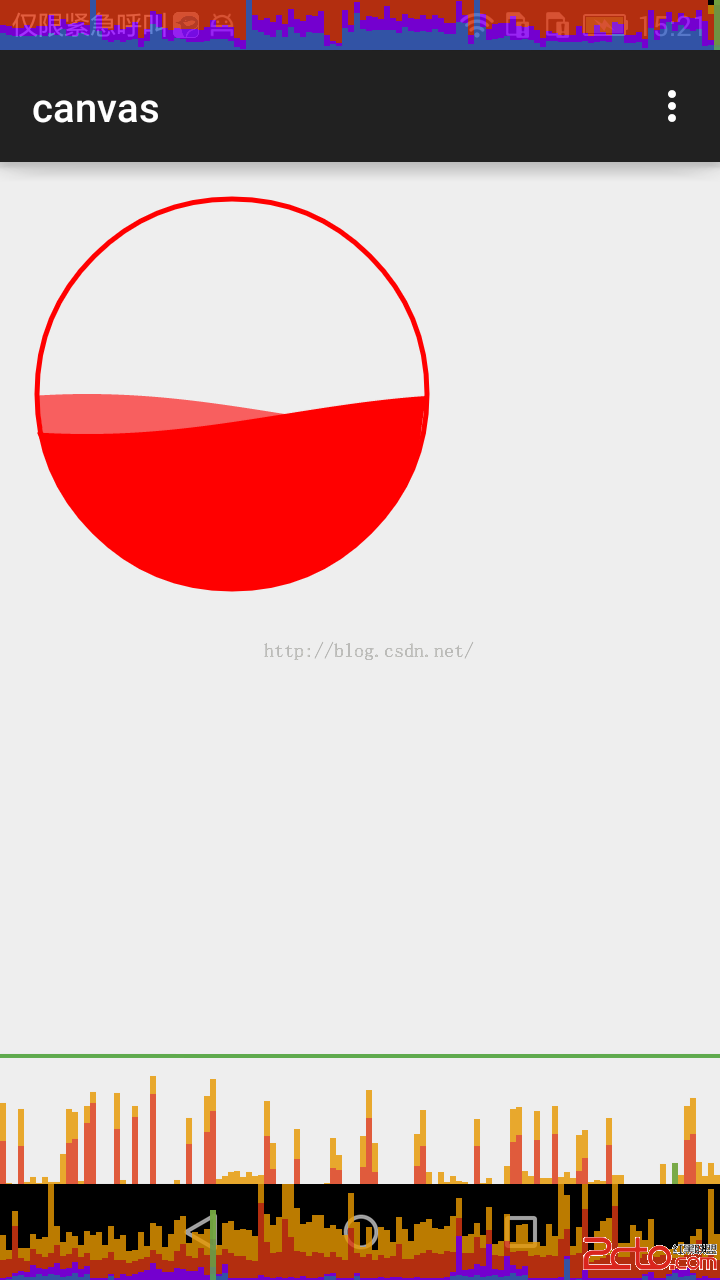
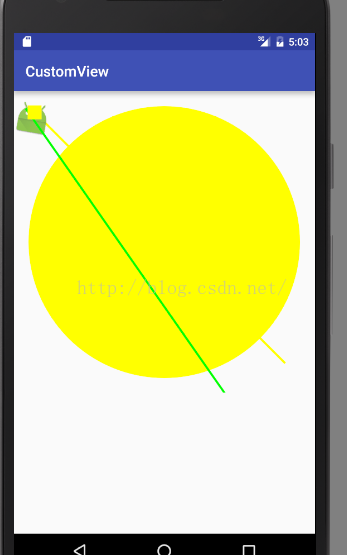
先看效果如圖…
代碼實現過程–main布局
這個布局中就是一個簡單的引用
<LinearLayout xmlns:android="http://schemas.android.com/apk/res/android"
 xmlns:tools="http://schemas.android.com/tools"
 android:layout_width="match_parent"
 android:layout_height="match_parent"
 android:orientation="vertical" >

 <Button
  android:layout_width="match_parent"
  android:layout_height="wrap_content"
  android:text="開始下載"
  android:onClick="start" />

 <com.example.pb.ProgressView
  android:id="@+id/circleView"
  android:layout_width="100dp"
  android:layout_height="100dp" />

</LinearLayout>
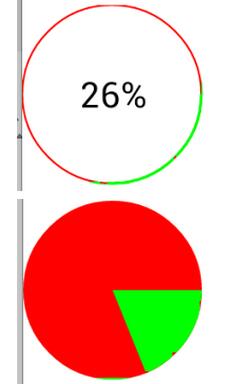
自定義ProgressView-默認是圖中第一種效果
package com.example.pb;
import android.content.Context;
import android.graphics.Canvas;
import android.graphics.Color;
import android.graphics.Matrix;
import android.graphics.Paint;
import android.graphics.Paint.Style;
import android.graphics.Rect;
import android.graphics.RectF;
import android.os.Handler;
import android.util.AttributeSet;
import android.view.View;
public class ProgressView extends View {
int progress = 0;
private String text="0%";
private int max = 100;
public ProgressView(Context context, AttributeSet attrs, int defStyleAttr) {
super(context, attrs, defStyleAttr);
}
public ProgressView(Context context, AttributeSet attrs) {
super(context, attrs);
}
public ProgressView(Context context) {
super(context);
}
@Override
protected void onDraw(Canvas canvas) {
super.onDraw(canvas);
// 對於畫筆
Paint paint = new Paint();
// 設置抗鋸齒
paint.setAntiAlias(true);
// 設置畫筆顏色
// 三種樣式--Stroke 只要描邊 Fill 填充 FILL_AND_STROKE和既有描邊又有填充
paint.setStyle(Style.STROKE);
//設置描邊寬度
paint.setStrokeWidth(2);
//定義外圈員的顏色
paint.setColor(Color.RED);
//繪制圓形進度條--獲取當前控件多大,正好讓進度條在這個控件區間內
canvas.drawCircle(getMeasuredWidth()/2, getMeasuredWidth()/2, getMeasuredWidth()/2, paint);
//重新設置描邊寬度,這個寬度最好能完全蓋過圓形
paint.setStrokeWidth(3);
//定義限制圓弧的矩形,當前這樣定義正好讓圓弧和圓重合
RectF oval = new RectF(0, 0, getMeasuredWidth(), getMeasuredWidth());
//設置進度條(圓弧的顏色)
paint.setColor(Color.GREEN);
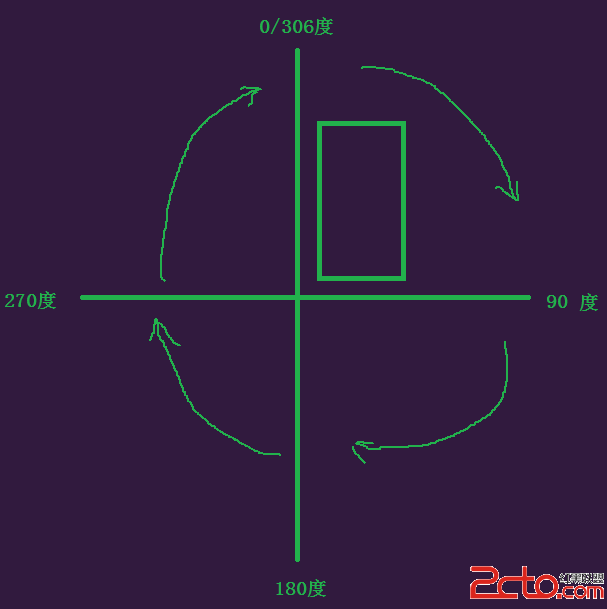
//繪制,設置進度條的度數從0開始,結束值是個變量,可以自己自由設置,來設置進度
//true和false 代表是否使用中心點,如果true,代表連接中心點,會出現扇形的效果
canvas.drawArc(oval, 0, 360 * progress / max, false, paint);
//文字的繪制
paint.setTextSize(40);
//設置文字寬度
paint.setStrokeWidth(1.0f);
//測量文字大小-提前准備個矩形
Rect bounds = new Rect();
//測量文字的寬和高,測量的值可以根據矩形獲取
paint.getTextBounds(text, 0, text.length(), bounds);
paint.setColor(Color.BLACK);
paint.setStyle(Style.FILL);
//繪制文字,計算文字的寬高進行設置
canvas.drawText(text, getMeasuredWidth()/2 - bounds.width() / 2,
getMeasuredWidth()/2 + bounds.height() / 2, paint);
}
/**
* 初始設置當前進度的最大值-默認100
* @param max
*/
public void setMax(int max) {
this.max = max;
}
/**
* 更新進度和文字
* @param progress
* @param text
*/
public void setProgressAndText(int progress, String text) {
this.progress = progress;
this.text = text;
//重新繪制
postInvalidate();
}
}
如果想要實現第二種效果
//設置填充模式
paint.setStyle(Style.FILL);
//繪制,設置進度條的度數從0開始,結束值是個變量,可以自己自由設置,來設置進度
  //true和false 代表是否使用中心點,如果true,代表連接中心點,會出現扇形的效果
  canvas.drawArc(oval, 0, 360 * progress / max, false, paint);
Activity中代碼–模擬一下下載的過程,效果隨便定義
package com.example.pb;

import android.app.Activity;
import android.os.Bundle;
import android.view.View;

public class MainActivity extends Activity {

 private ProgressView circleView;

 @Override
 protected void onCreate(Bundle savedInstanceState) {
  super.onCreate(savedInstanceState);
  setContentView(R.layout.activity_main);

  circleView = (ProgressView) findViewById(R.id.circleView);

 }

 int progress = 0;

 public void start(View v) {
  // 1000公裡
  circleView.setMax(100);
  progress=0;
  new Thread() {
   public void run() {
    while (true) {
     progress = progress + 1;
     String text = progress + "%";
     circleView.setProgressAndText(progress, text);
     try {
      sleep(30);
     } catch (InterruptedException e) {
      // TODO Auto-generated catch block
      e.printStackTrace();
     }
     if (progress == 100) {
      break;
     }
    }
   };
  }.start();
 }

}
以上就是本文的全部內容,希望對大家的學習有所幫助,也希望大家多多支持本站。
 關於自定義View的基礎思路以及畫布的解析
1、前言UI作為用戶看得到的東西,已經成為吸引用戶的最重要因素了。在android中提供了大量的widget以及主題和屬性,加上各種動畫,已經可以實現非常多很絢麗的控件了
 android產品研發(十三)--)App輪訓操作
上一篇文章中我們講解了android app實現長連接的幾種方式,各自的優缺點以及具體的實現,一般而言使用第三方的推送服務已經可以滿足了基本的業務需求,當然了若是對技術有
 Android基礎入門教程——9.2 MediaPlayer播放音頻與視頻
本節引言: 本節帶來的是Android多媒體中的——MediaPlayer,我們可以通過這個API來播放音頻和視頻 該類是Androd
 Android關於ListView的優化問題
今天在我哥們的帶領下,學習了一些關於ListView的優化方案。現在提出來和大家分享下.... 第一點: 在Listview中數據加載時經常用到的ViewHolder,我