現在的Android應用,只要有一個什麼新的創意,過不了多久,幾乎所有的應用都帶這個創意。這不,咱們公司最近的一個持續性的項目,想在首頁加個從左滑動出來的菜單,我查閱網上資料,並自己摸索,實現了左、右兩邊都能滑出菜單,並且,左、右菜單中,都可以加ListView等這類需要解決GestureDetector沖突的問題(如在首頁面中,含有ListView,上下滾動時,左右不動,相反,左右滑動菜單時,上下不動,聽著頭就大了吧!)
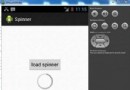
先上幾張圖,給大家瞧瞧,對整體有個了解:
 一、首頁布局:
 代碼如下:
<RelativeLayout xmlns:android="http://schemas.android.com/apk/res/android"
xmlns:tools="http://schemas.android.com/tools"
android:layout_width="match_parent"
android:layout_height="match_parent"
tools:context=".MainActivity" >
<!-- 主布局 -->
<RelativeLayout
android:id="@+id/mainLayout"
android:layout_width="match_parent"
android:layout_height="match_parent">
<RelativeLayout
android:id="@+id/titlebar"
android:layout_width="match_parent"
android:layout_height="wrap_content"
android:background="#ffffff"
android:padding="5dip">
<ImageView
android:id="@+id/ivMore"
android:src="@drawable/nav_more_normal"
android:contentDescription="@string/img_desc"
android:layout_width="wrap_content"
android:layout_height="wrap_content"
android:layout_centerVertical="true"
android:layout_alignParentLeft="true"
android:layout_marginLeft="10dip"/>
<TextView
android:layout_width="wrap_content"
android:layout_height="wrap_content"
android:layout_centerHorizontal="true"
android:layout_centerVertical="true"
android:text="@string/title"
android:textSize="20sp"
android:textColor="#000000"/>
<ImageView
android:id="@+id/ivSettings"
android:src="@drawable/nav_setting_normal"
android:contentDescription="@string/img_desc"
android:layout_width="wrap_content"
android:layout_height="wrap_content"
android:layout_centerVertical="true"
android:layout_alignParentRight="true"
android:layout_marginRight="10dip"/>
</RelativeLayout>
<ImageView
android:src="@drawable/picture"
android:contentDescription="@string/img_desc"
android:scaleType="fitXY"
android:layout_width="match_parent"
android:layout_height="match_parent"
android:layout_below="@id/titlebar"/>
</RelativeLayout>
<!-- 左側菜單導航 -->
<RelativeLayout
android:id="@+id/leftLayout"
android:layout_width="140dip"
android:layout_height="match_parent"
android:background="#000000">
<RelativeLayout
android:id="@+id/leftTitlebar"
android:layout_width="match_parent"
android:layout_height="wrap_content"
android:background="@color/grey21"
android:padding="5dip">
<TextView
android:layout_marginLeft="5dip"
android:layout_width="wrap_content"
android:layout_height="wrap_content"
android:layout_alignParentLeft="true"
android:layout_centerVertical="true"
android:text="@string/leftNav"
android:textSize="20sp"
android:textColor="#ffffff"/>
</RelativeLayout>
<com.chris.lr.slidemenu.LayoutRelative
android:id="@+id/layoutSlideMenu"
android:layout_width="match_parent"
android:layout_height="match_parent"
android:layout_below="@id/leftTitlebar">
<ListView
android:id="@+id/listMore"
android:cacheColorHint="#00000000"
android:layout_width="match_parent"
android:layout_height="match_parent"/>
</com.chris.lr.slidemenu.LayoutRelative>
</RelativeLayout>
<!-- 右側菜單導航 -->
<RelativeLayout
android:id="@+id/rightLayout"
android:layout_width="140dip"
android:layout_height="match_parent"
android:background="#000000">
<RelativeLayout
android:id="@+id/rightTitlebar"
android:layout_width="match_parent"
android:layout_height="wrap_content"
android:background="@color/gold"
android:padding="5dip">
<TextView
android:layout_marginLeft="5dip"
android:layout_width="wrap_content"
android:layout_height="wrap_content"
android:layout_alignParentLeft="true"
android:layout_centerVertical="true"
android:text="@string/right_title"
android:textSize="20sp"
android:textColor="#ffffff"/>
</RelativeLayout>
<TextView
android:text="@string/rightNav"
android:textColor="#ff00ff"
android:textSize="18sp"
android:layout_width="match_parent"
android:layout_height="30dip"
android:layout_below="@id/rightTitlebar"
android:background="#000000"/>
</RelativeLayout>
</RelativeLayout>
布局很簡單,我個人比較推薦用RelativeLayout,因為這個是幾個Layout中,性能最好的,而LinearLayout則不好,原因在於,某個子視圖的寬高變動,會引起這個布局中其它地方也需要重新調整。
布局中,有com.chris.lr.slidemenu.LayoutRelative這個自定義控件是繼承RelativeLayout的,裡面只是加了些手勢的處理,它的作用實際上就是最開始講到的,如果含有ListView這類需要判斷手勢的,則就用到它,先由它來判斷,然後在視情況是否攔截由自己來處理。
二、自定義控件: 代碼如下:
package com.chris.lr.slidemenu;
import android.content.Context;
import android.util.AttributeSet;
import android.util.Log;
import android.view.GestureDetector;
import android.view.GestureDetector.SimpleOnGestureListener;
import android.view.MotionEvent;
import android.widget.RelativeLayout;
public class LayoutRelative extends RelativeLayout {
private static final String TAG = "ChrisSlideMenu";
private GestureDetector mGestureDetector;
private boolean bLockScrollX = false;
private boolean bTouchIntercept = false;
private OnScrollListener mOnScrollListenerCallback = null;
public LayoutRelative(Context context) {
this(context, null);
}
public LayoutRelative(Context context, AttributeSet attrs) {
this(context, attrs, 0);
}
public LayoutRelative(Context context, AttributeSet attrs, int defStyle) {
super(context, attrs, defStyle);
mGestureDetector = new GestureDetector(new LayoutGestureListener());
}
/**
* 設置滾動監聽接口
* @param l
*/
public void setOnScrollListener(OnScrollListener l){
mOnScrollListenerCallback = l;
}
/*
* Progress:
* 1. 重載dispatchTouchEvent,將消息傳遞給GestureDetector;
* 2. 重載手勢中onDown 和 onScroll兩個函數;
* 3. 在onDown中,默認對水平滾動方向加鎖;
* 4. 在onScroll中,判斷e1與e2的水平方向與垂直方向距離:
* a. 如果垂直方向大,則表明是上下滾動,且返回false表明當前手勢不用攔截;
* b. 如果水平方向大,則表明是左右滾動,且返回true表明當前手勢需要攔截;
* 5. 重載onInterceptTouchEvent,如果手勢返回為true,則onInterceptTouchEvent也返回true;
* 6. 如果要攔截手勢消息,則需要重載onTouchEvent,或子視圖中重載這個函數,來處理這條消息;
* 7. 如果自己處理,則對水平方向滾動去鎖(表明當前用戶想左右滾動);
*
* ----------
* ---------------------- ------>| onDown |
* | | | ----------
* | dispatchTouchEvent | <---- ------ false: 上下滾動
* | | | ------------ /
* ---------------------- ------>| onScroll | ----
* | ------------ \
* | ------ true : 左右滾動
* | intercept = true ----------------
* |----------------------| onTouchEvent |
* | ----------------
* -------------------------
* | |
* | onInterceptTouchEvent |
* | |
* -------------------------
*
*/
@Override
public boolean dispatchTouchEvent(MotionEvent ev) {
bTouchIntercept = mGestureDetector.onTouchEvent(ev);
if(MotionEvent.ACTION_UP == ev.getAction() && !bLockScrollX){
if(mOnScrollListenerCallback != null){
mOnScrollListenerCallback.doOnRelease();
}
}
return super.dispatchTouchEvent(ev);
}
// viewgroup.onInterceptTouchEvent
@Override
public boolean onInterceptTouchEvent(MotionEvent ev) {
super.onInterceptTouchEvent(ev);
return bTouchIntercept;
}
// view.onTouchEvent
@Override
public boolean onTouchEvent(MotionEvent event) {
bLockScrollX = false;
return super.onTouchEvent(event);
}
/**
* @author cheng.yang
*
* 自定義手勢監聽
*/
public class LayoutGestureListener extends SimpleOnGestureListener {
@Override
public boolean onDown(MotionEvent e) {
bLockScrollX = true;
return super.onDown(e);
}
@Override
public boolean onScroll(MotionEvent e1, MotionEvent e2,
float distanceX, float distanceY) {
if(!bLockScrollX){
if(mOnScrollListenerCallback != null){
mOnScrollListenerCallback.doOnScroll(e1, e2, distanceX, distanceY);
}
}
if(Math.abs(e1.getY() - e2.getY()) > Math.abs(e1.getX() - e2.getX())){
return false;
}else{
return true;
}
}
}
public interface OnScrollListener {
void doOnScroll(MotionEvent e1, MotionEvent e2,
float distanceX, float distanceY);
void doOnRelease();
}
}
這個控件中,含有一個接口,當用戶手勢為左右時,則需要將滾動數據回傳到主視圖中去處理,而自己攔截不往下傳遞消息。裡面有個消息流程圖,講的比較詳細了,大家可以先看看,有什麼問題,可以問我。
三、MainActivity的實現:
這個需要著講解,畢竟,左、右滑動的實現都在這裡。
代碼如下:
/**
*
* @author cheng.yang
*
* 左、右菜單滑出
*
* params[0]: 滑動距離
* params[1]: 滑動速度,帶方向
*/
public class SlideMenu extends AsyncTask<Integer, Integer, Void>{
@Override
protected Void doInBackground(Integer... params) {
if(params.length != 2){
Log.e(TAG, "error, params must have 2!");
}
int times = params[0] / Math.abs(params[1]);
if(params[0] % Math.abs(params[1]) != 0){
times ++;
}
for(int i = 0; i < times; i++){
this.publishProgress(params[0], params[1], i+1);
}
return null;
}
@Override
protected void onProgressUpdate(Integer... values) {
if(values.length != 3){
Log.e(TAG, "error, values must have 3!");
}
int distance = Math.abs(values[1]) * values[2];
int delta = values[0] - distance;
int leftMargin = 0;
if(values[1] < 0){ // 左移
leftMargin = (delta > 0 ? values[1] : -(Math.abs(values[1]) - Math.abs(delta)));
}else{
leftMargin = (delta > 0 ? values[1] : (Math.abs(values[1]) - Math.abs(delta)));
}
rollLayout(leftMargin);
}
首先,自定義一個繼承於AsyncTask的類的線程,這個自定義類,就是用來實現動畫效果,重在“滑動”,而不是硬生生的擠出來。關於AsyncTask的用法,大家可以看我的博客中關於它的講解:
http://blog.csdn.net/qingye_love/article/details/8777508
自定義類的使用需要兩個參數,一個是滑動的距離,一個是每次滑動多少且向哪個方向滑動:
1. 滑動距離:若是左側菜單滑出來,距離就是左側菜單的寬度;同理,右側滑出就是右側菜單的寬度;
2. 滑動速度:即動畫滑動時,向哪個方向,且每次滑動多少像素;
在doInBackground中,計算需要滑動多少次,然後用for循環調用publishProgress,實際上就是調用的onProgressUpdate,在onProgressUpdate中,根據方向,以及當前main layout的 leftMargin來計算是滑動指定的距離(速度),還是當終點距離小於滑動速度時,速度就為終點距離,最終,調用rollLayout,來修改 leftLayout, mainLayout, rightLayout三者的布局,達到滑動的效果。
rollLayout的實現:
代碼如下:
private void rollLayout(int margin){
RelativeLayout.LayoutParams lp = (LayoutParams) mainLayout.getLayoutParams();
lp.leftMargin += margin;
lp.rightMargin -= margin;
mainLayout.setLayoutParams(lp);
lp = (LayoutParams) leftLayout.getLayoutParams();
lp.leftMargin += margin;
leftLayout.setLayoutParams(lp);
lp = (LayoutParams) rightLayout.getLayoutParams();
lp.leftMargin += margin;
lp.rightMargin -= margin;
rightLayout.setLayoutParams(lp);
}
這個就是修改三個layout的leftMargin和rightMargin。
初始化布局控件:
代碼如下:
private void initView(){
mainLayout = (RelativeLayout) findViewById(R.id.mainLayout);
leftLayout = (RelativeLayout) findViewById(R.id.leftLayout);
rightLayout = (RelativeLayout) findViewById(R.id.rightLayout);
mainLayout.setOnTouchListener(this);
leftLayout.setOnTouchListener(this);
rightLayout.setOnTouchListener(this);
layoutSlideMenu = (LayoutRelative) findViewById(R.id.layoutSlideMenu);
layoutSlideMenu.setOnScrollListener(new OnScrollListener(){
@Override
public void doOnScroll(MotionEvent e1, MotionEvent e2,
float distanceX, float distanceY) {
onScroll(distanceX);
}
@Override
public void doOnRelease(){
onRelease();
}
});
ivMore = (ImageView) findViewById(R.id.ivMore);
ivSettings = (ImageView) findViewById(R.id.ivSettings);
ivMore.setOnTouchListener(this);
ivSettings.setOnTouchListener(this);
mListMore = (ListView) findViewById(R.id.listMore);
mListMore.setAdapter(new ArrayAdapter<String>(this, R.layout.item, R.id.tv_item, title));
mListMore.setOnItemClickListener(this);
mGestureDetector = new GestureDetector(this);
mGestureDetector.setIsLongpressEnabled(false);
resizeLayout();
}
調整三個layout,將leftLayout移動到屏幕最左邊之外,現時將rightLayout移動到屏幕最右邊之外:
代碼如下:
/*
* 使用leftMargin及rightMargin防止layout被擠壓變形
* Math.abs(leftMargin - rightMargin) = layout.width
*/
private void resizeLayout(){
DisplayMetrics dm = getResources().getDisplayMetrics();
// 固定 main layout, 防止被左、右擠壓變形
RelativeLayout.LayoutParams lp = (LayoutParams) mainLayout.getLayoutParams();
lp.width = dm.widthPixels;
mainLayout.setLayoutParams(lp);
// 將左layout調整至main layout左邊
lp = (LayoutParams) leftLayout.getLayoutParams();
lp.leftMargin = -lp.width;
leftLayout.setLayoutParams(lp);
Log.d(TAG, "left l.margin = " + lp.leftMargin);
// 將左layout調整至main layout右邊
lp = (LayoutParams) rightLayout.getLayoutParams();
lp.leftMargin = dm.widthPixels;
lp.rightMargin = -lp.width;
rightLayout.setLayoutParams(lp);
Log.d(TAG, "right l.margin = " + lp.leftMargin);
}
重載onTouch,處理消息:
代碼如下:
////////////////////////////// onTouch ///////////////////////////////
@Override
public boolean onTouch(View v, MotionEvent event) {
mClickedView = v;
if(MotionEvent.ACTION_UP == event.getAction() && bIsScrolling){
onRelease();
}
return mGestureDetector.onTouchEvent(event);
}
記錄選擇的view,並將消息傳給GestureDetector;
重載GestureDetector的onDown, onScroll, onSingleTapUp這三個是主要的,其它的重載不做任何修改;
代碼如下:
/////////////////// GestureDetector Override Begin ///////////////////
@Override
public boolean onDown(MotionEvent e) {
bIsScrolling = false;
mScroll = 0;
iLimited = 0;
RelativeLayout.LayoutParams lp = (LayoutParams) mainLayout.getLayoutParams();
if(lp.leftMargin > 0){
iLimited = 1;
}else if(lp.leftMargin < 0){
iLimited = -1;
}
return true;
}
在onDown中,判斷當前的 mainLayout 的 leftMargin 的值,並用 iLimited 記錄下來,原因:
如果當前顯示的是左側菜單,則用戶滾動屏幕時,最多只是將左側菜單滑出到屏幕外,而不會繼續滑動,將右側菜單顯示出來;同理,當前已經顯示了右側菜單。
代碼如下:
@Override
public boolean onSingleTapUp(MotionEvent e) {
/*
* 正常情況下,mainLayout的leftMargin為0,
* 當左/右菜單為打開中,此時就不為0,需要判斷
*/
if(mClickedView != null){
RelativeLayout.LayoutParams lp = (LayoutParams) mainLayout.getLayoutParams();
if(mClickedView == ivMore){
Log.d(TAG, "[onSingleTapUp] ivMore clicked! leftMargin = " + lp.leftMargin);
if(lp.leftMargin == 0){
new SlideMenu().execute(leftLayout.getLayoutParams().width, SPEED);
}else{
new SlideMenu().execute(leftLayout.getLayoutParams().width, -SPEED);
}
}else if(mClickedView == ivSettings){
Log.d(TAG, "[onSingleTapUp] ivSettings clicked! leftMargin = " + lp.leftMargin);
if(lp.leftMargin == 0){
new SlideMenu().execute(rightLayout.getLayoutParams().width, -SPEED);
}else{
new SlideMenu().execute(rightLayout.getLayoutParams().width, SPEED);
}
}else if(mClickedView == mainLayout){
Log.d(TAG, "[onSingleTapUp] mainLayout clicked!");
}
}
return true;
}
這個函數中,處理標題欄左、右兩個按鈕,點擊一次,顯示側導航菜單,再點擊一次,則關閉。
代碼如下:
@Override
public boolean onScroll(MotionEvent e1, MotionEvent e2, float distanceX,
float distanceY) {
onScroll(distanceX);
return false;
}
滾動處理,直接將本次的水平滾動距離傳給onScroll函數來處理,因為,側邊導航菜單的水平滾動也將通過OnScrollListener.doOnScroll來回調,所以,寫個通用函數。
代碼如下:
private void onScroll(float distanceX){
bIsScrolling = true;
mScroll += distanceX; // 向左為正
Log.d(TAG, "mScroll = " + mScroll + ", distanceX = " + distanceX);
RelativeLayout.LayoutParams lp = (LayoutParams) mainLayout.getLayoutParams();
RelativeLayout.LayoutParams lpLeft = (LayoutParams) leftLayout.getLayoutParams();
RelativeLayout.LayoutParams lpRight = (LayoutParams) rightLayout.getLayoutParams();
Log.d(TAG, "lp.leftMargin = " + lp.leftMargin);
int distance = 0;
if(mScroll > 0){ // 向左移動
if(lp.leftMargin <= 0){ // 打開右導航菜單
if(iLimited > 0){
return;
}
distance = lpRight.width - Math.abs(lp.leftMargin);
}else if(lp.leftMargin > 0){ // 關閉左導航菜單
distance = lp.leftMargin;
}
if(mScroll >= distance){
mScroll = distance;
}
}else if(mScroll < 0){ // 向右移動
if(lp.leftMargin >= 0){ // 打開左導航菜單
if(iLimited < 0){
return;
}
distance = lpLeft.width - Math.abs(lp.leftMargin);
}else if(lp.leftMargin < 0){ // 關閉右導航菜單
distance = Math.abs(lp.leftMargin);
}
if(mScroll <= -distance){
mScroll = -distance;
}
}
Log.d(TAG, "mScroll = " + mScroll);
if(mScroll != 0){
rollLayout(-mScroll);
}
}
接下來,我們看看當側邊導航菜單,水平滾動且用戶松開手指時,回調OnScrollListener.doOnRelease,我們會調用一個onRelease來負責處理收尾工作:
代碼如下:
private void onRelease(){
RelativeLayout.LayoutParams lp = (LayoutParams) mainLayout.getLayoutParams();
if(lp.leftMargin < 0){ // 左移
/*
* 左移大於右導航寬度一半,則自動展開,否則自動縮回去
*/
if(Math.abs(lp.leftMargin) > rightLayout.getLayoutParams().width/2){
new SlideMenu().execute(rightLayout.getLayoutParams().width - Math.abs(lp.leftMargin), -SPEED);
}else{
new SlideMenu().execute(Math.abs(lp.leftMargin), SPEED);
}
}else if(lp.leftMargin > 0){
/*
* 右移大於左導航寬度一半,則自動展開,否則自動縮回去
*/
if(Math.abs(lp.leftMargin) > leftLayout.getLayoutParams().width/2){
new SlideMenu().execute(leftLayout.getLayoutParams().width - Math.abs(lp.leftMargin), SPEED);
}else{
new SlideMenu().execute(Math.abs(lp.leftMargin), -SPEED);
}
}
}
主要的代碼塊已經講解完了,下面是完整的代碼:
代碼如下:
package com.chris.lr.slidemenu;
import com.chris.lr.slidemenu.LayoutRelative.OnScrollListener;
import android.os.AsyncTask;
import android.os.Bundle;
import android.util.DisplayMetrics;
import android.util.Log;
import android.view.GestureDetector;
import android.view.GestureDetector.OnGestureListener;
import android.view.KeyEvent;
import android.view.MotionEvent;
import android.view.View;
import android.view.View.OnTouchListener;
import android.view.Window;
import android.widget.AdapterView;
import android.widget.AdapterView.OnItemClickListener;
import android.widget.ArrayAdapter;
import android.widget.ImageView;
import android.widget.ListView;
import android.widget.RelativeLayout;
import android.widget.Toast;
import android.widget.RelativeLayout.LayoutParams;
import android.app.Activity;
public class MainActivity extends Activity implements OnGestureListener,
OnTouchListener, OnItemClickListener {
private static final String TAG = "ChrisSlideMenu";
private RelativeLayout mainLayout;
private RelativeLayout leftLayout;
private RelativeLayout rightLayout;
private LayoutRelative layoutSlideMenu;
private ListView mListMore;
private ImageView ivMore;
private ImageView ivSettings;
private GestureDetector mGestureDetector;
private static final int SPEED = 30;
private boolean bIsScrolling = false;
private int iLimited = 0;
private int mScroll = 0;
private View mClickedView = null;
private String title[] = {"待發送隊列",
"同步分享設置",
"編輯我的資料",
"找朋友",
"告訴朋友",
"節省流量",
"推送設置",
"版本更新",
"意見反饋",
"積分兌換",
"精品應用",
"常見問題",
"退出當前帳號",
"退出1",
"退出2",
"退出3",
"退出4"};
@Override
protected void onCreate(Bundle savedInstanceState) {
super.onCreate(savedInstanceState);
this.requestWindowFeature(Window.FEATURE_NO_TITLE);
setContentView(R.layout.activity_main);
initView();
}
private void initView(){
mainLayout = (RelativeLayout) findViewById(R.id.mainLayout);
leftLayout = (RelativeLayout) findViewById(R.id.leftLayout);
rightLayout = (RelativeLayout) findViewById(R.id.rightLayout);
mainLayout.setOnTouchListener(this);
leftLayout.setOnTouchListener(this);
rightLayout.setOnTouchListener(this);
layoutSlideMenu = (LayoutRelative) findViewById(R.id.layoutSlideMenu);
layoutSlideMenu.setOnScrollListener(new OnScrollListener(){
@Override
public void doOnScroll(MotionEvent e1, MotionEvent e2,
float distanceX, float distanceY) {
onScroll(distanceX);
}
@Override
public void doOnRelease(){
onRelease();
}
});
ivMore = (ImageView) findViewById(R.id.ivMore);
ivSettings = (ImageView) findViewById(R.id.ivSettings);
ivMore.setOnTouchListener(this);
ivSettings.setOnTouchListener(this);
mListMore = (ListView) findViewById(R.id.listMore);
mListMore.setAdapter(new ArrayAdapter<String>(
this, R.layout.item, R.id.tv_item, title));
mListMore.setOnItemClickListener(this);
mGestureDetector = new GestureDetector(this);
mGestureDetector.setIsLongpressEnabled(false);
resizeLayout();
}
/*
* 使用leftMargin及rightMargin防止layout被擠壓變形
* Math.abs(leftMargin - rightMargin) = layout.width
*/
private void resizeLayout(){
DisplayMetrics dm = getResources().getDisplayMetrics();
// 固定 main layout, 防止被左、右擠壓變形
RelativeLayout.LayoutParams lp =
(LayoutParams) mainLayout.getLayoutParams();
lp.width = dm.widthPixels;
mainLayout.setLayoutParams(lp);
// 將左layout調整至main layout左邊
lp = (LayoutParams) leftLayout.getLayoutParams();
lp.leftMargin = -lp.width;
leftLayout.setLayoutParams(lp);
Log.d(TAG, "left l.margin = " + lp.leftMargin);
// 將左layout調整至main layout右邊
lp = (LayoutParams) rightLayout.getLayoutParams();
lp.leftMargin = dm.widthPixels;
lp.rightMargin = -lp.width;
rightLayout.setLayoutParams(lp);
Log.d(TAG, "right l.margin = " + lp.leftMargin);
}
@Override
public boolean onKeyDown(int keyCode, KeyEvent event) {
if(keyCode == KeyEvent.KEYCODE_BACK && event.getRepeatCount() == 0){
RelativeLayout.LayoutParams lp =
(LayoutParams) mainLayout.getLayoutParams();
if(lp.leftMargin != 0){
if(lp.leftMargin > 0){
new SlideMenu().execute(
leftLayout.getLayoutParams().width, -SPEED);
}else if(lp.leftMargin < 0){
new SlideMenu().execute(
rightLayout.getLayoutParams().width, SPEED);
}
return true;
}
}
return super.onKeyDown(keyCode, event);
}
private void rollLayout(int margin){
RelativeLayout.LayoutParams lp =
(LayoutParams) mainLayout.getLayoutParams();
lp.leftMargin += margin;
lp.rightMargin -= margin;
mainLayout.setLayoutParams(lp);
lp = (LayoutParams) leftLayout.getLayoutParams();
lp.leftMargin += margin;
leftLayout.setLayoutParams(lp);
lp = (LayoutParams) rightLayout.getLayoutParams();
lp.leftMargin += margin;
lp.rightMargin -= margin;
rightLayout.setLayoutParams(lp);
}
private void onScroll(float distanceX){
bIsScrolling = true;
mScroll += distanceX; // 向左為正
Log.d(TAG, "mScroll = " + mScroll + ", distanceX = " + distanceX);
RelativeLayout.LayoutParams lp =
(LayoutParams) mainLayout.getLayoutParams();
RelativeLayout.LayoutParams lpLeft =
(LayoutParams) leftLayout.getLayoutParams();
RelativeLayout.LayoutParams lpRight =
(LayoutParams) rightLayout.getLayoutParams();
Log.d(TAG, "lp.leftMargin = " + lp.leftMargin);
int distance = 0;
if(mScroll > 0){ // 向左移動
if(lp.leftMargin <= 0){ // 打開右導航菜單
if(iLimited > 0){
return;
}
distance = lpRight.width - Math.abs(lp.leftMargin);
}else if(lp.leftMargin > 0){ // 關閉左導航菜單
distance = lp.leftMargin;
}
if(mScroll >= distance){
mScroll = distance;
}
}else if(mScroll < 0){ // 向右移動
if(lp.leftMargin >= 0){ // 打開左導航菜單
if(iLimited < 0){
return;
}
distance = lpLeft.width - Math.abs(lp.leftMargin);
}else if(lp.leftMargin < 0){ // 關閉右導航菜單
distance = Math.abs(lp.leftMargin);
}
if(mScroll <= -distance){
mScroll = -distance;
}
}
Log.d(TAG, "mScroll = " + mScroll);
if(mScroll != 0){
rollLayout(-mScroll);
}
}
private void onRelease(){
RelativeLayout.LayoutParams lp =
(LayoutParams) mainLayout.getLayoutParams();
if(lp.leftMargin < 0){ // 左移
/*
* 左移大於右導航寬度一半,則自動展開,否則自動縮回去
*/
if(Math.abs(lp.leftMargin) > rightLayout.getLayoutParams().width/2){
new SlideMenu().execute(rightLayout.getLayoutParams().width -
Math.abs(lp.leftMargin), -SPEED);
}else{
new SlideMenu().execute(Math.abs(lp.leftMargin), SPEED);
}
}else if(lp.leftMargin > 0){
/*
* 右移大於左導航寬度一半,則自動展開,否則自動縮回去
*/
if(Math.abs(lp.leftMargin) > leftLayout.getLayoutParams().width/2){
new SlideMenu().execute(leftLayout.getLayoutParams().width -
Math.abs(lp.leftMargin), SPEED);
}else{
new SlideMenu().execute(Math.abs(lp.leftMargin), -SPEED);
}
}
}
///////////////////// ListView.onItemClick ///////////////////////
@Override
public void onItemClick(AdapterView<?> arg0, View arg1, int arg2, long arg3) {
Toast.makeText(this, title[arg2], Toast.LENGTH_SHORT).show();
}
////////////////////////////// onTouch ///////////////////////////////
@Override
public boolean onTouch(View v, MotionEvent event) {
mClickedView = v;
if(MotionEvent.ACTION_UP == event.getAction() && bIsScrolling){
onRelease();
}
return mGestureDetector.onTouchEvent(event);
}
/////////////////// GestureDetector Override Begin ///////////////////
@Override
public boolean onDown(MotionEvent e) {
bIsScrolling = false;
mScroll = 0;
iLimited = 0;
RelativeLayout.LayoutParams lp =
(LayoutParams) mainLayout.getLayoutParams();
if(lp.leftMargin > 0){
iLimited = 1;
}else if(lp.leftMargin < 0){
iLimited = -1;
}
return true;
}
@Override
public boolean onFling(MotionEvent arg0, MotionEvent arg1, float arg2,
float arg3) {
return false;
}
@Override
public void onLongPress(MotionEvent e) {
}
@Override
public boolean onScroll(MotionEvent e1, MotionEvent e2, float distanceX,
float distanceY) {
onScroll(distanceX);
return false;
}
@Override
public void onShowPress(MotionEvent arg0) {
}
@Override
public boolean onSingleTapUp(MotionEvent e) {
/*
* 正常情況下,mainLayout的leftMargin為0,
* 當左/右菜單為打開中,此時就不為0,需要判斷
*/
if(mClickedView != null){
RelativeLayout.LayoutParams lp =
(LayoutParams) mainLayout.getLayoutParams();
if(mClickedView == ivMore){
Log.d(TAG, "[onSingleTapUp] ivMore clicked! leftMargin = "
+ lp.leftMargin);
if(lp.leftMargin == 0){
new SlideMenu().execute(
leftLayout.getLayoutParams().width, SPEED);
}else{
new SlideMenu().execute(
leftLayout.getLayoutParams().width, -SPEED);
}
}else if(mClickedView == ivSettings){
Log.d(TAG, "[onSingleTapUp] ivSettings clicked! leftMargin = "
+ lp.leftMargin);
if(lp.leftMargin == 0){
new SlideMenu().execute(
rightLayout.getLayoutParams().width, -SPEED);
}else{
new SlideMenu().execute(
rightLayout.getLayoutParams().width, SPEED);
}
}else if(mClickedView == mainLayout){
Log.d(TAG, "[onSingleTapUp] mainLayout clicked!");
}
}
return true;
}
/////////////////// GestureDetector Override End ///////////////////
/**
*
* @author cheng.yang
*
* 左、右菜單滑出
*
* params[0]: 滑動距離
* params[1]: 滑動速度,帶方向
*/
public class SlideMenu extends AsyncTask<Integer, Integer, Void>{
@Override
protected Void doInBackground(Integer... params) {
if(params.length != 2){
Log.e(TAG, "error, params must have 2!");
}
int times = params[0] / Math.abs(params[1]);
if(params[0] % Math.abs(params[1]) != 0){
times ++;
}
for(int i = 0; i < times; i++){
this.publishProgress(params[0], params[1], i+1);
}
return null;
}
@Override
protected void onProgressUpdate(Integer... values) {
if(values.length != 3){
Log.e(TAG, "error, values must have 3!");
}
int distance = Math.abs(values[1]) * values[2];
int delta = values[0] - distance;
int leftMargin = 0;
if(values[1] < 0){ // 左移
leftMargin = (delta > 0 ? values[1] :
-(Math.abs(values[1]) - Math.abs(delta)));
}else{
leftMargin = (delta > 0 ? values[1] :
(Math.abs(values[1]) - Math.abs(delta)));
}
rollLayout(leftMargin);
}
}
}
總結: 本文左,右滑出菜單的原理,就是用到了leftMargin和rightMargin兩個屬性,並配合幾個GestureDetector來完全手勢判斷的邏輯處理,其中,自定義的那個控件布局LayoutRelative,可以用在任何子視圖中需要處理上下,左右滾動沖突的地方,良好的解決了沖突問題。
完整的代碼下載地址:
http://download.csdn.net/detail/qingye_love/5237799
希望大家多來聊聊,同時,大家可以在我的基礎上,實現onFling的方法,歡迎交流。
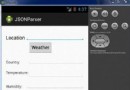 Android JSON解析器
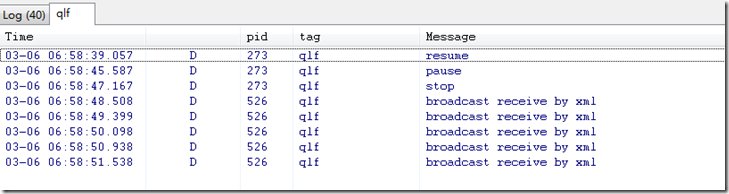 Android中的廣播(BroadCast)詳細介紹
 Android
 Android ApiDemo示例解讀系列之十:App