編輯:Android開發實例
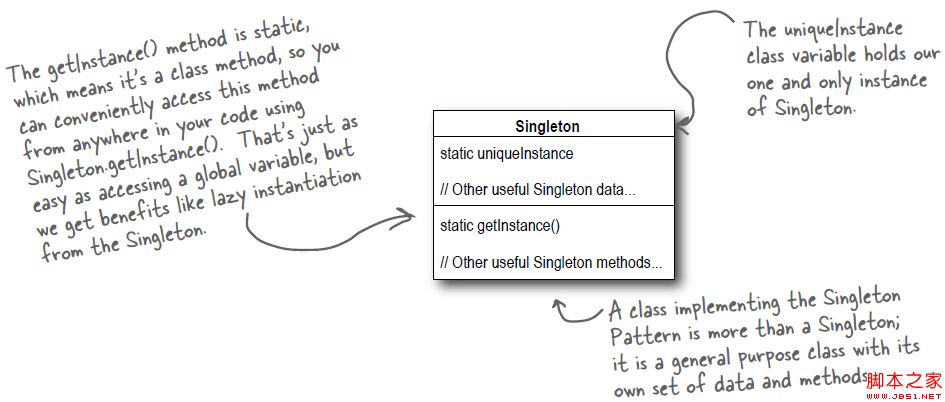
SensorDevice是在本地代碼中SensorService對Sensor設備的抽象類型封裝,它封裝了傳感器硬件的硬件操作,該類繼承了Singleton類,通過getInstance方法獲得單例模式設備操作對象:
@frameworks/base/services/sensorservice/SensorDevice.h
- class SensorDevice : public Singleton<SensorDevice> {
- friend class Singleton<SensorDevice>;
- struct sensors_poll_device_t* mSensorDevice;
- struct sensors_module_t* mSensorModule;
- mutable Mutex mLock; // protect mActivationCount[].rates
- // fixed-size array after construction
- struct Info {
- Info() : delay(0) { }
- KeyedVector<void*, nsecs_t> rates;
- nsecs_t delay;
- status_t setDelayForIdent(void* ident, int64_t ns);
- nsecs_t selectDelay();
- };
- DefaultKeyedVector<int, Info> mActivationCount;
- SensorDevice();
- public:
- ssize_t getSensorList(sensor_t const** list);
- status_t initCheck() const;
- ssize_t poll(sensors_event_t* buffer, size_t count);
- status_t activate(void* ident, int handle, int enabled);
- status_t setDelay(void* ident, int handle, int64_t ns);
- void dump(String8& result, char* buffer, size_t SIZE);
- };
通過SensorDevice類的定義可看到它包含的屬性和方法:
屬性:
mSensorDevice:Sensor設備HAL層操作接口封裝結構
mSensorModule:Sensor設備HAL硬件模塊封裝結構
mActivationCount:保存激活Sensor設備向量表
方法:
SensorDevice:構造方法
getSensorList:獲得Sensor設備列表方法
poll:Sensor設備多路監聽方法
activate:設備激活方法
setDelay:設備Sensor設備延遲方法
由前面分析可知,SensorDevice是單例模型,其構造方法僅會調用一次:
@frameworks/base/services/sensorservice/SensorDevice.cpp
- SensorDevice::SensorDevice()
- : mSensorDevice(0), mSensorModule(0)
- {
- // 終於看到hw_get_module了,幸福,高興,開心,相見時難別亦難…
- status_t err = hw_get_module(SENSORS_HARDWARE_MODULE_ID,
- (hw_module_t const**)&mSensorModule);
- LOGE_IF(err, "couldn't load %s module (%s)",
- SENSORS_HARDWARE_MODULE_ID, strerror(-err));
- if (mSensorModule) {
- //打開module設備,返回module設備的操作接口,保存在mSensorDevice中
- err = sensors_open(&mSensorModule->common, &mSensorDevice);
- LOGE_IF(err, "couldn't open device for module %s (%s)",
- SENSORS_HARDWARE_MODULE_ID, strerror(-err));
- if (mSensorDevice) {
- sensor_t const* list;
- // 調用module設備的get_sensors_list接口
- ssize_t count = mSensorModule->get_sensors_list(mSensorModule, &list);
- mActivationCount.setCapacity(count);
- Info model;
- for (size_t i=0 ; i<size_t(count) ; i++) {
- mActivationCount.add(list[i].handle, model);
- mSensorDevice->activate(mSensorDevice, list[i].handle, 0);
- }
- }
- }
- }
在SensorDevice構造方法裡調用HAL架構的hw_get_module來獲得Sensor設備模塊,之後調用sensors_open這個工具函數,打開Sensor設備模塊(調用其methods->open函數指針),返回Sensor設備的操作接口(這些接口在HAL層實現),保存在mSensorDevice中,調用Sensor模塊的get_sensors_list方法獲得傳感器列表,然後依次激活這些設備並且添加到mActivationCount設備信息向量中。
Sensor HAL模塊代碼及打開模塊工具函數sensors_open:
@hardware/libhardware/include/hardware/sensors.h
- struct sensors_module_t {
- struct hw_module_t common;
- /** * Enumerate all available sensors. The list is returned in "list".
- * @return number of sensors in the list
- */
- int (*get_sensors_list)(struct sensors_module_t* module,
- struct sensor_t const** list);
- };
- ……
- static inline int sensors_open(const struct hw_module_t* module,
- struct sensors_poll_device_t** device) {
- return module->methods->open(module,
- SENSORS_HARDWARE_POLL, (struct hw_device_t**)device);
- }
SensorDevice其它幾個方法比較簡單:
- ssize_t SensorDevice::getSensorList(sensor_t const** list) {
- if (!mSensorModule) return NO_INIT;
- // 直接調用模塊的get_sensors_list方法獲得Sensor列表
- ssize_t count = mSensorModule->get_sensors_list(mSensorModule, list);
- return count;
- }
- ssize_t SensorDevice::poll(sensors_event_t* buffer, size_t count) {
- if (!mSensorDevice) return NO_INIT;
- ssize_t c;
- do {
- // 調用Sensor設備的poll操作接口,該接口實現在HAL層
- c = mSensorDevice->poll(mSensorDevice, buffer, count);
- } while (c == -EINTR);
- return c;
- }
- status_t SensorDevice::activate(void* ident, int handle, int enabled)
- {
- if (!mSensorDevice) return NO_INIT;
- status_t err(NO_ERROR);
- bool actuateHardware = false;
- Info& info( mActivationCount.editValueFor(handle) );
- LOGD_IF(DEBUG_CONNECTIONS,
- "SensorDevice::activate: ident=%p, handle=0x%08x, enabled=%d, count=%d",
- ident, handle, enabled, info.rates.size());
- if (enabled) {
- Mutex::Autolock _l(mLock);
- LOGD_IF(DEBUG_CONNECTIONS, "... index=%ld",
- info.rates.indexOfKey(ident));
- // 設置設備為默認延遲級別
- if (info.rates.indexOfKey(ident) < 0) {
- info.rates.add(ident, DEFAULT_EVENTS_PERIOD);
- if (info.rates.size() == 1) {
- actuateHardware = true;
- }
- } else {
- // sensor was already activated for this ident
- }
- } else {
- Mutex::Autolock _l(mLock);
- LOGD_IF(DEBUG_CONNECTIONS, "... index=%ld",
- info.rates.indexOfKey(ident));
- ssize_t idx = info.rates.removeItem(ident);
- if (idx >= 0) {
- if (info.rates.size() == 0) {
- actuateHardware = true;
- }
- } else {
- // sensor wasn't enabled for this ident
- }
- }
- if (actuateHardware) {
- LOGD_IF(DEBUG_CONNECTIONS, "\t>>> actuating h/w");
- // 調用Sensor設備activate操作接口,其實現在HAL層
- err = mSensorDevice->activate(mSensorDevice, handle, enabled);
- if (enabled) {
- LOGE_IF(err, "Error activating sensor %d (%s)", handle, strerror(-err));
- if (err == 0) {
- // 在電池服務中使能Sensor電源
- BatteryService::getInstance().enableSensor(handle);
- }
- } else {
- if (err == 0) {
- // 在電池服務中關閉Sensor電源
- BatteryService::getInstance().disableSensor(handle);
- }
- }
- }
- { // scope for the lock
- Mutex::Autolock _l(mLock);
- nsecs_t ns = info.selectDelay();
- // 設置延遲值
- mSensorDevice->setDelay(mSensorDevice, handle, ns);
- }
- return err;
- }
由這幾個SensorDevice的方法可知,其具體的實現全部由mSensorDevice 封裝的設備操作接口函數實現,這些設備操作接口在HAL層實現,其實SensorDevice只是SensorService的設備操作對象,封裝了設備的操作,而這些操作實際“干活的”的是HAL層代碼。
一路分析過來,已經到了HAL層了,我們回顧下前面所學的東西。
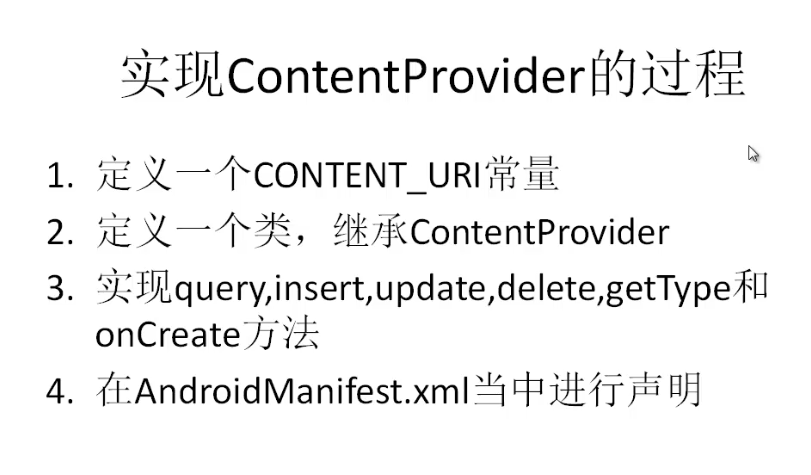
讓我們從Java應用層到框架層再到本地代碼來總結下:
1. Android的應用程序調用getSystemService方法獲得SensorManager對象,該方法實現在ContextImpl.java中,它是Activity的抽象父類Context的實現類。
2. 在應用程序(Activity)初始化時調用registerService創建並注冊SensorManager
3. 創建SensorManager
4. 在SensorManager的構造方法中,調用了本地方法:nativeClassInit(),它用來初始化了Java對象Sensor在本地的引用,方便本地代碼對Java對象操作。
5. 在SensorManager的構造方法中,調用sensors_module_init()來創建SensorManager本地對象。
8. 調用sensors_module_get_next_sensor()方法,通過nativeClassInit中初始化的Sensor引用填充Sensor設備列表,返回給Java框架層。
12. 將sensors_module_get_next_sensor()獲得的設備列表保存在sFullSensorsList中。
13. 創建SensorThread線程准備監聽Sensor硬件事件變化。
14. 應用程序通過getDefaultSensor來獲得指定類型傳感器的對象
16. 通過registerListener注冊Sensor監聽器。
下一節,讓我們來看下SensorThread線程。
 Eclipse開發環境導入android sdk的sample中的源碼
初學Android編程,Android SDK中提供的Sample代碼自然是最好的學習材料。 &nb
 Android加載Spinner
可以顯示在的Android任務,通過加載進度條的進展。進度條有兩種形狀。加載欄和加載微調(spinner)。在本章中,我們將討論微調(spinner)。Spinner 用
 Android中BroadcastReceiver(異步接收廣播Intent)的使用
Broadcast Receiver簡介 Broadcast Receiver是Android的五大組件之一,使用頻率也很高。 用於異步接收廣播Intent,廣播
 Android源碼學習之單例模式應用及優點介紹
單例模式定義: Ensure a class has only one instance, and provide a global point of acces