編輯:Android開發教程
在繼承ViewGroup類時,需要重寫兩個方法,分別是onMeasure和onLayout。
1,在方法onMeasure中調用setMeasuredDimension方法void android.view.View.setMeasuredDimension(int measuredWidth, int measuredHeight)
在onMeasure(int, int)中,必須調用setMeasuredDimension(int width, int height)來存儲測量得到的寬度和高度值,如果沒有這麼去做會觸發異常IllegalStateException。
2,在方法onMeasure中調用孩子的measure方法
void android.view.View.measure(int widthMeasureSpec, int heightMeasureSpec)
這個方法用來測量出view的大小。父view使用width參數和height參數來提供constraint信息。實際上,view的測量工作在onMeasure(int, int)方法中完成。因此,只有onMeasure(int, int)方法可以且必須被重寫。參數widthMeasureSpec提供view的水平空間的規格說明,參數heightMeasureSpec提供view的垂直空間的規格說明。
3,解析onMeasure(int, int)方法
void android.view.View.onMeasure(int widthMeasureSpec, int heightMeasureSpec)
測量view及其內容來確定view的寬度和高度。這個方法在measure(int, int)中被調用,必須被重寫來精確和有效的測量view的內容。
在重寫這個方法時,必須調用setMeasuredDimension(int, int)來存儲測量得到的寬度和高度值。執行失敗會觸發一個IllegalStateException異常。調用父view的onMeasure(int, int)是合法有效的用法。
view的基本測量數據默認取其背景尺寸,除非允許更大的尺寸。子view必須重寫onMeasure(int, int)來提供其內容更加准確的測量數值。如果被重寫,子類確保測量的height和width至少是view的最小高度和寬度(通過getSuggestedMinimumHeight()和getSuggestedMinimumWidth()獲取)。
4,解析onLayout(boolean, int, int, int, int)方法
void android.view.ViewGroup.onLayout(boolean changed, int l, int t, int r, int b)
調用場景:在view給其孩子設置尺寸和位置時被調用。子view,包括孩子在內,必須重寫onLayout(boolean, int, int, int, int)方法,並且調用各自的layout(int, int, int, int)方法。
參數說明:參數changed表示view有新的尺寸或位置;參數l表示相對於父view的Left位置;參數t表示相對於父view的Top位置;參數r表示相對於父view的Right位置;參數b表示相對於父view的Bottom位置。.
5,解析View.MeasureSpec類
android.view.View.MeasureSpec
MeasureSpec對象,封裝了layout規格說明,並且從父view傳遞給子view。每個MeasureSpec對象代表了width或height的規格。
MeasureSpec對象包含一個size和一個mode,其中mode可以取以下三個數值之一:
UNSPECIFIED,1073741824 [0x40000000],未加規定的,表示沒有給子view添加任何規定。
EXACTLY,0 [0x0],精確的,表示父view為子view確定精確的尺寸。
AT_MOST,-2147483648 [0x80000000],子view可以在指定的尺寸內盡量大。
在這裡給大家舉一個例子demo:
第一步:自定義一個View實現ViewGroup接口,即自定義ViewGroup:
import android.content.Context;
import android.util.AttributeSet;
import android.view.View;
import android.view.ViewGroup;

public class MyViewGroup extends ViewGroup {

    public MyViewGroup(Context context) {
        super(context);
    }

    public MyViewGroup(Context context, AttributeSet attrs) {
        super(context, attrs);
    }

    public MyViewGroup(Context context, AttributeSet attrs, int defStyle) {
        super(context, attrs, defStyle);
    }

    /**
     * 計算控件的大小
     */
    @Override
    protected void onMeasure(int widthMeasureSpec, int heightMeasureSpec) {
        super.onMeasure(widthMeasureSpec, heightMeasureSpec);
        int measureWidth = measureWidth(widthMeasureSpec);
        int measureHeight = measureHeight(heightMeasureSpec);
        // 計算自定義的ViewGroup中所有子控件的大小
        measureChildren(widthMeasureSpec, heightMeasureSpec);
        // 設置自定義的控件MyViewGroup的大小
        setMeasuredDimension(measureWidth, measureHeight);
    }

    private int measureWidth(int pWidthMeasureSpec) {
        int result = 0;
        int widthMode = MeasureSpec.getMode(pWidthMeasureSpec);// 得到模式
        int widthSize = MeasureSpec.getSize(pWidthMeasureSpec);// 得到尺寸

        switch (widthMode) {
        /**
         * mode共有三種情況,取值分別為MeasureSpec.UNSPECIFIED, MeasureSpec.EXACTLY,
         * MeasureSpec.AT_MOST。
         *
         *
         * MeasureSpec.EXACTLY是精確尺寸,
         * 當我們將控件的layout_width或layout_height指定為具體數值時如andorid
         * :layout_width="50dip",或者為FILL_PARENT是,都是控件大小已經確定的情況,都是精確尺寸。
         *
         *
         * MeasureSpec.AT_MOST是最大尺寸,
         * 當控件的layout_width或layout_height指定為WRAP_CONTENT時
         * ,控件大小一般隨著控件的子空間或內容進行變化,此時控件尺寸只要不超過父控件允許的最大尺寸即可
         * 。因此,此時的mode是AT_MOST,size給出了父控件允許的最大尺寸。
         *
         *
         * MeasureSpec.UNSPECIFIED是未指定尺寸,這種情況不多,一般都是父控件是AdapterView,
         * 通過measure方法傳入的模式。
         */
        case MeasureSpec.AT_MOST:
        case MeasureSpec.EXACTLY:
            result = widthSize;
            break;
        }
        return result;
    }

    private int measureHeight(int pHeightMeasureSpec) {
        int result = 0;

        int heightMode = MeasureSpec.getMode(pHeightMeasureSpec);
        int heightSize = MeasureSpec.getSize(pHeightMeasureSpec);

        switch (heightMode) {
        case MeasureSpec.AT_MOST:
        case MeasureSpec.EXACTLY:
            result = heightSize;
            break;
        }
        return result;
    }

    /**
     * 覆寫onLayout,其目的是為了指定視圖的顯示位置,方法執行的前後順序是在onMeasure之後,因為視圖肯定是只有知道大小的情況下,
     * 才能確定怎麼擺放
     */
    @Override
    protected void onLayout(boolean changed, int l, int t, int r, int b) {
        // 記錄總高度
        int mTotalHeight = 0;
        // 遍歷所有子視圖
        int childCount = getChildCount();
        for (int i = 0; i < childCount; i++) {
            View childView = getChildAt(i);

            // 獲取在onMeasure中計算的視圖尺寸
            int measureHeight = childView.getMeasuredHeight();
            int measuredWidth = childView.getMeasuredWidth();

            childView.layout(l, mTotalHeight, measuredWidth, mTotalHeight
                    + measureHeight);

            mTotalHeight += measureHeight;

        }
    }

}
第二步,布局文件:
<RelativeLayout xmlns:android="http://schemas.android.com/apk/res/android"
    xmlns:tools="http://schemas.android.com/tools"
    android:layout_width="match_parent"
    android:layout_height="match_parent"
    android:background="#00f0f0"
    tools:context=".MainActivity" >

    <net.loonggg.viewgroup.MyViewGroup
        android:id="@+id/myViewGroup"
        android:layout_width="480dp"
        android:layout_height="300dp"
        android:background="#0f0f0f" >

        <TextView
            android:layout_width="200dp"
            android:layout_height="100dp"
            android:background="#000000"
            android:gravity="center"
            android:text="第一個TextView" />

        <TextView
            android:layout_width="100dp"
            android:layout_height="200dp"
            android:background="#ffffff"
            android:gravity="center"
            android:text="第二個TextView" />
    </net.loonggg.viewgroup.MyViewGroup>

</RelativeLayout>
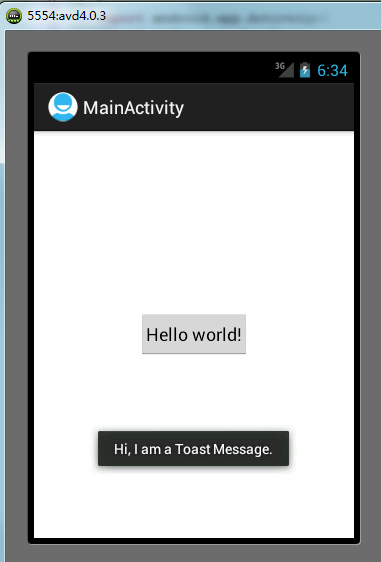 Android開發入門(四)發送通知 4.1 Toast通知
Toast通知是Android中最簡單的消息通知。接下來展示如何使用吐司通知。1. 新建一個工程, Toast。2. main.xml中的代碼。<RelativeL
 Android開發入門(五)屏幕組件 5.3 AbsoluteLayout絕對布局
使用AbsoluteLayout,可以指定它其中的子View的確切位置。觀察如下main.xml中的代碼:<?xml version="1.0"
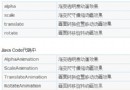 Android Animations動畫使用詳解
一、動畫類型Android的animation由四種類型組成:alpha、scale、translate、rotateXML配置文件中二、 Android動畫模式Anim
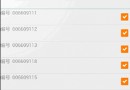 Android ListView的一個問題
需要的功能很簡單,就是一個帶checkbox的列表,提交時需要知道用戶選擇了那些項目,如下圖:使用SimpleAdapter作為數據適配器,重寫SimpleAdapter