編輯:Android開發教程
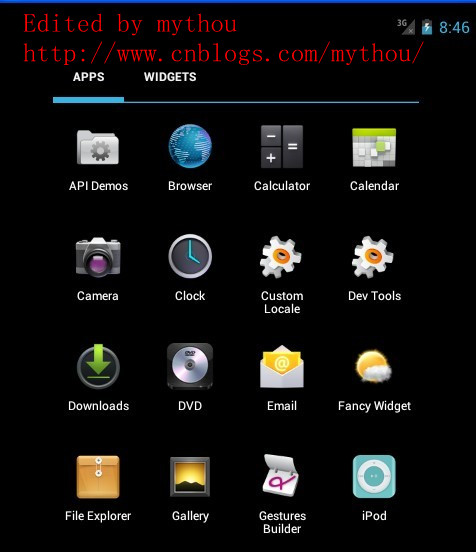
今天主要是分析一下Launcher裡面的所有應用列表。Android4.0 Launcher的所有應用列表跟2.X比較大的 區別就是多了Widget的顯示。下面會詳細分析Launcher裡面有關所有應用列表配置和代碼分析。
1 、AllApp列表配置文件
配置AllAPP應用列表界面的配置文件是\res\Layout\apps_customize_pane.xml 文件。AllAPP列表使用了一個TabHost組織了兩個頁面(全部應用和Widget),通過界面上面的TabHost進行切 換。下面是TabHost的配置和AllAPP界面配置,我這裡需要把Widget部分功能取消,因為我做的Launcher把 Widget放到workspace裡面實現了。
<!-- 取消TabHost的顯示,把TabHost設置為0dp高,避免影響all app顯示 mythou -->
<com.android.launcher2.AppsCustomizeTabHost
    android:background="@android:color/transparent">
    <LinearLayout
        android:id="@+id/apps_customize_content"
        android:orientation="vertical"
        android:layout_width="match_parent"
        android:layout_height="match_parent">

        <!-- TabHost欄,配置TahHost欄的高度寬度
        我這裡把TabHost取消了,因為我的Launcher需要把Widget反正workspace裡面實現,
        所以全部應用列表修改成和2.X的Launcher一樣 mythou-->
        <FrameLayout
            android:id="@+id/tabs_container"
            android:layout_width="0dp"
            android:layout_height="0dp"
            android:layout_marginTop="0dp"
            android:layout_gravity="center_horizontal">
       <!-- TabHost上面Widget 的按鈕-->
            <com.android.launcher2.FocusOnlyTabWidget
                android:id="@android:id/tabs"
                android:layout_width="match_parent"
                android:layout_height="match_parent"
                android:layout_gravity="left"
                android:background="@android:color/transparent"
                android:tabStripEnabled="false"
                android:tabStripLeft="@null"
                android:tabStripRight="@null"
                android:pider="@null"   />
       <!--TabHost 右邊的Android市場的圖標,不需要可以去掉-->
            <include
                android:id="@+id/market_button"
                layout="@layout/market_button"
                android:layout_width="wrap_content"
                android:layout_height="match_parent"
                android:layout_gravity="right"   />

        </FrameLayout>

     <!--下面這裡就是我們所有應用列表的選項和所有應用列表的顯示View
        需要注意的是AppsCustomizePagedView同時支持顯示所有應用列表和Widget列表 mythou--

>
        <FrameLayout
            android:id="@android:id/tabcontent"
            android:layout_width="match_parent"
            android:layout_height="match_parent"
            >
       <!-- 所有應用列表是通過自定義VIewAppsCustomizePagedView顯示,後面會詳細分析這個View
          下面只對部分重要屬性加入注釋-->
            <com.android.launcher2.AppsCustomizePagedView
                android:id="@+id/apps_customize_pane_content"
                android:layout_width="match_parent"
                android:layout_height="match_parent"
         //MaxAppCellCountX 和MaxAppCellCounY指的是所有App圖標排列的最大行列數。
         //一般設置為-1,表示無限制
                launcher:maxAppCellCountX="@integer/apps_customize_maxCellCountX"
                launcher:maxAppCellCountY="@integer/apps_customize_maxCellCountY"
         //pageLayoutWidthGap和pageLayoutHeightGap分別表示菜單界面與屏幕邊緣的距離,
         //一般小屏幕這裡設置為-1。避免邊框太窄誤觸屏幕才需要設置。
                launcher:pageLayoutWidthGap="@dimen/apps_customize_pageLayoutWidthGap"
                launcher:pageLayoutHeightGap="@dimen/apps_customize_pageLayoutHeightGap"
                launcher:pageLayoutPaddingTop="50dp"
         //pageLayoutPaddingXXX指的是內填充,這個和系統的padding一樣
                launcher:pageLayoutPaddingBottom="@dimen/apps_customize_pageLayoutPaddingBottom"
                launcher:pageLayoutPaddingLeft="@dimen/apps_customize_pageLayoutPaddingLeft"
                launcher:pageLayoutPaddingRight="@dimen/apps_customize_pageLayoutPaddingRight"
         //widgetCellWithGap和widgetCellHeightGap指的是widget列表界面各個widget之間的間隔,
         //和系統的margin屬性類似
                launcher:widgetCellWidthGap="@dimen/apps_customize_widget_cell_width_gap"
                launcher:widgetCellHeightGap="@dimen/apps_customize_widget_cell_height_gap"

         //widgetCountX和WidgetCountY都是表示Widget界面每行每列顯示多少Widget
                launcher:widgetCountX="@integer/apps_customize_widget_cell_count_x"
                launcher:widgetCountY="@integer/apps_customize_widget_cell_count_y"
         //提示界面的焦點
                launcher:clingFocusedX="@integer/apps_customize_cling_focused_x"
                launcher:clingFocusedY="@integer/apps_customize_cling_focused_y"
                launcher:maxGap="@dimen/workspace_max_gap"   />
       <!-- 加載全部應用時的旋轉動畫 -->
            <FrameLayout
                android:id="@+id/animation_buffer"
                android:layout_width="match_parent"
                android:layout_height="match_parent"
                android:background="#FF000000"
                android:visibility="gone"   />
       <!-- 分頁符,代表多少頁和當前頁面-->
            <include
                android:id="@+id/paged_view_indicator"
                layout="@layout/scroll_indicator"
                android:layout_width="wrap_content"
                android:layout_height="wrap_content"
                android:layout_gravity="bottom"   />
        </FrameLayout>
    </LinearLayout>
  <!--第一次進入所有應用列表的提示界面,和workspace提示界面一樣-->
    <include layout="@layout/all_apps_cling"
        android:id="@+id/all_apps_cling"
        android:layout_width="match_parent"
        android:layout_height="match_parent"  />

</com.android.launcher2.AppsCustomizeTabHost>
上面已經針對TabHost的配置文件給了詳 細注釋,這裡需要說明的一點是,不管是所有應用列表還是Widget列表都是通過AppsCustomizedPagedView顯 示出來,也就是說這個自定義View支持兩種形式顯示。下面我們先對AppsCustomizeTabHost做個簡單分析。
 Android與db4o的完美結合:Password Manager
項目簡介這裡提供的Password Manager項目是Steven Osborn編寫的PasswordSafe(在Apache License下發行)的改寫版,目前已經
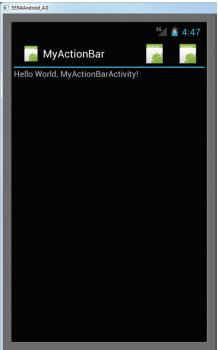 Android開發入門(八)使用活動欄 8.2 添加ActionBar物件
除了在ActionBar的左側顯示應用圖標和Activity的標題,也可以在ActionBar上面顯示額外的項目。這些 被添加的項目被叫做“action it
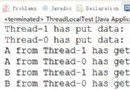 Android多線程研究(6)多線程之間數據隔離
在上一篇《Android多線程研究(5)——線程之間共享數據》中對線程之間的數據共享進行了學習和研究,這一篇我們來看看如何解決多個線程之間的數據隔
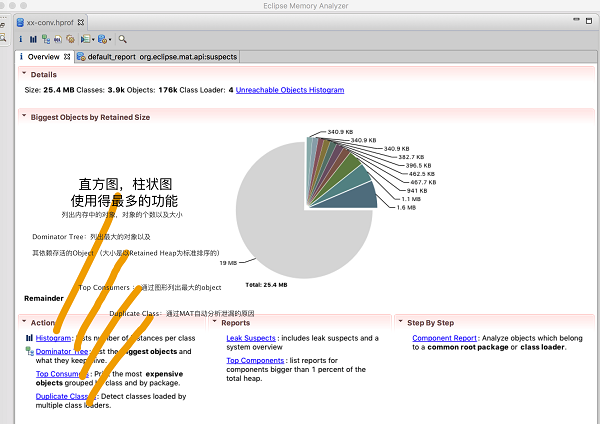 android內存洩露分析工具MAT詳解
一.准備1.什麼是MATEclipse提供的一個內存分析工具。它是一個功能豐富的 JAVA 堆轉儲文件分析工具,可以幫助你發現內存漏洞和減少內存消耗。android st