編輯:Android開發教程
想要理解ContentProvider的最佳方式就是自己動手去嘗試一下。下面介紹如何使用一個內置的Contacts ContentProvider。
1. 創建一個工程,Provider。
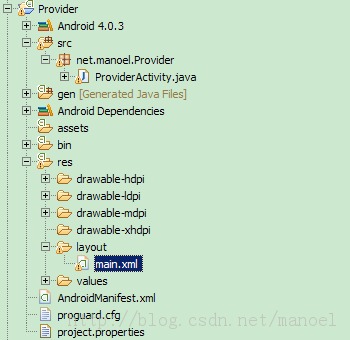
2. main.xml中的代碼。
<?xml version="1.0" encoding="utf-8"?>
<LinearLayout xmlns:android="http://schemas.android.com/apk/res/android"
    android:layout_width="fill_parent"
    android:layout_height="fill_parent"
    android:orientation="vertical" >

    <ListView
        android:id="@+id/android:list"
        android:layout_width="fill_parent"
        android:layout_height="wrap_content"
        android:layout_weight="1"
        android:stackFromBottom="false"
        android:transcriptMode="normal" />

    <TextView
        android:id="@+id/contactName"
        android:layout_width="wrap_content"
        android:layout_height="wrap_content"
        android:textStyle="bold" />

    <TextView
        android:id="@+id/contactID"
        android:layout_width="fill_parent"
        android:layout_height="wrap_content" />

</LinearLayout>
3. ProviderActivity.java中的代碼。
public class

ProviderActivity extends ListActivity {
    /** Called when the activity is first created. */
    @Override
    public void onCreate(Bundle savedInstanceState) {
        super.onCreate(savedInstanceState);
        setContentView(R.layout.main);

        // Uri allContacts = Uri.parse("content://contacts/people");
        Uri allContacts = ContactsContract.Contacts.CONTENT_URI;

        Cursor c;
        if (android.os.Build.VERSION.SDK_INT < 11) {
            // before Honeycomb
            c = managedQuery(allContacts, null, null, null, null);
        } else {
            // Honeycomb and later
            CursorLoader cursorLoader = new CursorLoader(this, allContacts,
                    null, null, null, null);
            c = cursorLoader.loadInBackground();
        }

        String[] columns = new String[] {
                ContactsContract.Contacts.DISPLAY_NAME,
                ContactsContract.Contacts._ID };

        int[] views = new int[] { R.id.contactName, R.id.contactID };

        SimpleCursorAdapter adapter;

        if (android.os.Build.VERSION.SDK_INT < 11) {
            // before Honeycomb
            adapter = new SimpleCursorAdapter(this, R.layout.main, c, columns,
                    views);
        } else {
            // Honeycomb and later
            adapter = new SimpleCursorAdapter(this, R.layout.main, c, columns,
                    views, CursorAdapter.FLAG_REGISTER_CONTENT_OBSERVER);
        }
        this.setListAdapter(adapter);

    }

}
 Android開發入門(十九)數據庫 19.3 預創建數據庫
在開發過程中,有時候,預先創建好數據庫比在程序運行時創建數據庫更加地高效。舉個例子,你想編寫 一個程序,這個程序把你去過的地方的坐標都顯示出來。這種情況下,預先創建數據庫
 Appium移動自動化測試(二) 安裝Android開發環境
繼續Appium環境的搭建。第二節 安裝Android開發環境如果你的環境是MAC那麼可以直接跳過這一節。就像我們在用Selenium進行web自動
 Galaxy Nexus與Nexus 7設備Android 4.2 ROM下載地址
目前谷歌已經逐步開始向Galaxy Nexus用戶以OTA升級的形式推送全新的Android 4.2果凍豆系統,不過如果你缺乏耐心,希望可以直接手動升級,那麼這裡的方法或
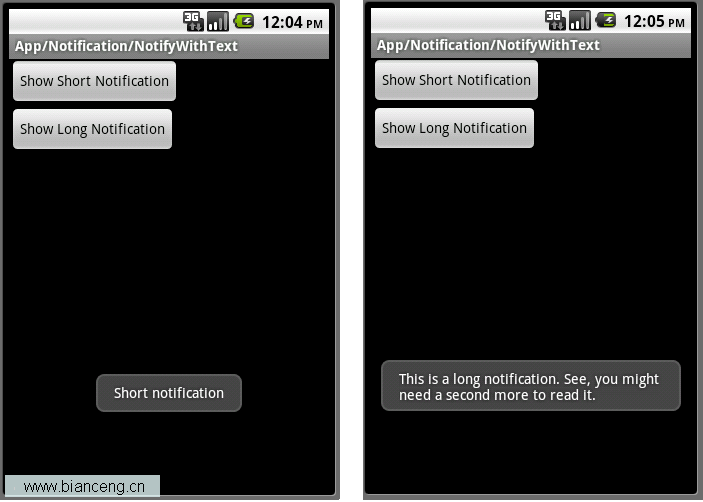 Android ApiDemos示例解析(28):App->Notification->NotifyWithText
除了使用Notification之外,Toast也可以用來通知用戶某件事發生了,Toast為一個透明的對話框,可以在屏幕上顯示幾秒 鐘後自動消失。功能上有點類似Tool