編輯:Android開發教程
前段時間,我們做了一下Android的幾個動畫(http://blog.csdn.net/qq_25193681/article/details/51777248),對Android的補間動畫有了一定的了解。但是在Android的3.0之後,google又提出了屬性動畫的這樣一個框架,他可以更好的幫助我們實現更豐富的動畫效果。所以為了跟上技術的步伐,今天就聊一聊屬性動畫。
這一次的需求是這樣的:當點擊一個View的時候,顯示下面隱藏的一個View,要實現這個功能,需要將V iew的visibility屬性設置gone為visible即可,但是這個過程是一瞬間的,並不能實現我們要的效果。所以,屬性動畫是個不錯的方案。
先把效果貼上
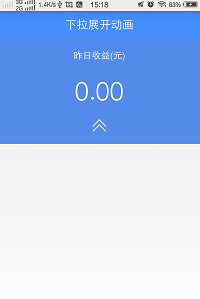
第一個:
第二個:
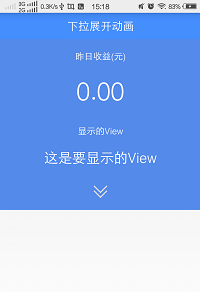
前面的這個是隱藏著,後面這個是顯示的。當點擊這個箭頭的時候,來切換顯示或者隱藏,
現在開始編碼:
布局文件如下
 =
    =
    =
    =
    =
    = >

            =
        =
        =
        = >

                    =
            =
            =
            =
            =
            =
            = />
    >

            =
        =
        =
        =
        = >

                    =
            =
            =
            =
            =
            = />

                    =
            =
            =
            =
            = />
    >

            =
        =
        =
        =
        =
        = >

                    =
            =
            =
            =
            =
            = />

                    =
            =
            =
            =
            = />
    >

            =
        =
        =
        =
        =
        = >

                    =
            =
            =
            =
            = />
    >

>
這裡面代碼並不多,也很簡單,三個線性布局,裡面裝載著各自的控件,並且還設置了ID。按鈕是一個線性布局,采用了onClick自身的點擊事件。接下來,當點擊了這個線性布局的時候,需要隱藏的控件最終到達一個高度,這個就是我們的目標值,只需要通過布局中的dp轉換成像素就行了。
+ );
這裡是120就是我們布局裡面定義的高度。
然後給這個過程增加一個動畫效果。
    ValueAnimator animator = ValueAnimator.ofInt(start, end);
        animator.addUpdateListener( AnimatorUpdateListener() {

            @Override
              (ValueAnimator arg0) {
                  = () arg0.getAnimatedValue();
                ViewGroup.LayoutParams layoutParams = v.getLayoutParams();
                layoutParams.height = ;
                v.setLayoutParams(layoutParams);

            }
        });
通過這樣一個簡單的ValueAnimator ,就可以很方便的實現顯示和隱藏的動畫效果了。
下面是完整的代碼。
 android.animation.Animator;
 android.animation.AnimatorListenerAdapter;
 android.animation.ValueAnimator;
 android.animation.ValueAnimator.AnimatorUpdateListener;
 android.os.Bundle;
 android.support.v7.app.ActionBarActivity;
 android.view.View;
 android.view.ViewGroup;
 android.view.Window;
 android.view.animation.Animation;
 android.view.animation.RotateAnimation;
 android.widget.ImageView;
 android.widget.LinearLayout;

     {
     LinearLayout mHiddenLayout;

      mDensity;

      mHiddenViewMeasuredHeight;

     ImageView mIv;


      (Bundle savedInstanceState) {
        .onCreate(savedInstanceState);
        requestWindowFeature(Window.FEATURE_NO_TITLE);
        setContentView(R.layout.activity_main);
        //URL:http://www.bianceng.cn/OS/extra/201608/50381.htm
        mHiddenLayout = (LinearLayout) findViewById(R.id.linear_hidden);
        mIv = (ImageView) findViewById(R.id.my_iv);

        mDensity = getResources().getDisplayMetrics().density;

        mHiddenViewMeasuredHeight = () (mDensity *  + );

    }

      (View v) {
         (mHiddenLayout.getVisibility() == View.GONE) {
            animateOpen(mHiddenLayout);
            animationIvOpen();
        }  {
            animateClose(mHiddenLayout);
            animationIvClose();
        }
    }

      (View v) {
        v.setVisibility(View.VISIBLE);
        ValueAnimator animator = createDropAnimator(v, ,
                mHiddenViewMeasuredHeight);
        animator.start();

    }

      () {
        RotateAnimation animation =  RotateAnimation(, ,
                Animation.RELATIVE_TO_SELF, f, Animation.RELATIVE_TO_SELF,
                f);
        animation.setFillAfter();
        animation.setDuration();
        mIv.startAnimation(animation);
    }

      () {
        RotateAnimation animation =  RotateAnimation(, ,
                Animation.RELATIVE_TO_SELF, f, Animation.RELATIVE_TO_SELF,
                f);
        animation.setFillAfter();
        animation.setDuration();
        mIv.startAnimation(animation);
    }

      ( View view) {
         origHeight = view.getHeight();
        ValueAnimator animator = createDropAnimator(view, origHeight, );
        animator.addListener( AnimatorListenerAdapter() {

              (Animator animation) {
                view.setVisibility(View.GONE);
            }

        });
        animator.start();
    }

     ValueAnimator ( View v,  start,  end) {
        ValueAnimator animator = ValueAnimator.ofInt(start, end);
        animator.addUpdateListener( AnimatorUpdateListener() {


              (ValueAnimator arg0) {
                 value = () arg0.getAnimatedValue();
                ViewGroup.LayoutParams layoutParams = v.getLayoutParams();
                layoutParams.height = value;
                v.setLayoutParams(layoutParams);

            }
        });
         animator;
    }

} 如何讓你的iphone,ipad,android正常使用Lync 2013
一、生產環境1.經驗:1) 保證A.你的PC在intranet和internet上正常使得Lync 2013B.你的iphone,ipad,andro
 Android開發入門(五)屏幕組件 5.7 ScrollView滾動視圖
ScrollView是一種特殊的FrameLayout,使用ScrollView可以使用戶能夠滾動一個包含views的列表,這樣 做的話,就可以利用比物理顯示區域更大的空
 Android使用Dom解析xml文件並進行展示
本程序實現了使用Dom方法從網絡端解析xml文件,展示在列表,並實現點擊進入相關頁面。首先我們創建一個類,用來實現http請求和xml文件節點的獲取,這裡的http請求很
 Android Service服務(一) Service
一、Service簡介Service是android 系統中的四大組件之一(Activity、Service、BroadcastReceiver、 ContentProv