編輯:Android開發教程
周末玩的有點嗨,沒更新博客了,今天補上,這個示波器是在大學的時候老師教的,但是出來工作一直沒有用到過,漸漸的也就忘記了,現在重新學習一下。來看看效果圖:
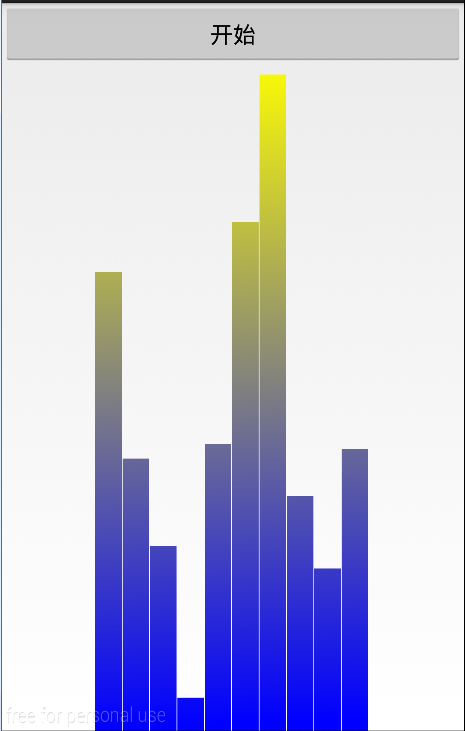
這裡是一個自定義的柱狀圖,然後有一個按鈕,點擊按鈕的時候,這裡柱子會不停的運動,類似於音樂播放器裡示波器的跳動。
跟前面幾個自定義view的方式類似,重寫了onSizeChange()方法和onDraw()方法
先列一下我們要用到的變量
     Paint mPaint;

      mWidth;

      mRectWidth;

      mRectHeight;

      mRectCount = ;

      offsets = ;

     LinearGradient mLinearGradient;

      mRandom;
所有的變量都在這裡了
下面給畫筆初始化
      () {
        mPaint =  Paint();
        mPaint.setAntiAlias();
    }
然後在onSizeChange()裡面給變量賦值
      ( w,  h,  oldw,  oldh) {
        .onSizeChanged(w, h, oldw, oldh);
        mWidth = getWidth();
        mRectHeight = getHeight();
        mRectWidth = () (mWidth *  / mRectCount);
        mLinearGradient =  LinearGradient(, , mRectWidth, mRectHeight,
                Color.YELLOW, Color.BLUE, Shader.TileMode.CLAMP);
        mPaint.setShader(mLinearGradient);

    }
最後繪制柱狀圖
      (Canvas canvas) {
        .onDraw(canvas);
         ( i = ; i < mRectCount; i++) {
            mRandom = Math.random();
             currentHeight = () (mRectHeight * mRandom);
            canvas.drawRect(
                    () (mWidth *  /  + mRectWidth * i + offsets),
                    currentHeight, () (mWidth *  /  + mRectWidth
                            * (i + )), mRectHeight, mPaint);
        }

    }
URL:http://www.bianceng.cn/OS/extra/201609/50414.htm
這個時候,一個音樂播放器的示波器已經完成了,但是,這個是靜態的,接下來,向外面暴露一個方法,用於刷新View,實現動態的效果。
      () {
        postInvalidateDelayed();
    }
每間隔300ms對View進行重繪,就可以有一個比較好的視覺效果了。
好了,最後我貼上全部的代碼:
     {
     Paint mPaint;
      mWidth;
      mRectWidth;
      mRectHeight;
      mRectCount = ;
      offsets = ;
     LinearGradient mLinearGradient;
      mRandom;

     (Context context, AttributeSet attrs,  defStyle) {
        (context, attrs, defStyle);

        initView();
    }

     (Context context, AttributeSet attrs) {
        (context, attrs);
        initView();
    }

     (Context context) {
        (context);
        initView();
    }


      () {
        mPaint =  Paint();
        mPaint.setAntiAlias();
    }


      ( w,  h,  oldw,  oldh) {
        .onSizeChanged(w, h, oldw, oldh);
        mWidth = getWidth();
        mRectHeight = getHeight();
        mRectWidth = () (mWidth *  / mRectCount);
        mLinearGradient =  LinearGradient(, , mRectWidth, mRectHeight,
                Color.YELLOW, Color.BLUE, Shader.TileMode.CLAMP);
        mPaint.setShader(mLinearGradient);

    }


      (Canvas canvas) {
        .onDraw(canvas);
         ( i = ; i < mRectCount; i++) {
            mRandom = Math.random();
             currentHeight = () (mRectHeight * mRandom);
            canvas.drawRect(
                    () (mWidth *  /  + mRectWidth * i + offsets),
                    currentHeight, () (mWidth *  /  + mRectWidth
                            * (i + )), mRectHeight, mPaint);
        }

    }

      () {
        postInvalidateDelayed();
    }

}
至此,全部完成了。
 Android定位知識詳解
相信很多的朋友都有在APP中實現定位的需求,今天我就再次超炒冷飯,為大家獻上國內開發者常用到的三種定位方式。它們分別為GPS,百度和高德,慣例先簡單介紹下定位的背景知識。
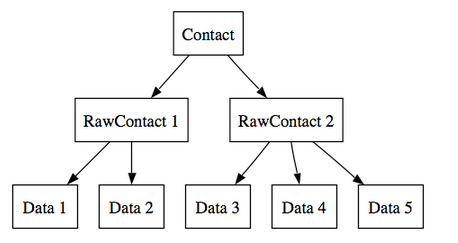 android聯系人信息的存儲結構
在新的Contacts API中,聯系人數據被放到三張表中:Contacts、RawContacts和Data。這樣可以幫助系統更好地存儲與管理一個聯系人的多個帳戶的信息
 開發可統計單詞個數的Android驅動程序(上)
Android本質上是基於Linux內核的系統,也就是說Android就是一種Linux操作系統。只不過大多數時候都會運行在ARM架構的設備上,例如,Android手機、
 android安全問題(三) 釣魚程序
這個話題是繼續android安全問題(二) 程序鎖延伸的之前我已經展示了如何制作程序鎖。當打 開指定應用的時候,彈出一個密碼頁面。程序鎖的話題雖然是和安全相關,但是這應該