編輯:關於Android編程
最近項目忙,然後呢很久沒有更新博客了,react-native也是沒有時間學習,然後項目裡面用到了數據持久化(數據存儲),Android系統中主要提供了三種數據持久化方式:文件存儲、SharedPreference存儲、數據庫存儲。說實在的畢竟app這種輕量級的使用數據庫還是不多,然後呢要使用數據庫也是在特定場合,這也導致了很多的移動端開發(對數據庫操作不多)對數據庫使用不太熟練。
一般我們都不使用數據庫的,基本上使用SharedPreference就能處理大部分問題,然後在特定場合比如做商城類資訊類及三級緩存圖片地址時候就可能需要使用數據庫,真到用的時候就要google和baidu了,對於數據簡單並且不需要頻繁操作數據的我們就參考下別人demo好了,然後數據存儲量大比如新聞、緩存的離線天氣、商品列表等我們就不得不去考慮性能了,然後開發就要考慮時間和性能你可能會使用greenDao、LitePal、realm。

public MyDatabaseHelper(Context context, String name, CursorFactory factory, int version) {
     super(context, name, factory, version);
 }

 public void onCreate(SQLiteDatabase db) {
     db.execSQL(CREATE_BOOK);
 }

 public void onUpgrade(SQLiteDatabase db, int oldVersion, int newVersion) {
 }
 public void onUpgrade(SQLiteDatabase db, int oldVersion, int newVersion) {
     db.execSQL("drop table if exists ***");
     db.execSQL("drop table if exists ***");
     onCreate(db);
 }
MyDatabaseHelper dbHelper = new MyDatabaseHelper(this, "**.db", null, 1);
dbHelper.getWritableDatabase();
CRUD我們可以通過像java使用hibernate樣既可以執行原生的sql語句(db.execSQL(**))也可以執行自帶的封裝語句ad.insert。
insert()
ContentValues values = new ContentValues();
   values.put("key1", value1);
   values.put("key2", value2);
   values.put("key3", value3);
   db.insert("table", null, values);
   values.clear();
query()
Cursor query(String table, String[] columns, String selection, String[] selectionArgs, String groupBy, String having, String orderBy)
update()
public int update (String table, ContentValues values, String whereClause, String[] whereArgs)
delete()
public int delete (String table, String whereClause, String[] whereArgs)
創建數據庫:
package com.losileeya.dbsimple.db;

import android.content.Context;
import android.database.sqlite.SQLiteDatabase;
import android.database.sqlite.SQLiteOpenHelper;
import android.util.Log;

public class MyHelper extends SQLiteOpenHelper {

    private static String DB_NAME = "mydata.db";  //數據庫名稱
    public static String TABLE_NAME = "employee"; //表名

    /**super(參數1,參數2,參數3,參數4),其中參數4是代表數據庫的版本,
     * 是一個大於等於1的整數,如果要修改(添加字段)表中的字段,則設置
     * 一個比當前的 參數4大的整數 ,把更新的語句寫在onUpgrade(),下一次
     * 調用
     */
    public MyHelper(Context context) {
        super(context, DB_NAME, null, 2);
    }

    @Override
    public void onCreate(SQLiteDatabase db) {
        //Create table
        String sql = "CREATE TABLE "+TABLE_NAME + "("
                      + "_id INTEGER PRIMARY KEY,"
                      + "name TEXT,"
                      + "sex TEXT);";

        Log.e("table oncreate", "create table");
        db.execSQL(sql);        //創建表
    }

    @Override
    public void onUpgrade(SQLiteDatabase db, int oldVersion, int newVersion) {
        // TODO Auto-generated method stub
        Log.e("update", "update");
//      db.execSQL("ALTER TABLE "+ MyHelper.TABLE_NAME+" ADD sex TEXT"); //修改字段
        String sql = "DROP TABLE IF EXISTS " + TABLE_NAME;
        db.execSQL(sql);
        this.onCreate(db);

    }

}
實際數據操作,進行crud
package com.losileeya.dbsimple.db;

import android.content.ContentValues;
import android.content.Context;
import android.database.Cursor;
import android.database.SQLException;
import android.database.sqlite.SQLiteDatabase;
import android.util.Log;

import com.losileeya.dbsimple.bean.Person;

import java.util.ArrayList;
import java.util.List;


public class DatabaseUtil {
    private MyHelper helper;
    private SQLiteDatabase db;

    public DatabaseUtil(Context context) {
        super();
        helper = new MyHelper(context);
        db = helper.getWritableDatabase();
    }

    /**
     * 插入數據
     *
     * param String
     * */
    public boolean Insert(Person person) {

        // String sql = "insert into " + MyHelper.TABLE_NAME
        // + "(name,sex) values (" + "'" + person.getName() + "' ," + "'"
        // + person.getSex() + "'" + ")";
        //
        // try {
        // db.execSQL(sql);
        // return true;
        // } catch (SQLException e) {
        // Log.e("err", "insert failed");
        // return false;
        // } finally {
        // db.close();
        // }
        ContentValues values = new ContentValues();
        values.put("name", person.getName());
        values.put("sex", person.getSex());
        try {
            db.insert("employee", null, values);
            return true;
        } catch (SQLException e) {
            Log.e("err", "insert failed");
            return false;
        }
    }

    /**
     * 更新數據
     *
     * param Person
     *            person , int id
     * */

    public void Update(Person person, int id) {
        ContentValues values = new ContentValues();
        values.put("name", person.getName());
        values.put("sex", person.getSex());
        int rows = db.update(MyHelper.TABLE_NAME, values, "_id=?",
                new String[] { id + "" });
    }

    /**
     * 刪除數據
     *
     * param int id
     * */

    public void Delete(int id) {


        int raw = db.delete(MyHelper.TABLE_NAME, "_id=?", new String[] { id
                + "" });

    }

    /**
     * 查詢所有數據
     *
     * */
    public List queryAll() {

        List list = new ArrayList();
        Cursor cursor = db.query(MyHelper.TABLE_NAME, null, null, null, null,
                null, null);

        while (cursor.moveToNext()) {
            Person person = new Person();
            person.setId(cursor.getInt(cursor.getColumnIndex("_id")));
            person.setName(cursor.getString(cursor.getColumnIndex("name")));
            person.setSex(cursor.getString(cursor.getColumnIndex("sex")));
            list.add(person);
        }

        return list;
    }

    /**
     * 按姓名進行查找並排序
     *
     * */
    public List queryByname(String name) {
        List list = new ArrayList();
        Cursor cursor = db.query(MyHelper.TABLE_NAME, new String[] { "_id",
                "name", "sex" }, "name like ? ", new String[] { "%" + name
                + "%" }, null, null, "name asc");
        while (cursor.moveToNext()) {
            Person person = new Person();
            person.setId(cursor.getInt(cursor.getColumnIndex("_id")));
            person.setName(cursor.getString(cursor.getColumnIndex("name")));
            person.setSex(cursor.getString(cursor.getColumnIndex("sex")));
            list.add(person);
        }

        return list;
    }

    /**
     * 按id查詢
     *
     * */
    public Person queryByid(int id) {
        Person person = new Person();
        Cursor cursor = db.query(MyHelper.TABLE_NAME, new String[] { "name",
                "sex" }, "_id=?", new String[] { id + "" }, null, null, null);
        while (cursor.moveToNext()) {
            person.setId(id);
            person.setName(cursor.getString(cursor.getColumnIndex("name")));
            person.setSex(cursor.getString(cursor.getColumnIndex("sex")));
        }

        return person;
    }
    public void close() {
        if (db != null) {
            db.close();
        }
    }
}
然後使用數據庫千萬記得要加權限:
注意:我們使用數據庫的時候很容易因為手動關閉數據庫,然後再次操作時出現錯誤,所以呢我們應該在數據庫操作幫助類添加關閉方法,然後在activity銷毀時候調用 。
當然如果你項目中可能使用到把數據庫導出為excel表格的功能:
package com.losileeya.dbsimple.tools;
import android.os.Environment;
import com.losileeya.dbsimple.bean.Person;
import java.io.File;
import java.util.List;
import jxl.Workbook;
import jxl.write.Label;
import jxl.write.WritableSheet;
import jxl.write.WritableWorkbook;
public class JxlUtil {
    /**
     * 導出生成excel文件,存放於SD卡中
     * @author smart *
     */
    private List list;

    public JxlUtil(List list){
        this.list = list;
    }
    public boolean toExcel() {
        // 准備設置excel工作表的標題
        String[] title = { "編號", "姓名", "性別" };
        try {
            // 獲得開始時間
            long start = System.currentTimeMillis();
            //判斷SD卡是否存在
    if(!Environment.getExternalStorageState().equals(Environment.MEDIA_MOUNTED)){
                return false;
            }

            String SDdir =  Environment.getExternalStorageDirectory().toString();  //獲取SD卡的根目錄
            // 創建Excel工作薄
            WritableWorkbook wwb;
            // 在SD卡中,新建立一個名為person的jxl文件
            wwb = Workbook.createWorkbook(new File(Environment.getExternalStorageDirectory().getAbsolutePath() + "/person.xls"));
            // 添加第一個工作表並設置第一個Sheet的名字
            WritableSheet sheet = wwb.createSheet("員工清單", 0);
            Label label;
            for (int i = 0; i < title.length; i++) {
                label = new Label(i, 0, title[i]);
                // 將定義好的單元格添加到工作表中
                sheet.addCell(label);
            }
            /*
             * 保存數字到單元格,需要使用jxl.write.Number 必須使用其完整路徑,否則會出現錯誤
             */
            for(int i = 0 ; i < list.size(); i++){
                Person person = list.get(i);
                //添加編號
                jxl.write.Number number = new jxl.write.Number(0, i+1, person.getId());
                sheet.addCell(number);
                //添加姓名
                label = new Label(1,i+1,person.getName());
                sheet.addCell(label);
                //添加性別
                label = new Label(2,i+1,person.getSex());
                sheet.addCell(label);
            }
            wwb.write(); //寫入數據
            wwb.close(); //關閉文件
        } catch (Exception e) {
            e.printStackTrace();
        }
        return true;
    }
}
實現這樣一個功能你需要准備一個jxl.jar,過多的解釋不多說。
可能大多數的情況下我們的數據一般from網絡,下一篇我們就來對數據庫進行封裝提高一下數據庫的使用效率。
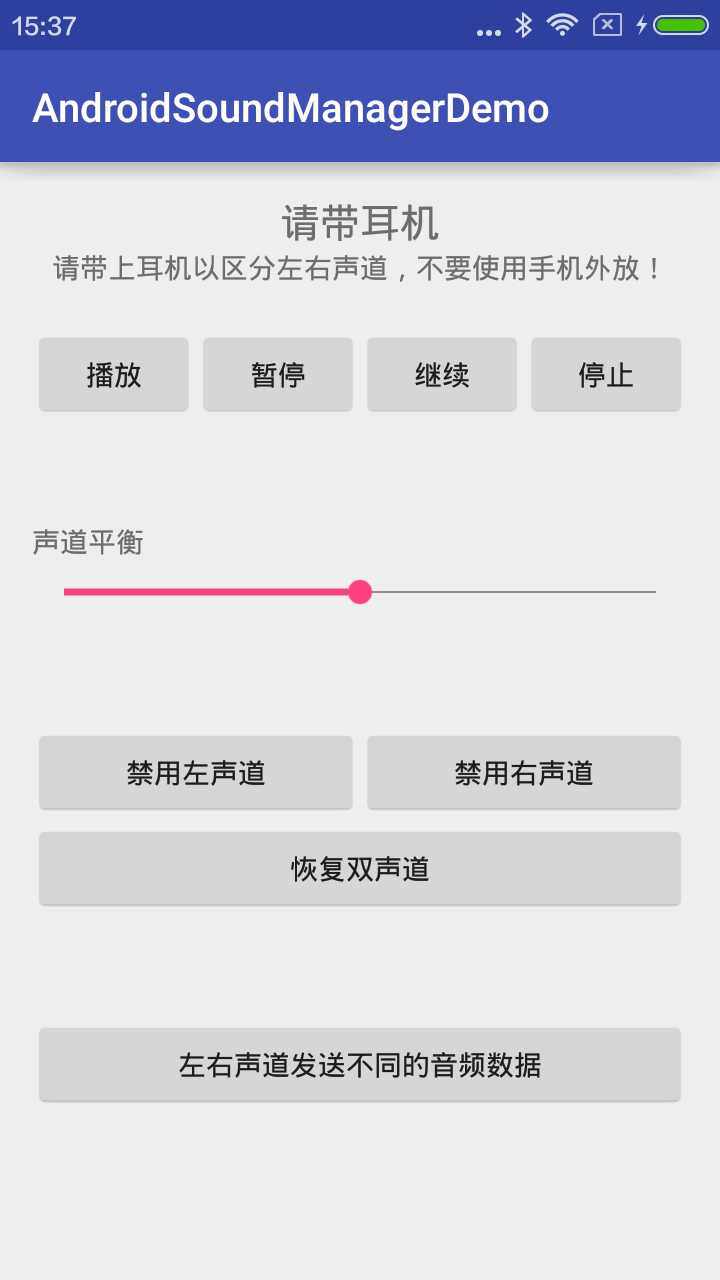 Android左右聲道的控制
效果圖源碼我這裡主要是用到了AudioTrack實現的左右聲道的控制,手機一般都只有兩個聲道,即左聲道和右聲道,我們在輸出的時候可以選擇單聲道,也可以選擇雙聲道(立體聲)
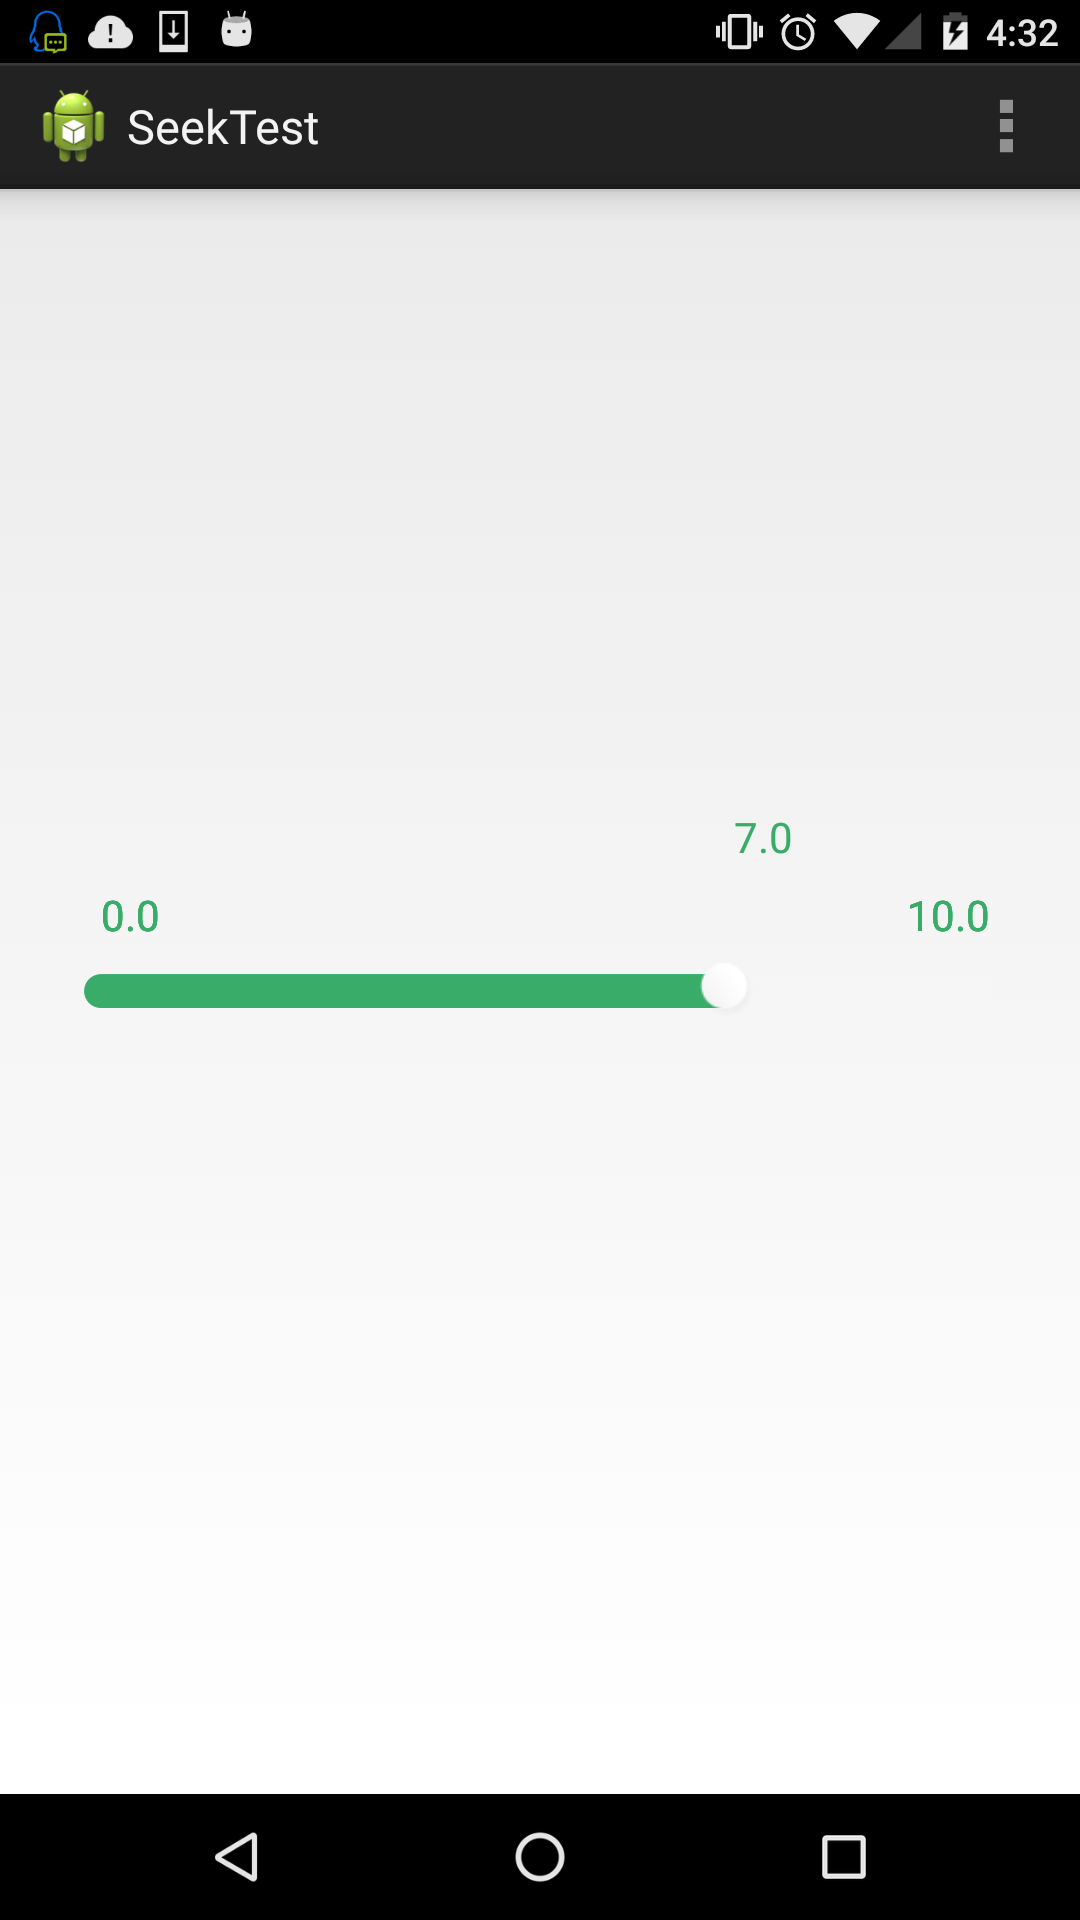 Android 可拖動的seekbar自定義進度值
最近接了個項目其中有需要要實現此功能:seekbar需要顯示最左和最右值,進度要跟隨進度塊移動。下面通過此圖給大家展示下效果,可能比文字描述要更清晰。其實實現起來很簡單,
 android sdk 8-10M/S下載速度,有圖有教程
1.強制使用http替換https鏈接 Tools》選擇Options,勾選上”Use Download Cache”和”Force
 編譯android源碼6---運行android編譯源碼
1.配置環境變量 (/media/M_hM_=M_M_dM__M_6/Download/442為android所在的目錄)export PATH=$PATH:/media