編輯:關於Android編程
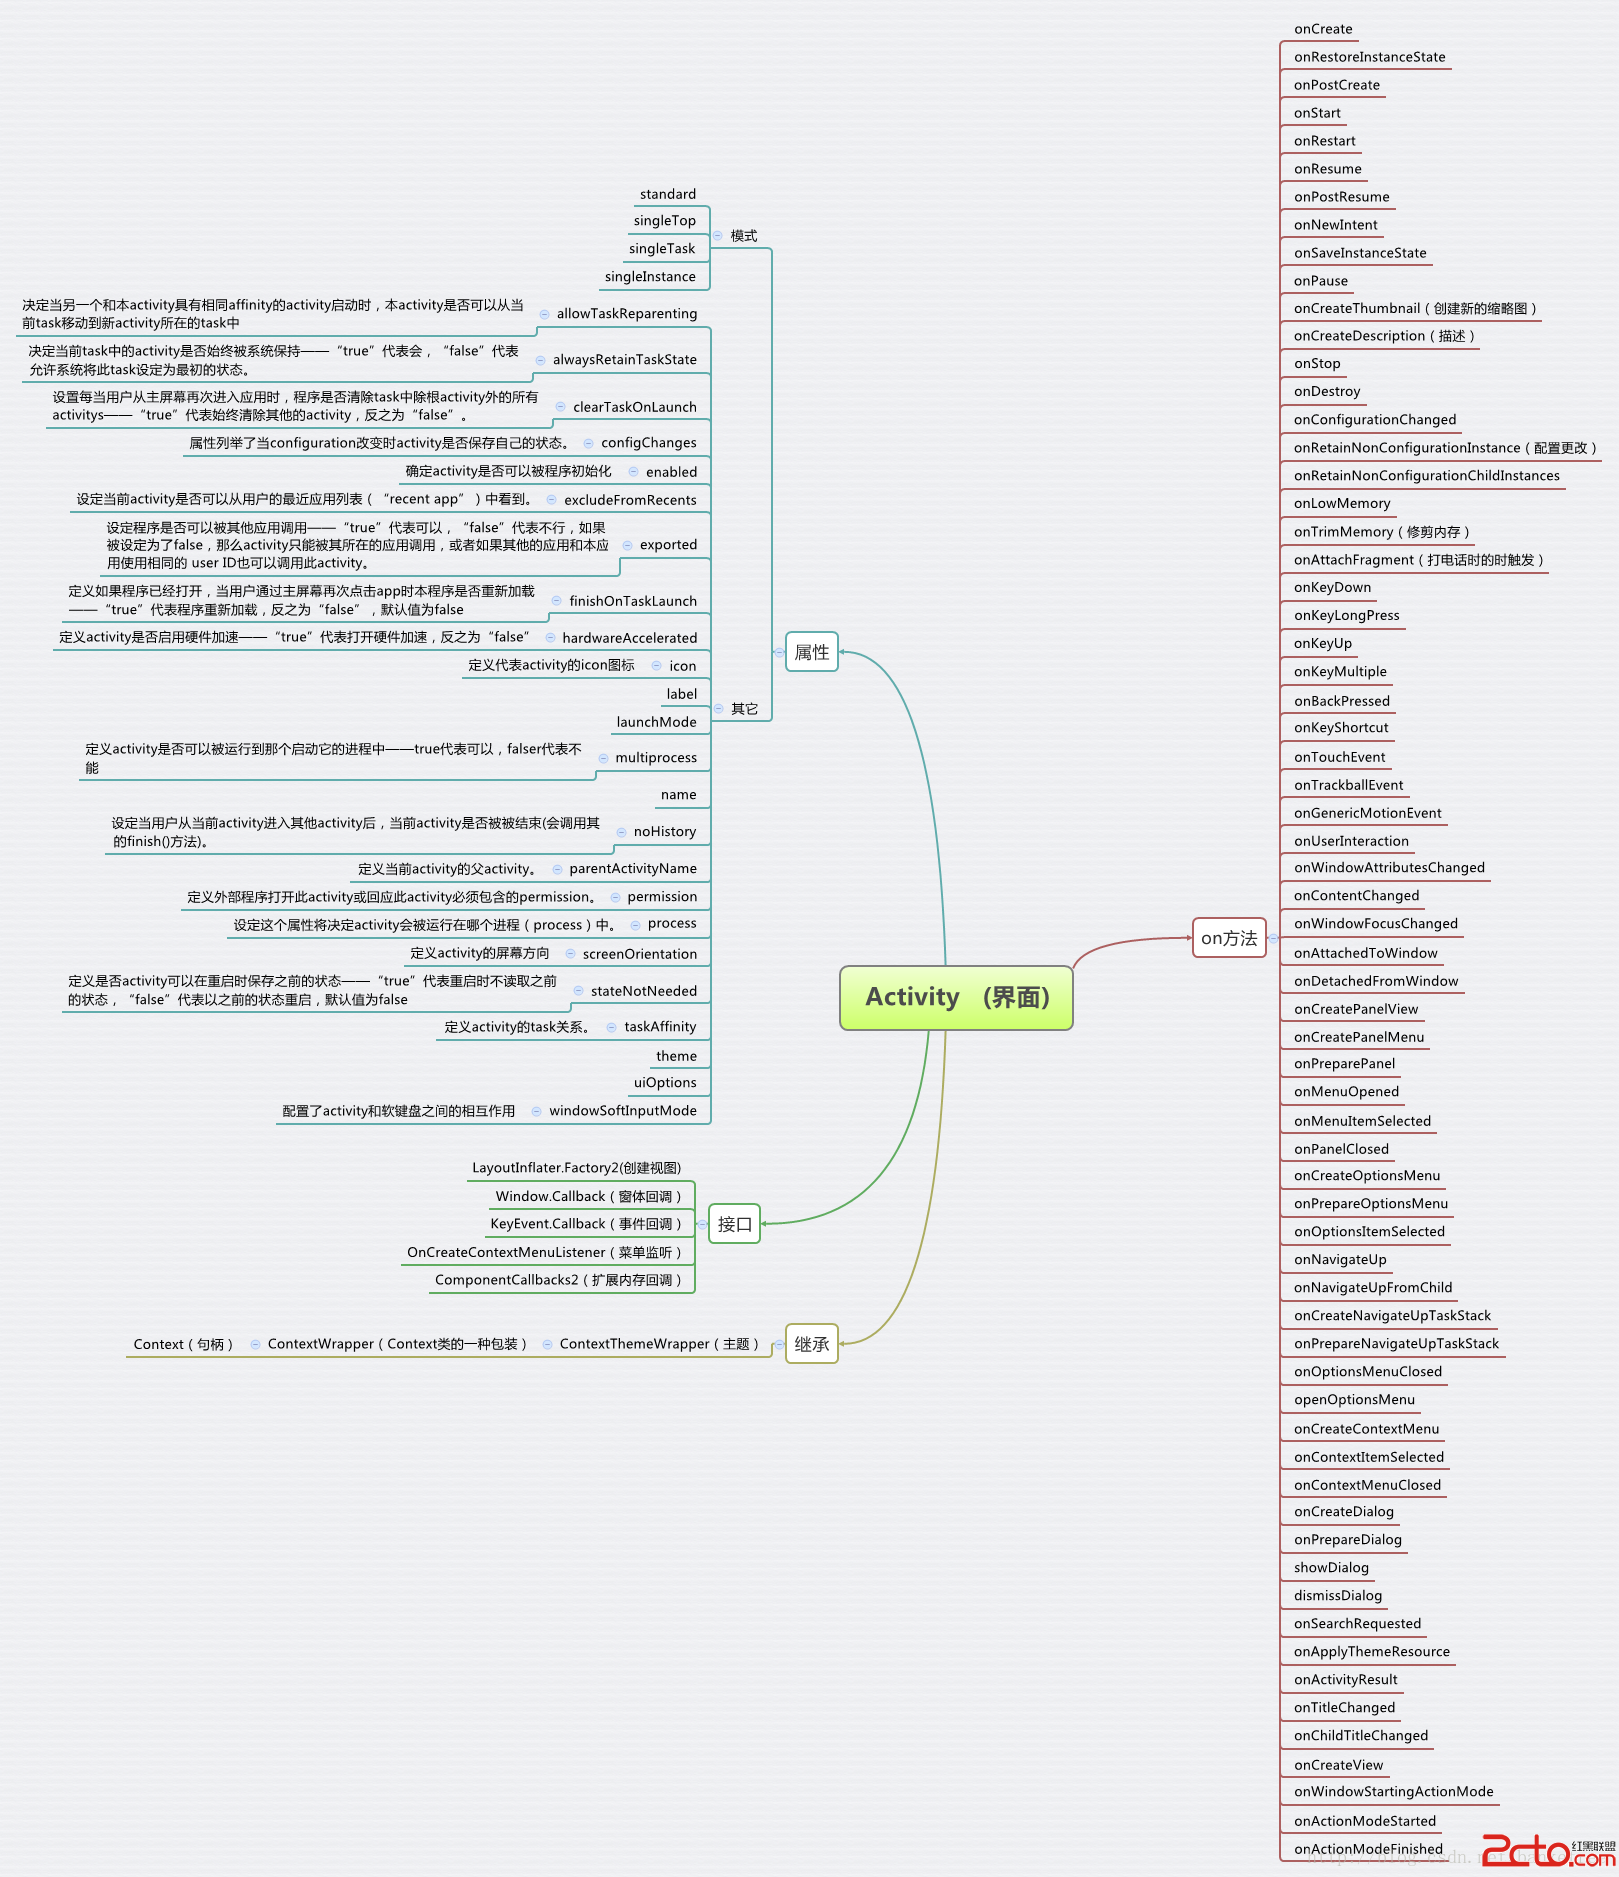
2014的 google i/o發表令多數人為之一亮的 material design toolbar,這是用來取代過去 actionbar 的控件,而現在於 material design中也對之有一個統一名稱:app bar,在未來的 android app 中,就以 toolbar這個元件來實作之。概述 Android 3.0 Android推了 ActionBar這個控件,而到了2013年 Google開始大力地推動所謂的 android style,想要逐漸改善過去 android 紛亂的界面設計,希望讓終端使用者盡可能在 android手機有個一致的操作體驗。ActionBar過去最多人使用的兩大套件就是 ActionBarSherlock以及官方提供在 support library v 7裡的 AppCompat。 Toolbar的誕生,也意味著官方在某些程度上認為 ActionBar 限制了 android app的開發與設計的彈性,而在 material design也對之做了名稱的定義:App bar。
Material Design的Theme
@android:style/Theme.Material (dark version)@android:style/Theme.Material.Light (light version)@android:style/Theme.Material.Light.DarkActionBar與之對應的Compat Theme:
Theme.AppCompatTheme.AppCompat.LightTheme.AppCompat.Light.DarkActionBar示例:https://github.com/mengdd/HelloActivityAndFragmenthttps://github.com/hongyangAndroid/Android_Blog_Demos/tree/master/blogcodes/src/main/java/com/zhy/blogcodes/toolbarhttps://github.com/tekinarslan/AndroidMaterialDesignToolbarhttps://github.com/mosil/Android-Mosil-Sample-Toolbarhttps://github.com/hanks-zyh/ToolBar
1.首先項目gradle中添加:appcompat-v7依賴 2.確保Activity繼承AppCompatActivity 3.在application設置中使用NoActionBar的主題:
android:theme="@style/Theme.AppCompat.Light.NoActionBar"
/>
4.把Toolbar寫在布局中
android:id="@+id/toolbar"
android:layout_height="wrap_content"
android:minHeight="?attr/actionBarSize"
android:layout_width="match_parent"
android:background="?attr/colorPrimary"
android:elevation="4dp"
android:theme="@style/ThemeOverlay.AppCompat.ActionBar"
app:popupTheme="@style/ThemeOverlay.AppCompat.Light"/>
請記得用 support v7裡的 toolbar,不然然只有 API Level 21也就是 Android 5.0以上的版本才能使用。程序 (Java)在 MainActivity.java中onCreate中加入 Toolbar的聲明:
Toolbar toolbar=(Toolbar) findViewById(R.id.toolbar);
setSupportActionBar(toolbar);//聲明後,再將之用 setSupportActionBar 設定,Toolbar即能取代原本的 actionbar 了
定義menu:
然後在代碼中inflate和處理它的點擊事件:
@Override
publicboolean onCreateOptionsMenu(Menu menu){
Log.i(TAG, "onCreateOptionsMenu()");
getMenuInflater().inflate(R.menu.menu_activity_main, menu);
returnsuper.onCreateOptionsMenu(menu);
}

@Override
publicboolean onOptionsItemSelected(MenuItem item){
switch(item.getItemId()){
case R.id.action_android:
Log.i(TAG, "action android selected");
returntrue;
case R.id.action_favourite:
Log.i(TAG, "action favourite selected");
returntrue;
case R.id.action_settings:
Log.i(TAG, "action settings selected");
returntrue;
default:
returnsuper.onOptionsItemSelected(item);
}
}
Menu Item,依然支持在menu/menu_main.xml去聲明,然後復寫onCreateOptionsMenu和onOptionsItemSelected即可。可選方案也可以通過toolbar.setOnMenuItemClickListener實現點擊MenuItem的回調。
toolbar.setOnMenuItemClickListener(new Toolbar.OnMenuItemClickListener(){
@Override
publicboolean onMenuItemClick(MenuItem item){
returnfalse;
}
});
添加向上返回的action添加向上返回parent的action:
@Override
protectedvoid onCreate(Bundle savedInstanceState){
super.onCreate(savedInstanceState);
setContentView(R.layout.activity_toolbar_demo);
setSupportActionBar(toolbar);

// add a left arrow to back to parent activity,
// no need to handle action selected event, this is handled by super
getSupportActionBar().setDisplayHomeAsUpEnabled(true);
}
然後只需要在manifest中指定parent:
android:name=".toolbar.ToolbarDemoActivity"
android:parentActivityName=".MainActivity">

android:name="android.support.PARENT_ACTIVITY"
android:value=".MainActivity" />
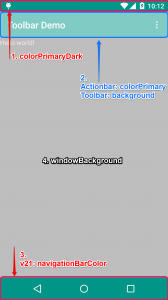
可若是采用 toolbar的話,則要在界面 (layout)裡面設定 toolbar控件的background屬性。
navigationBarColor(導航欄底色):僅能在 API v21也就是 Android 5以後的版本中使用,因此要將之設定在 res/values-v21/styles.xml裡面。也因此在這個階段,我們需要設定的地方有三,一是 style中(res/values/styles.xml)
@color/accent_material_dark
@color/accent_material_light
@color/dim_foreground_material_dark
再來是 v21的style中 (res/values-v21/styles.xml)
@color/accent_material_light
最後,就是為了本篇的主角 – Toolbar的 background進行設定。
android:id="@+id/toolbar"
android:layout_height="?attr/actionBarSize"
android:layout_width="match_parent"
android:background="?attr/colorPrimary">
在還未於 標簽中,自行添加元件的 toolbar有幾個大家常用的元素可以使用,請先見下圖: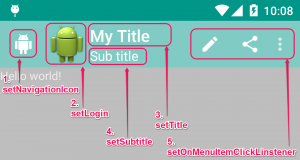
Toolbar toolbar=(Toolbar) findViewById(R.id.toolbar);

// App Logo
toolbar.setLogo(R.drawable.ic_launcher);
// Title
toolbar.setTitle("My Title");
// Sub Title
toolbar.setSubtitle("Sub title");

setSupportActionBar(toolbar);

// Navigation Icon 要設定在 setSupoortActionBar之後才有作用
// 否則會出現 back button
toolbar.setNavigationIcon(R.drawable.ab_android);
這邊要留意的是setNavigationIcon需要放在 setSupportActionBar之後才會生效。可選方案當然如果你喜歡,也可以在布局文件中去設置部分屬性:
android:id="@+id/id_toolbar"
app:title="App Title"
app:subtitle="Sub Title"
app:navigationIcon="@drawable/ic_toc_white_24dp"
android:layout_height="wrap_content"
android:minHeight="?attr/actionBarSize"
android:layout_width="match_parent"
android:background="?attr/colorPrimary"/>
Action Views and Action Providers To add an action view, create an
getActionView的正確操作方式:
@Override
publicboolean onCreateOptionsMenu(Menu menu){
getMenuInflater().inflate(R.menu.main_activity_actions, menu);

MenuItem searchItem= menu.findItem(R.id.action_search);
SearchView searchView =
(SearchView) MenuItemCompat.getActionView(searchItem);

// Configure the search info and add any event listeners...

returnsuper.onCreateOptionsMenu(menu);
}

Add an Action Provider
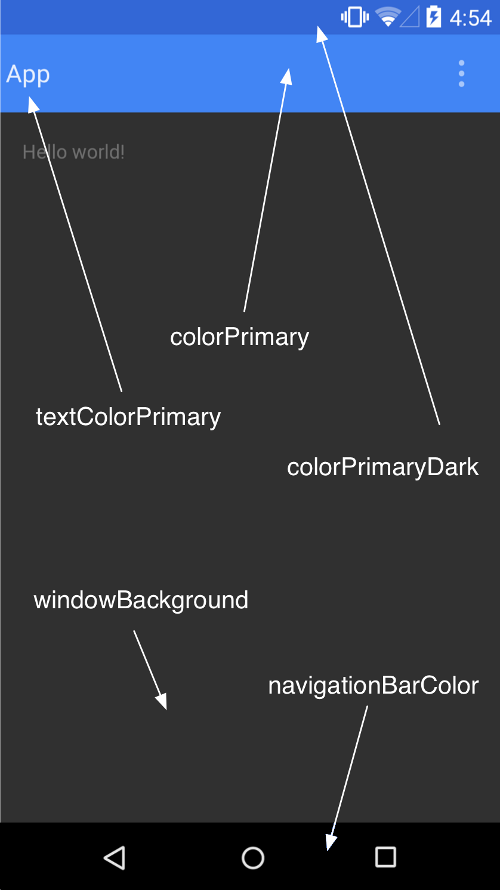
在這樣的架構設計下,ToolBar直接成了Layout中可以控制的東西,相對於過去的actionbar來說,設計與可操控性大幅提升。最後再附上一個界面上常用的屬性說明圖: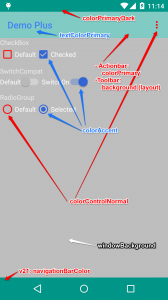 這裡按照圖中從上到下的順序做個簡單的說明:
colorPrimaryDark
狀態欄背景色。在 style的屬性中設置。 textColorPrimary
App bar上的標題與更多菜單中的文字顏色。在 style的屬性中設置。 App bar的背景色
Actionbar的背景色設定在 style中的 colorPrimary。 Toolbar的背景色在layout文件中設置background屬性。 colorAccent
各控制元件(如:check box、switch或是 radoi)被勾選 (checked)或是選定 (selected)的顏色。在 style的屬性中設置。 colorControlNormal
各控制元件的預設顏色。在 style的屬性中設置 windowBackground
App 的背景色。在 style的屬性中設置 navigationBarColor
導航欄的背景色,但只能用在 API Level 21 (Android 5)以上的版本在 style的屬性中設置
最後需要注意的是:使用material主題的時候,必須設定targetSdkVersion = 21,否則界面看起來是模糊的
在Fragment中使用Toolbar的步驟和Activity差不多.在Fragment布局中添加一個Toolbar,然後find它,然後調用Activity的方法來把它設置成ActionBar:
((AppCompatActivity) getActivity()).setSupportActionBar(toolbar);
注意此處有一個強轉,必須是AppCompatActivity才有這個方法.但是此時運行到Fragment之後,發現Toolbar上的文字和按鈕全是Activity傳過來的,這是因為只有Activity的onCreateOptionsMenu()被調用了,但是Fragment的並沒有被調用.在Fragment中加上這句:
setHasOptionsMenu(true);
此時Fragment的onCreateOptionsMenu()回調會被調到了,但是inflate出的按鈕和Activity中的actions加在一起顯示出來了.因為Activity的onCreateOptionsMenu()會在之前調用到.於是Fragment中的寫成這樣:
@Override
publicvoid onCreateOptionsMenu(Menu menu, MenuInflater inflater){
Log.e(TAG, "onCreateOptionsMenu()");
menu.clear();
inflater.inflate(R.menu.menu_parent_fragment, menu);
}
即先clear()一下,這樣按鈕就只有Fragment中設置的自己的了,不會有Activity中的按鈕.
前面已經介紹過, Fragment可以嵌套使用:Android Fragment使用(二)嵌套Fragments (Nested Fragments)的使用及常見錯誤那麼在前面的Fragment中再顯示一個子Fragment,並且又帶有一個不一樣的Toolbar,還需要哪些處理呢?首先, java代碼中還是需要有:
setHasOptionsMenu(true)
((AppCompatActivity) getActivity()).setSupportActionBar(toolbar);
然後根據是否需要菜單按鈕,覆寫onCreateOptionsMenu()方法來inflate自己的menu文件即可.感覺和在普通的Fragment中使用Toolbar作為ActionBar並沒有什麼區別.但是如果你的多個Fragment有不同的Toolbar菜單選項,如果你沒有懂得其中的原理,可能就會出現一些混亂.下面來解說一下相關的方法.onCreateOptionsMenu()方法的調用一旦調用.setSupportActionBar(toolbar);就會導致Activity.onCreateOptionsMenu()方法的調用,而Activity會根據其中Fragment是否設置了setHasOptionsMenu(true)來調用Fragment的onCreateOptionsMenu()方法,調用順序是樹形的,按層級調用,中間如果有false則跳過.
假設當前Activity, Parent Fragment和Child Fragment中都設置了自己的Toolbar為ActionBar.在打開Child fragment的時候, onCreateOptionsMenu()的調用順序是.Activity → Parent → Child. 此時parent和child fragment都設置了setHasOptionsMenu(true).
關於這個,還有以下幾種情況: -如果Parent的`setHasOptionsMenu(false)`, Child為true,則Parent的`onCreateOptionsMenu()`不會調用,打開Child的時候Activity → Child. -如果Child的`setHasOptionsMenu(false)`, Parent為true,則打開Child的時候仍然會調用Activity和Parent的onCreateOptionsMenu()方法. - 如果Parent和Child都置為false,打開Parent和Child Fragment的時候都會調用Activity的onCreateOptionsMenu()方法.僅僅是child Fragment的show() hide()的切換, activity和parent Fragment的onCreateOptionsMenu()也會重新進入.
上面的機制常常是導致Toolbar上面的按鈕混淆錯亂的原因.舉個例子:如果我們現在Activity和Parent Fragment有不同的Toolbar按鈕,但是Child只有文字,沒有按鈕.很顯然我們不需要給child寫menu文件,也不需要覆寫child裡的onCreateOptionsMenu()方法.但是此時不管怎樣, parent的onCreateOptionsMenu()方法都會被調用,這樣我們打開child的時候, toolbar上就神奇地出現了parent裡的按鈕.這種情況如何解決呢?可以在parent中加一個條件,當沒有child fragment的時候才做inflate的工作:
@Override
publicvoid onCreateOptionsMenu(Menu menu, MenuInflater inflater){
Log.e(TAG, "onCreateOptionsMenu()");
menu.clear();
if(getChildFragmentManager().getBackStackEntryCount()==0){
inflater.inflate(R.menu.menu_parent_fragment, menu);
}
}
另外,除了setSupportActionBar()之外,如果我們想主動觸發 onCreateOptionsMenu()方法的調用,可以用invalidateOptionsMenu()方法.
onOptionsItemSelected()方法的調用在Activity和其中的Fragment都有options menu的時候,需要注意menu item的id不要重復.因為點擊事件的分發也是從Activity開始分發下去的,如果child fragment中有個選項的id和Activity中一個選項的id重復了,則在Activity中就會將其處理,不會繼續分發.
有嵌套Fragment時 Back鍵處理之前沒有嵌套Fragment的情況下,只要將Fragment加入到Back Stack中,那麼按下Back鍵的時候pop動作是系統自動做好的.雖然在添加child fragment的時候將其加入到back stack中,但是按back鍵的時候仍然是將parent fragment彈出,只剩下Activity.這是因為back鍵只檢查第一層Fragment的back stack, 對於child fragment,需要在其parent中自己處理.比如這樣處理:在Activity中
@Override
publicvoid onBackPressed(){
Fragment fragment = getSupportFragmentManager().findFragmentById(android.R.id.content);
if(fragmentinstanceof ToolbarFragment){
if(((ToolbarFragment) fragment).onBackPressed()){
return;
}
}
super.onBackPressed();
}
其中ToolbarFragment是直接加在Activity中作為parent fragment的.在parent fragment中(即ToolbarFragment中):
publicboolean onBackPressed(){
return getChildFragmentManager().popBackStackImmediate();
對於Fragment使用Toolbar思維被局限了,Menu的操作也不用在onCreateOptionsMenu方法,直接使用ToolBar的inflateMenu方法,Menu的事件也是獨立的,需要通過設置ToolBar的setOnMenuItemClickListener來實現。
Toolbar toolbar=(Toolbar) findViewById(R.id.toolbar);

// App Logo
toolbar.setLogo(R.drawable.ic_launcher);
// Title
toolbar.setTitle("My Title");
// Sub Title
toolbar.setSubtitle("Sub title");

//setSupportActionBar(toolbar);
toolbar.inflateMenu(R.menu.activity_main);
// Navigation Icon 要設定在 setSupoortActionBar後 才有作用
// 否則會出現 back button
toolbar.setNavigationIcon(R.drawable.ab_android);
toolbar.setNavigationOnClickListener(newView.OnClickListener(){
@Override
publicvoid onClick(View v){

}
});
// Menu item click 設定在 setSupportActionBar 之後才有作用
toolbar.setOnMenuItemClickListener(onMenuItemClick);
private Toolbar.OnMenuItemClickListener onMenuItemClick=new Toolbar.OnMenuItemClickListener(){
@Override
publicboolean onMenuItemClick(MenuItem menuItem){
String msg="";
switch(menuItem.getItemId()){
case R.id.action_edit:
break;
}
returntrue;
}
};
自定義布局 title修改為居中
xmlns:android="http://schemas.android.com/apk/res/android"
android:id="@+id/toolbar"
android:layout_width="match_parent"
android:layout_height="wrap_content"
android:background="@mipmap/bg_title"
android:minHeight="?actionBarSize">
android:id="@+id/toolbar_title"
style="@style/TextAppearance.AppCompat.Widget.ActionBar.Title"
android:layout_width="wrap_content"
android:layout_height="wrap_content"
android:layout_gravity="center"/>
禁用系統的title顯示,即setDisplayShowTitleEnabled方法實現將布局的內容延伸到狀態欄 styles.xml
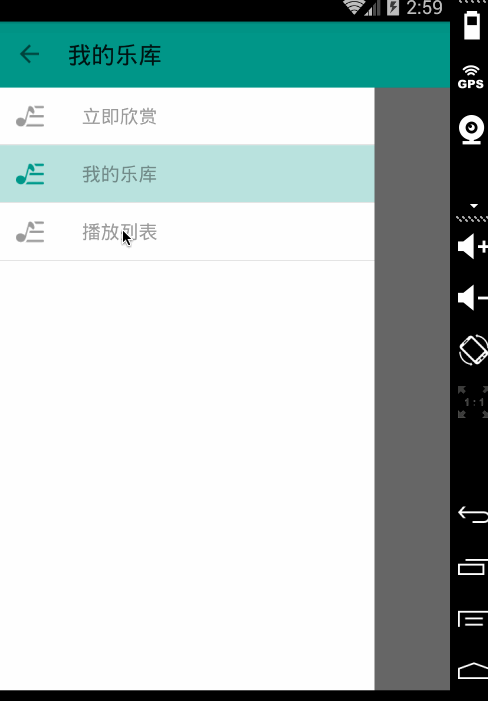 大致思路整體實現還是比較容易的,首先需要引入DrawerLayout(如果你對DrawerLayout不了解,可以參考Android DrawerLayout 高仿QQ5.2雙向側滑菜單),然後去初始化mActionBarDrawerToggle,mActionBarDrawerToggle實際上是個DrawerListener,設置mDrawerLayout.setDrawerListener(mActionBarDrawerToggle);就已經能夠實現上面點擊Nav Icon切換效果了。當然了細節還是挺多的。我們的效果圖,左側菜單為Fragment,內容區域為Fragment,點擊左側菜單切換內容區域的Fragment即可。 activity_main.xml
DrawerLayout中包含兩個FrameLayout,分別放內容區域和左側菜單的Fragment。 LeftMenuFragment
packagecom.zhy.toolbar;

importandroid.os.Bundle;
import android.support.annotation.Nullable;
import android.support.v4.app.ListFragment;
import android.view.LayoutInflater;
import android.view.View;
import android.view.ViewGroup;
import android.widget.ListView;

/**
* Created by zhy on 15/4/26.
*/
publicclass LeftMenuFragmentextends ListFragment {

privatestaticfinalint SIZE_MENU_ITEM=3;

privateMenuItem[] mItems=newMenuItem[SIZE_MENU_ITEM];

private LeftMenuAdapter mAdapter;

private LayoutInflater mInflater;

@Override
publicvoid onCreate(@Nullable Bundle savedInstanceState){
super.onCreate(savedInstanceState);

mInflater = LayoutInflater.from(getActivity());

MenuItem menuItem=null;
for(int i =0; i< SIZE_MENU_ITEM; i++){
menuItem =newMenuItem(getResources().getStringArray(R.array.array_left_menu)[i],false, R.drawable.music_36px, R.drawable.music_36px_light);
mItems[i]= menuItem;
}
}

@Override
publicView onCreateView(LayoutInflater inflater, ViewGroup container, Bundle savedInstanceState){
returnsuper.onCreateView(inflater, container, savedInstanceState);
}

@Override
publicvoid onViewCreated(View view, @Nullable Bundle savedInstanceState){
super.onViewCreated(view, savedInstanceState);

setListAdapter(mAdapter =new LeftMenuAdapter(getActivity(), mItems));

}

@Override
publicvoid onListItemClick(ListView l, View v, int position,long id){
super.onListItemClick(l, v, position, id);

if(mMenuItemSelectedListener!=null){
mMenuItemSelectedListener.menuItemSelected(((MenuItem) getListAdapter().getItem(position)).text);
}

mAdapter.setSelected(position);

}


//選擇回調的接口
publicinterface OnMenuItemSelectedListener{
void menuItemSelected(String title);
}
private OnMenuItemSelectedListener mMenuItemSelectedListener;

publicvoid setOnMenuItemSelectedListener(OnMenuItemSelectedListener menuItemSelectedListener){
this.mMenuItemSelectedListener= menuItemSelectedListener;
}


}
繼承自ListFragment,主要用於展示各個Item,提供了一個選擇Item的回調,這個需要在Activity中去注冊處理。 LeftMenuAdapter
packagecom.zhy.toolbar;

importandroid.content.Context;
import android.graphics.Color;
import android.view.LayoutInflater;
import android.view.View;
import android.view.ViewGroup;
import android.widget.ArrayAdapter;
import android.widget.ImageView;
import android.widget.TextView;

/**
* Created by zhy on 15/4/26.
*/
publicclass LeftMenuAdapterextends ArrayAdapter{


private LayoutInflater mInflater;

privateint mSelected;


public LeftMenuAdapter(Context context,MenuItem[] objects){
super(context, -1, objects);

mInflater = LayoutInflater.from(context);

}

@Override
publicView getView(int position, View convertView, ViewGroup parent){


if(convertView==null){
convertView = mInflater.inflate(R.layout.item_left_menu, parent,false);
}

ImageView iv =(ImageView) convertView.findViewById(R.id.id_item_icon);
TextView title =(TextView) convertView.findViewById(R.id.id_item_title);
title.setText(getItem(position).text);
iv.setImageResource(getItem(position).icon);
convertView.setBackgroundColor(Color.TRANSPARENT);

if(position== mSelected){
iv.setImageResource(getItem(position).iconSelected);
convertView.setBackgroundColor(getContext().getResources().getColor(R.color.state_menu_item_selected));
}

return convertView;
}

publicvoid setSelected(int position){
this.mSelected= position;
notifyDataSetChanged();
}


}


packagecom.zhy.toolbar;

publicclassMenuItem{

publicMenuItem(String text, boolean isSelected, int icon, int iconSelected){
this.text= text;
this.isSelected= isSelected;
this.icon= icon;
this.iconSelected= iconSelected;
}

boolean isSelected;
String text;
int icon;
int iconSelected;
}
Adapter沒撒說的~~提供了一個setSection方法用於設置選中Item的樣式什麼的。接下來看ContentFragment,僅僅只是一個TextView而已,所以代碼也比較easy。
packagecom.zhy.toolbar;

importandroid.os.Bundle;
import android.support.annotation.Nullable;
import android.support.v4.app.Fragment;
import android.text.TextUtils;
import android.view.Gravity;
import android.view.LayoutInflater;
import android.view.View;
import android.view.ViewGroup;
import android.widget.TextView;

/**
* Created by zhy on 15/4/26.
*/
publicclass ContentFragmentextends Fragment {

publicstaticfinalString KEY_TITLE ="key_title";
privateString mTitle;

publicstatic ContentFragment newInstance(String title){
ContentFragment fragment =new ContentFragment();
Bundle bundle =new Bundle();
bundle.putString(KEY_TITLE, title);
fragment.setArguments(bundle);
return fragment;
}

@Nullable
@Override
publicView onCreateView(LayoutInflater inflater, @Nullable ViewGroup container,
@Nullable Bundle savedInstanceState){

TextView tv =new TextView(getActivity());
String title=(String) getArguments().get(KEY_TITLE);
if(!TextUtils.isEmpty(title))
{
tv.setGravity(Gravity.CENTER);
tv.setTextSize(40);
tv.setText(title);
}

return tv;
}
}
提供newInstance接收一個title參數去實例化它。最後就是我們的MainActivity了,負責管理各種Fragment。
MainActivity
packagecom.zhy.toolbar;importandroid.os.Bundle;importandroid.support.v4.app.Fragment;importandroid.support.v4.app.FragmentManager;importandroid.support.v4.app.FragmentTransaction;importandroid.support.v4.widget.DrawerLayout;importandroid.support.v7.app.ActionBarDrawerToggle;importandroid.support.v7.app.AppCompatActivity;importandroid.support.v7.widget.Toolbar;importandroid.text.TextUtils;importandroid.view.Gravity;importjava.util.List;publicclass MainActivity extends AppCompatActivity {

private ActionBarDrawerToggle mActionBarDrawerToggle;private DrawerLayout mDrawerLayout;private Toolbar mToolbar;private LeftMenuFragment mLeftMenuFragment;private ContentFragment mCurrentFragment;privateString mTitle;privatestaticfinalString TAG ="com.zhy.toolbar";privatestaticfinalString KEY_TITLLE ="key_title"; @Override
protectedvoid onCreate(Bundle savedInstanceState){super.onCreate(savedInstanceState);
setContentView(R.layout.activity_main);

initToolBar();
initViews();//恢復title
restoreTitle(savedInstanceState);

FragmentManager fm = getSupportFragmentManager();//查找當前顯示的Fragment
mCurrentFragment =(ContentFragment) fm.findFragmentByTag(mTitle);if(mCurrentFragment==null){
mCurrentFragment = ContentFragment.newInstance(mTitle);
fm.beginTransaction().add(R.id.id_content_container, mCurrentFragment, mTitle).commit();
}

mLeftMenuFragment =(LeftMenuFragment) fm.findFragmentById(R.id.id_left_menu_container);if(mLeftMenuFragment==null){
mLeftMenuFragment =new LeftMenuFragment();
fm.beginTransaction().add(R.id.id_left_menu_container, mLeftMenuFragment).commit();
}//隱藏別的Fragment,如果存在的話
List fragments= fm.getFragments();if(fragments!=null)for(Fragment fragment: fragments){if(fragment== mCurrentFragment || fragment == mLeftMenuFragment)continue;
fm.beginTransaction().hide(fragment).commit();
}//設置MenuItem的選擇回調
mLeftMenuFragment.setOnMenuItemSelectedListener(new LeftMenuFragment.OnMenuItemSelectedListener(){ @Override
publicvoid menuItemSelected(String title){

FragmentManager fm = getSupportFragmentManager();
ContentFragment fragment =(ContentFragment) getSupportFragmentManager().findFragmentByTag(title);if(fragment== mCurrentFragment){
mDrawerLayout.closeDrawer(Gravity.LEFT);return;
}

FragmentTransaction transaction = fm.beginTransaction();
transaction.hide(mCurrentFragment);if(fragment==null){
fragment = ContentFragment.newInstance(title);
transaction.add(R.id.id_content_container, fragment, title);
}else{
transaction.show(fragment);
}
transaction.commit();

mCurrentFragment = fragment;
mTitle = title;
mToolbar.setTitle(mTitle);
mDrawerLayout.closeDrawer(Gravity.LEFT);


}
});

}privatevoid restoreTitle(Bundle savedInstanceState){if(savedInstanceState!=null)
mTitle = savedInstanceState.getString(KEY_TITLLE);if(TextUtils.isEmpty(mTitle)){
mTitle = getResources().getStringArray(
R.array.array_left_menu)[0];
}

mToolbar.setTitle(mTitle);
} @Override
protectedvoid onSaveInstanceState(Bundle outState){super.onSaveInstanceState(outState);
outState.putString(KEY_TITLLE, mTitle);
}privatevoid initToolBar(){

Toolbar toolbar = mToolbar =(Toolbar) findViewById(R.id.id_toolbar);// App Logo
// toolbar.setLogo(R.mipmap.ic_launcher);
// Title
toolbar.setTitle(getResources().getStringArray(R.array.array_left_menu)[0]);// Sub Title
// toolbar.setSubtitle("Sub title");// toolbar.setTitleTextAppearance();


setSupportActionBar(toolbar);//Navigation Icon
toolbar.setNavigationIcon(R.drawable.ic_toc_white_24dp);/*
toolbar.setOnMenuItemClickListener(new Toolbar.OnMenuItemClickListener() {
@Override
public boolean onMenuItemClick(MenuItem item) {
return false;
}
});*/

}privatevoid initViews(){

mDrawerLayout =(DrawerLayout) findViewById(R.id.id_drawerlayout);

mActionBarDrawerToggle =new ActionBarDrawerToggle(this,
mDrawerLayout, mToolbar, R.string.open, R.string.close);
mActionBarDrawerToggle.syncState();
mDrawerLayout.setDrawerListener(mActionBarDrawerToggle);


}
}
內容區域的切換是通過Fragment hide和show實現的,畢竟如果用replace,如果Fragment的view結構比較復雜,可能會有卡頓。當然了,注意每個Fragment占據的內存情況,如果內存不足,可能需要改變實現方式。對於旋轉屏幕或者應用長時間置於後台,Activity重建的問題,做了簡單的處理。
 如何獲取android手機聯系人並按字母展示(二)
下面寫怎麼讓每個首字母相同的聯系人歸類展示: 在adapter implement SectionIndexer 這樣adapter裡必須實現以下3個接口: @Ove
 Android Listview上下拉動刷新tab滑動切換功能
近期要做一個含有兩個tab切換頁面,兩個頁面有公共的描述信息區域,兩個tab都是listview,可以向上或向下拉動刷新,在頁面中部有一個tab切換區域,向上滑動的時候t
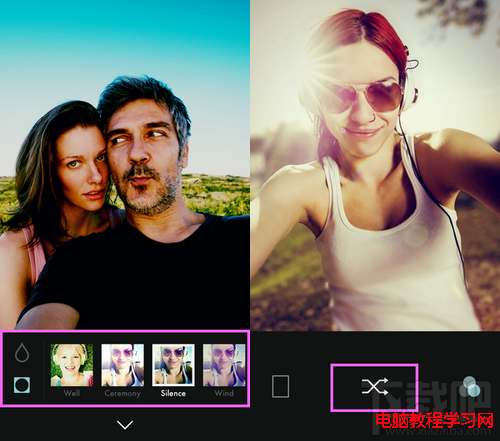 Line B612 APP怎麼用
Line靜音自拍APP“B612”是一款自拍專用APP,專門用於自拍,且不會發出快門聲。該應用使用簡單,拍照之前無需像傳統拍照軟件那
 Android中利用5.0系統屏幕錄制UI漏洞騙取應用錄制屏幕授權
一、漏洞分析今天我們來看一下Android中的屏幕錄制功能帶來的一個漏洞問題,在之前的一篇文章中介紹了關於Android5.0新增的Api來進行錄制屏幕視頻,不了解的同學