編輯:關於Android編程
關於Android自動化測試,研究了Monkey,Robotium 這次來看下 Monkeyrunner.
這裡簡單記錄下實踐過程,Monkeyrunner 需要用Python來編寫,對於曾未學過Python的童鞋來說也沒關系,因為Python屬於比較好學的一門腳本語言.筆者也未曾學過Python,但有其他編程基礎如:PHP,Java,Peal,還是能夠很好理解Python的。
一、monkeyrunner 介紹
monkeyrunner 提供了一個API,使用此API寫出的程序可以在Android代碼之外控制Android設備和模擬器.
二、monkeyrunner 測試類型
多設備控制、功能測試、回歸測試
三、實例(測試MyAndroid.apk)
1. 新建一個 monkeyrunnerTest.py
# Import the monkey runner modules used by this program
from com.android.monkeyrunner import MonkeyRunner, MonkeyDevice, MonkeyImage
# Connects to current device, returning a MonkeyDevice object
device = MonkeyRunner.waitForConnection()
# Installs the Android package
device.installPackage("./MyAndroid.apk")
# Runs the component
device.startActivity(component = 'com.luwenjie.android/.MyAndroidActivity')
#Presses the Menu button
device.press('KEYCODE_MENU','DOWN_AND_UP')
#Takes a screenshot
result = device.takeSnapshot()
# Writes the screenshot to a file
result.writeToFile('./shot1.png','png')
2. 運行在 %Android_HOME%\tools 目錄下運行一下命令
monkeyrunner monkeyrunnerTest.py
四、API參考
MonkeyRunner:http://developer.android.com/tools/help/MonkeyRunner.html
MonkeyDevice:http://developer.android.com/tools/help/MonkeyDevice.html
MonkeyImage:http://developer.android.com/tools/help/MonkeyImage.html
五、錄制模式
#Usage: monkeyrunner recorder.py
#recorder.py
from com.android.monkeyrunner import MonkeyRunner as mr
from com.android.monkeyrunner.recorder import MonkeyRecorder as recorder
device = mr.waitForConnection()
recorder.start(device)
#END recorder.py
#Press ExportAction to save recorded scrip to a file
#Example of result:
#PRESS|{'name':'MENU','type':'downAndUp',}
#TOUCH|{'x':190,'y':195,'type':'downAndUp',}
#TYPE|{'message':'',}
#Usage: monkeyrunner playback.py "myscript"
#playback.py http://mirror.yongbok.net/linux/android/repository/platform/sdk/monkeyrunner/scripts/monkey_playback.py
import sys
from com.android.monkeyrunner import MonkeyRunner
# The format of the file we are parsing is very carfeully constructed.
# Each line corresponds to a single command. The line is split into 2
# parts with a | character. Text to the left of the pipe denotes
# which command to run. The text to the right of the pipe is a python
# dictionary (it can be evaled into existence) that specifies the
# arguments for the command. In most cases, this directly maps to the
# keyword argument dictionary that could be passed to the underlying
# command.
# Lookup table to map command strings to functions that implement that
# command.
CMD_MAP = {
'TOUCH': lambda dev, arg: dev.touch(**arg),
'DRAG': lambda dev, arg: dev.drag(**arg),
'PRESS': lambda dev, arg: dev.press(**arg),
'TYPE': lambda dev, arg: dev.type(**arg),
'WAIT': lambda dev, arg: MonkeyRunner.sleep(**arg)
}
# Process a single file for the specified device.
def process_file(fp, device):
for line in fp:
(cmd, rest) = line.split('|')
try:
# Parse the pydict
rest = eval(rest)
except:
print 'unable to parse options'
continue
if cmd not in CMD_MAP:
print 'unknown command: ' + cmd
continue
CMD_MAP[cmd](device, rest)
def main():
file = sys.argv[1]
fp = open(file, 'r')
device = MonkeyRunner.waitForConnection()
process_file(fp, device)
fp.close();
if __name__ == '__main__':
main()
作者:luckyapplelwj
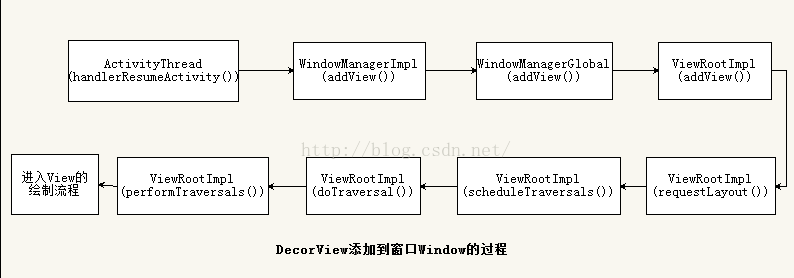 android6.0 Activity(五) Activity的測量(Measure)、布局(Layout)和繪制(Draw)
Android應用程序窗口的繪圖表面在創建完成之後,我們就可以從上到下地繪制它裡面的各個視圖了,即各個UI元素了。不過在繪制這些UI元素之前,我們還需要從上到下地測量它們
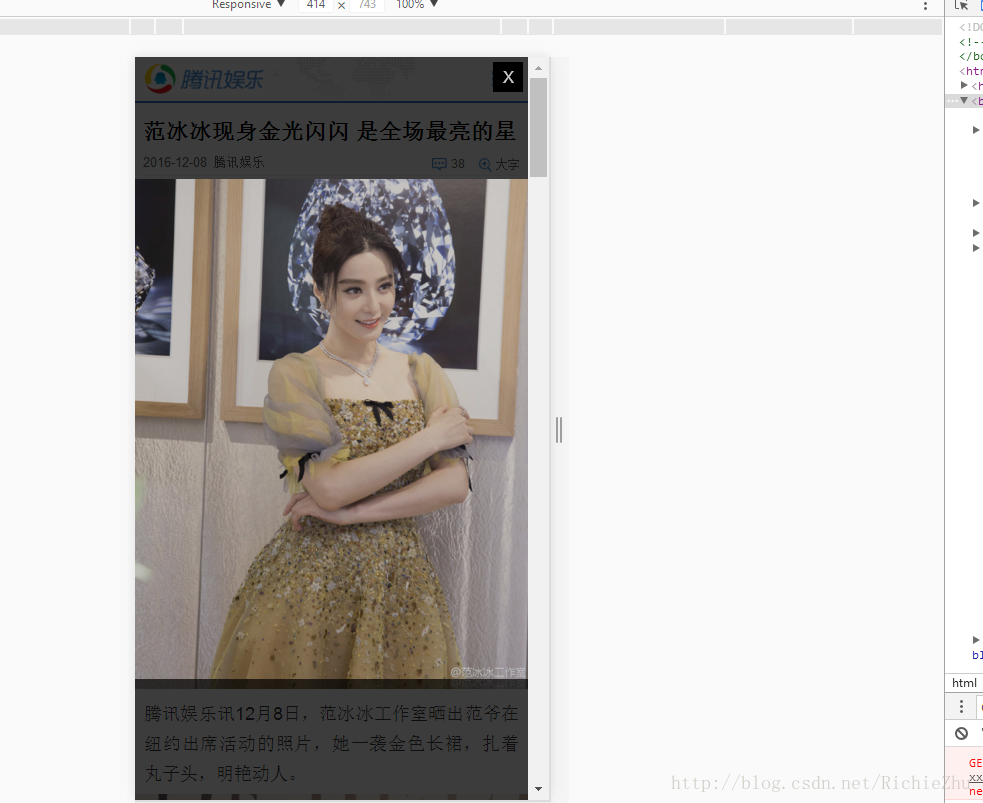 Android WebView In NestedScrollView 加載騰訊新聞頁面 點擊彈出層 bug 小記
Android WebView In NestedScrollView 加載騰訊新聞頁面 點擊彈出層 bug 小記。目的是: CoordinatorLayou+AppBa
 Intent Filter匹配規則
Intent簡介Android中提供了Intent機制來協助應用間的交互與通訊,Intent負責對應用中一次操作的動作、動作涉及數據、附加數據進行描述,Android則根
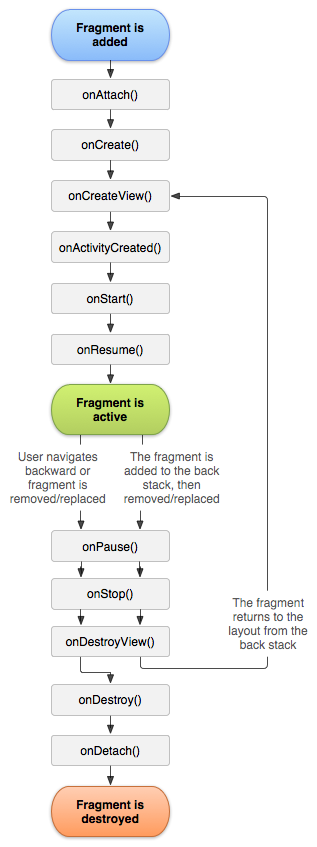 Fragment生命周期詳解
1. Fragment概述Fragment從Android v3.0版本開始引入隨著界面布局的復雜化,處理起來也更加的復雜,引入Fragment可以把activity拆分