編輯:關於Android編程
A contextual menu offers actions that affect a specific item or context frame in the UI. You can provide a context menu for any view, but they are most often used for items in a ListView, GridView, or other view collections in which the user can perform direct actions on each item.
一個上下文菜單提供了行動,影響特定項目或上下文框架在UI。你可以提供一個上下文菜單,任何觀點,但他們通常都用於項目在列表視圖中,顯示數據表格,或其他視圖集合中,用戶可以直接在每個項目上執行操作。
There are two ways to provide contextual actions:
有兩種方法提供相關操作:
In a floating context menu. A menu appears as a floating list of menu items (similar to a dialog) when the user performs a long-click (press and hold) on a view that declares support for a context menu. Users can perform a contextual action on one item at a time.
In the contextual action mode. This mode is a system implementation ofActionMode that displays a contextual action bar at the top of the screen with action items that affect the selected item(s). When this mode is active, users can perform an action on multiple items at once (if your app allows it).
Note: The contextual action mode is available on Android 3.0 (API level 11) and higher and is the preferred technique for displaying contextual actions when available. If your app supports versions lower than 3.0 then you should fall back to a floating context menu on those devices.
在一個浮動的上下文菜單。一個菜單顯示為一個浮動菜單項列表(類似於一個對話框),在用戶執行一個長點擊(按下並保持住)在一個視圖,宣布支持一個上下文菜單。用戶可以執行上下文動作在一個項目在一個時間。 在上下文動作模式。這種模式是一個系統實現的ActionMode上下文操作欄顯示在屏幕頂端與行動項目,影響選擇的項目(s)。當這個模式被激活時,用戶可以執行一個動作在多個項目在一次(如果你的應用程序允許它)。 注意:上下文動作模式是可以在Android 3.0(API級別11)和更高的和是首選的技術顯示相關操作可用時。如果你的應用程序支持版本低於3.0,那麼你應該回退到一個浮動的上下文菜單在那些設備。
Creating a floating context menu創建一個浮動的上下文菜單
To provide a floating context menu:
Register the View to which the context menu should be associated by calling registerForContextMenu() and pass it the View.
If your activity uses a ListView or GridView and you want each item to provide the same context menu, register all items for a context menu by passing the ListView or GridView to registerForContextMenu().
Implement the onCreateContextMenu() method in your Activity or Fragment.
When the registered view receives a long-click event, the system calls your onCreateContextMenu() method. This is where you define the menu items, usually by inflating a menu resource. For example:
@Override
public void onCreateContextMenu(ContextMenu menu, View v,
ContextMenuInfo menuInfo) {
super.onCreateContextMenu(menu, v, menuInfo);
MenuInflater inflater = getMenuInflater();
inflater.inflate(R.menu.context_menu, menu);
}MenuInflater allows you to inflate the context menu from a menu resource. The callback method parameters include the View that the user selected and a ContextMenu.ContextMenuInfo object that provides additional information about the item selected. If your activity has several views that each provide a different context menu, you might use these parameters to determine which context menu to inflate.
Implement onContextItemSelected().
When the user selects a menu item, the system calls this method so you can perform the appropriate action. For example:
@Override
public boolean onContextItemSelected(MenuItem item) {
AdapterContextMenuInfo info = (AdapterContextMenuInfo) item.getMenuInfo();
switch (item.getItemId()) {
case R.id.edit:
editNote(info.id);
return true;
case R.id.delete:
deleteNote(info.id);
return true;
default:
return super.onContextItemSelected(item);
}
}The getItemId() method queries the ID for the selected menu item, which you should assign to each menu item in XML using the android:id attribute, as shown in the section about Defining a Menu in XML.
When you successfully handle a menu item, return true. If you don't handle the menu item, you should pass the menu item to the superclass(超類) implementation. If your activity includes fragments, the activity receives this callback first. By calling the superclass when unhandled, the system passes the event to the respective callback method in each fragment, one at a time (in the order each fragment was added) until trueor false is returned. (The default implementation for Activity and android.app.Fragment return false, so you should always call the superclass(超類) when unhandled.)
 Android-滿屏幕拖動的控件
覺得跟之前的模擬小火箭很相似,又有學習的地方,能作為知識補充。所以轉載一起學習。大家也可以關注他的文章哦。也就是,用戶可以隨心所欲的拖動控件,布局文件很簡單就是一個But
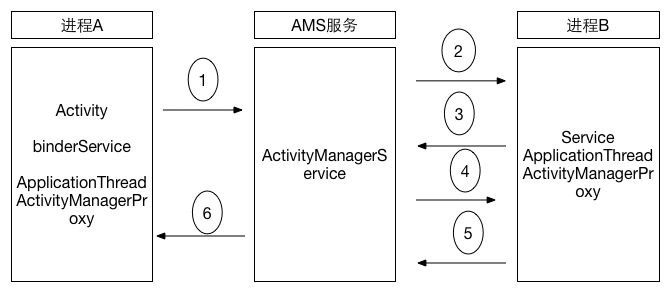 深入理解Binder
Binder概述一句話概括進程通信:進程間的數據傳遞。Binder是Anroid系統裡最重要的進程通信方式,很多文章會直接用代碼、原理類的文字進行描述,對於接觸Andro
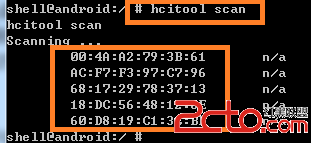 Android bluetooth介紹(三): 藍牙掃描(scan)設備分析
關鍵詞:藍牙blueZ A2DP、SINK、sink_connect、sink_disconnect、sink_suspend、sink_resume、sink_is_
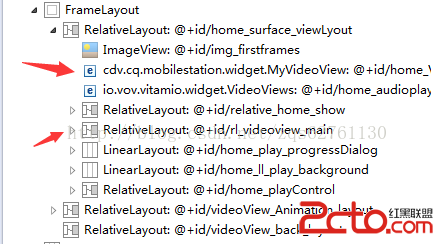
 Android Multimedia框架總結(一)MediaPlayer介紹之狀態圖及生命周期
前言:從本篇開始,將進入Multimedia框架,包含MediaPlayer, Camera, Surface, MediaRecord, 接下來幾篇都是MediaPla