編輯:關於Android編程
Android中實現拍照有兩種方法,一種是調用系統自帶的相機,然後使用其返回的照片數據。 還有一種是自己用Camera類和其他相關類實現相機功能,這種方法定制度比較高,洗染也比較復雜,一般平常的應用只需使用第一種即可。
用Intent啟動相機的代碼:
Intent intent = new Intent(MediaStore.ACTION_IMAGE_CAPTURE);
startActivityForResult(intent, 1);拍完照後就可以在onActivityResult(int requestCode, int resultCode, Intent data)中獲取到Bitmap對象了。 Bitmap bitmap = (Bitmap) data.getExtras().get("data");
要將圖像存儲到sd卡之前最好先檢查一下sd卡是否可用
String sdStatus = Environment.getExternalStorageState();
if (!sdStatus.equals(Environment.MEDIA_MOUNTED)) { // 檢測sd是否可用
Log.v("TestFile",
"SD card is not avaiable/writeable right now.");
return;
}
以下代碼可以實現將圖像文件存到“sdcard/myImage/”文件夾下,名稱為“111.jpg”
File file = new File("/sdcard/myImage/");
file.mkdirs();// 創建文件夾
String fileName = "/sdcard/myImage/111.jpg";
try {
b = new FileOutputStream(fileName);
bitmap.compress(Bitmap.CompressFormat.JPEG, 100, b);// 把數據寫入文件
} catch (FileNotFoundException e) {
e.printStackTrace();
} finally {
try {
b.flush();
b.close();
} catch (IOException e) {
e.printStackTrace();
}
}
另外要注意的是讀寫sd卡文件必須首先要在Mainifest.xml文件中配置權限:
<uses-permission android:name="android.permission.WRITE_EXTERNAL_STORAGE" />
<uses-permission android:name="android.permission.MOUNT_UNMOUNT_FILESYSTEMS" />
一個demo,實現調用系統相機拍照,將其顯示在屏幕上,並且存到sd卡。
完整代碼如下:
MyCaremaActivity.java
package barry.android.c;
import java.io.File;
import java.io.FileNotFoundException;
import java.io.FileOutputStream;
import java.io.IOException;
import android.app.Activity;
import android.content.Intent;
import android.graphics.Bitmap;
import android.os.Bundle;
import android.os.Environment;
import android.provider.MediaStore;
import android.util.Log;
import android.view.View;
import android.view.View.OnClickListener;
import android.widget.Button;
import android.widget.ImageView;
public class MyCaremaActivity extends Activity {
@Override
public void onCreate(Bundle savedInstanceState) {
super.onCreate(savedInstanceState);
setContentView(R.layout.main);
Button button = (Button) findViewById(R.id.button);
button.setOnClickListener(new OnClickListener() {
@Override
public void onClick(View v) {
Intent intent = new Intent(MediaStore.ACTION_IMAGE_CAPTURE);
startActivityForResult(intent, 1);
}
});
}
@Override
protected void onActivityResult(int requestCode, int resultCode, Intent data) {
super.onActivityResult(requestCode, resultCode, data);
if (resultCode == Activity.RESULT_OK) {
String sdStatus = Environment.getExternalStorageState();
if (!sdStatus.equals(Environment.MEDIA_MOUNTED)) { // 檢測sd是否可用
Log.v("TestFile",
"SD card is not avaiable/writeable right now.");
return;
}
Bundle bundle = data.getExtras();
Bitmap bitmap = (Bitmap) bundle.get("data");// 獲取相機返回的數據,並轉換為Bitmap圖片格式
FileOutputStream b = null;
File file = new File("/sdcard/myImage/");
file.mkdirs();// 創建文件夾
String fileName = "/sdcard/myImage/111.jpg";
try {
b = new FileOutputStream(fileName);
bitmap.compress(Bitmap.CompressFormat.JPEG, 100, b);// 把數據寫入文件
} catch (FileNotFoundException e) {
e.printStackTrace();
} finally {
try {
b.flush();
b.close();
} catch (IOException e) {
e.printStackTrace();
}
}
((ImageView) findViewById(R.id.imageView)).setImageBitmap(bitmap);// 將圖片顯示在ImageView裡
}
}
}
main.xml
<?xml version="1.0" encoding="utf-8"?>
<LinearLayout xmlns:android="http://schemas.android.com/apk/res/android"
android:layout_width="fill_parent"
android:layout_height="fill_parent"
android:orientation="vertical" >
<Button
android:id="@+id/button"
android:layout_width="fill_parent"
android:layout_height="wrap_content"
android:text="點擊啟動相機" />
<ImageView
android:id="@+id/imageView"
android:layout_width="fill_parent"
android:layout_height="fill_parent"
android:background="#999999" />
</LinearLayout>
AndroidMainifest.xml
<?xml version="1.0" encoding="utf-8"?>
<manifest xmlns:android="http://schemas.android.com/apk/res/android"
package="barry.android.c"
android:versionCode="1"
android:versionName="1.0" >
<uses-sdk android:minSdkVersion="7" />
<uses-permission android:name="android.permission.WRITE_EXTERNAL_STORAGE" />
<uses-permission android:name="android.permission.MOUNT_UNMOUNT_FILESYSTEMS" />
<application
android:icon="@drawable/ic_launcher"
android:label="@string/app_name" >
<activity
android:label="@string/app_name"
android:name=".MyCaremaActivity" >
<intent-filter >
<action android:name="android.intent.action.MAIN" />
<category android:name="android.intent.category.LAUNCHER" />
</intent-filter>
</activity>
</application>
</manifest>
 Android滾輪選擇時間控件使用詳解
滾輪選擇控件Android自帶的選擇時間控件有點丑,往往產品和設計都比較嫌棄,希望做成ios一樣的滾輪選擇,下面是我在NumberPicker的基礎上自定義的選擇控件,效
 仿QQ消息列表item橫向滑動刪除ListView中item側滑刪除
仿QQ消息列表item橫向滑動刪除ListView中item側滑刪除在最近的項目中,我的ListView中item選項是長按刪除的效果(Android的通常做法長按或點擊
 Android:ViewPager擴展詳解——帶有導航的ViewPagerIndicator(附帶圖片緩存,異步加載圖片)
大家都用過viewpager了, github上有對viewpager進行擴展,導航風格更加豐富,這個開源項目是ViewPagerIndicator,很好用
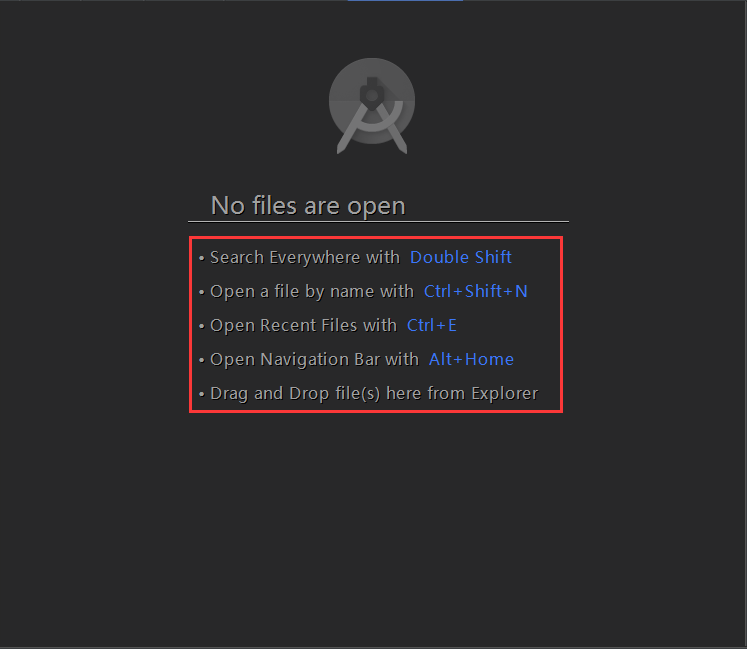 學習Android Studio開發工具之Activity2(&Fragment)
開篇先介紹幾個放在眼前卻經常忽視的快捷鍵如圖:展現出android Studio超強的搜索能力,提高大工程的開發維護效率。雙擊Shift按鍵效果Ctrl+Shift+N