編輯:關於Android編程
我們已經清楚了如何進入正常模式和Recovery模式已有深刻理解了,假設進入了Recovery模式,那麼其核心代碼是怎麼做的呢?
代碼路徑在 android 源碼的根路徑: bootable\recovery 其入口文件就是 recovery.c 中 main函數
下面就開始逐步了解其Recovery的設計思想:
static const char *COMMAND_FILE = "/cache/recovery/command";
static const char *INTENT_FILE = "/cache/recovery/intent";
static const char *LOG_FILE = "/cache/recovery/log";
注解裡面描述的相當清楚:
* The recovery tool communicates with the main system through /cache files.
* /cache/recovery/command - INPUT - command line for tool, one arg per line
* /cache/recovery/log - OUTPUT - combined log file from recovery run(s)
* /cache/recovery/intent - OUTPUT - intent that was passed in
static const char *LAST_LOG_FILE = "/cache/recovery/last_log";
static const char *LAST_INSTALL_FILE = "/cache/recovery/last_install";
static const char *CACHE_ROOT = "/cache";
static const char *SDCARD_ROOT = "/sdcard";
下面的描述針對寫入的 command 有大致的介紹:
* The arguments which may be supplied in the recovery.command file:
* --send_intent=anystring - write the text out to recovery.intent
* --update_package=path - verify install an OTA package file
* --wipe_data - erase user data (and cache), then reboot
* --wipe_cache - wipe cache (but not user data), then reboot
* --set_encrypted_filesystem=on|off - enables / diasables encrypted fs
兩種升級模式步驟說明:
* After completing, we remove /cache/recovery/command and reboot.
* Arguments may also be supplied in the bootloader control block (BCB).
* These important scenarios must be safely restartable at any point:
*
* FACTORY RESET
* 1. user selects "factory reset"
* 2. main system writes "--wipe_data" to /cache/recovery/command
* 3. main system reboots into recovery
* 4. get_args() writes BCB with "boot-recovery" and "--wipe_data"
* -- after this, rebooting will restart the erase --
* 5. erase_volume() reformats /data
* 6. erase_volume() reformats /cache
* 7. finish_recovery() erases BCB
* -- after this, rebooting will restart the main system --
* 8. main() calls reboot() to boot main system
*
* OTA INSTALL
* 1. main system downloads OTA package to /cache/some-filename.zip
* 2. main system writes "--update_package=/cache/some-filename.zip"
* 3. main system reboots into recovery
* 4. get_args() writes BCB with "boot-recovery" and "--update_package=..."
* -- after this, rebooting will attempt to reinstall the update --
* 5. install_package() attempts to install the update
* NOTE: the package install must itself be restartable from any point
* 6. finish_recovery() erases BCB
* -- after this, rebooting will (try to) restart the main system --
* 7. ** if install failed **
* 7a. prompt_and_wait() shows an error icon and waits for the user
* 7b; the user reboots (pulling the battery, etc) into the main system
* 8. main() calls maybe_install_firmware_update()
* ** if the update contained radio/hboot firmware **:
* 8a. m_i_f_u() writes BCB with "boot-recovery" and "--wipe_cache"
* -- after this, rebooting will reformat cache & restart main system --
* 8b. m_i_f_u() writes firmware image into raw cache partition
* 8c. m_i_f_u() writes BCB with "update-radio/hboot" and "--wipe_cache"
* -- after this, rebooting will attempt to reinstall firmware --
* 8d. bootloader tries to flash firmware
* 8e. bootloader writes BCB with "boot-recovery" (keeping "--wipe_cache")
* -- after this, rebooting will reformat cache & restart main system --
* 8f. erase_volume() reformats /cache
* 8g. finish_recovery() erases BCB
* -- after this, rebooting will (try to) restart the main system --
* 9. main() calls reboot() to boot main system
從上面的幾段注解中,基本上就明白的 Recovery 是如何工作的啦。下面就從具體代碼開始一步步分析。
1、recovery main 函數
int
main(int argc, char **argv) {
    time_t start = time(NULL);

    // If these fail, there's not really anywhere to complain...
    freopen(TEMPORARY_LOG_FILE, "a", stdout); setbuf(stdout, NULL);
    freopen(TEMPORARY_LOG_FILE, "a", stderr); setbuf(stderr, NULL);
    printf("Starting recovery on %s", ctime(&start));
int
main(int argc, char **argv) {
time_t start = time(NULL);
// If these fail, there's not really anywhere to complain...
freopen(TEMPORARY_LOG_FILE, "a", stdout); setbuf(stdout, NULL);
freopen(TEMPORARY_LOG_FILE, "a", stderr); setbuf(stderr, NULL);
printf("Starting recovery on %s", ctime(&start));
將標准輸出和標准錯誤輸出重定位到"/tmp/recovery.log",如果是eng模式,就可以通過adb pull /tmp/recovery.log, 看到當前的log信息,這為我們提供了有效的調試手段。
ui_init();
一個簡單的基於framebuffer的ui系統,叫miniui 主要建立了圖像部分(gglInit、gr_init_font、framebuffer)及進度條和事件處理(input_callback)
load_volume_table();
根據 /etc/recovery.fstab 建立分區表
// command line args come from, in decreasing precedence:
// - the actual command line
// - the bootloader control block (one per line, after "recovery")
// - the contents of COMMAND_FILE (one per line)
get_args(&argc, &argv);
從misc 分區以及 CACHE:recovery/command 文件中讀入參數,寫入到argc, argv (get_bootloader_message) 並有可能寫回 misc 分區(set_bootloader_message)
做完以上事情後就開始解析具體參數:
while ((arg = getopt_long(argc, argv, "", OPTIONS, NULL)) != -1) {
switch (arg) {
case 'p': previous_runs = atoi(optarg); break;
case 's': send_intent = optarg; break;
case 'u': update_package = optarg; break;
case 'w': wipe_data = wipe_cache = 1; break;
case 'c': wipe_cache = 1; break;
case 't': ui_show_text(1); break;
case '?':
LOGE("Invalid command argument\n");
continue;
}
}
printf("Command:");
for (arg = 0; arg < argc; arg++) {
printf(" \"%s\"", argv[arg]);
}
printf("\n");
以上僅僅是打印表明進入到哪一步,方便調試情況的掌握
下面的代碼就是具體干的事情了:
if (update_package != NULL) {
status = install_package(update_package, &wipe_cache, TEMPORARY_INSTALL_FILE);
if (status == INSTALL_SUCCESS && wipe_cache) {
if (erase_volume("/cache")) {
LOGE("Cache wipe (requested by package) failed.");
}
}
if (status != INSTALL_SUCCESS) ui_print("Installation aborted.\n");
} else if (wipe_data) {
if (device_wipe_data()) status = INSTALL_ERROR;
if (erase_volume("/data")) status = INSTALL_ERROR;
if (wipe_cache && erase_volume("/cache")) status = INSTALL_ERROR;
if (status != INSTALL_SUCCESS) ui_print("Data wipe failed.\n");
clear_sdcard_update_bootloader_message();
} else if (wipe_cache) {
if (wipe_cache && erase_volume("/cache")) status = INSTALL_ERROR;
if (status != INSTALL_SUCCESS) ui_print("Cache wipe failed.\n");
clear_sdcard_update_bootloader_message();
} else {
status = update_by_key(); // No command specified
}
根據用戶提供參數,調用各項功能,比如,安裝一個升級包,擦除cache分區, 擦除user data分區等等,後在會將繼續詳細分解。
if (status != INSTALL_SUCCESS) prompt_and_wait();如果前面做的操作成功則進入重啟流程,否則由用戶操作,可選操作為: reboot, 安裝update.zip,除cache分區, 擦除user data分區
// Otherwise, get ready to boot the main system...
finish_recovery(send_intent);
先看函數注解:
// clear the recovery command and prepare to boot a (hopefully working) system,
// copy our log file to cache as well (for the system to read), and
// record any intent we were asked to communicate back to the system.
// this function is idempotent: call it as many times as you like.
其實主要的就是如下函數操作:
// Remove the command file, so recovery won't repeat indefinitely.
if (ensure_path_mounted(COMMAND_FILE) != 0 ||
(unlink(COMMAND_FILE) && errno != ENOENT)) {
LOGW("Can't unlink %s\n", COMMAND_FILE);
}
將指定分區mounted 成功並 unlink 刪除一個文件的目錄項並減少它的鏈接數
ensure_path_unmounted(CACHE_ROOT);
將指定分區 unmounted
sync(); // For good measure.
對於上面的代碼總結:
它的功能如下:1、將前面定義的intent字符串寫入(如果有的話):CACHE:recovery/command2、將 /tmp/recovery.log 復制到 "CACHE:recovery/log";3、清空 misc 分區,這樣重啟就不會進入recovery模式4、刪除command 文件:CACHE:recovery/command;
最後重啟機器
ui_print("Rebooting...\n");
android_reboot(ANDROID_RB_RESTART, 0, 0);
2、factory reset 核心代碼實現
按照前面所列的8條步驟,其中1-6及7-8都與 main 通用流程一樣,不再復述。
* 5. erase_volume() reformats /data
* 6. erase_volume() reformats /cache
這兩個操作是如何做到的呢?
if (erase_volume("/data")) status = INSTALL_ERROR;
if (erase_volume("/cache")) status = INSTALL_ERROR;
最後就是
clear_sdcard_update_bootloader_message();
看看 erase_volume() 函數先:
 static int
erase_volume(const char *volume) {
    ui_set_background(BACKGROUND_ICON_INSTALLING);
    ui_show_indeterminate_progress();
    ui_print("Formatting %s...\n", volume);

    ensure_path_unmounted(volume);

    if (strcmp(volume, "/cache") == 0) {
        // Any part of the log we'd copied to cache is now gone.
        // Reset the pointer so we copy from the beginning of the temp
        // log.
        tmplog_offset = 0;
    }

    return format_volume(volume);
}

static int
erase_volume(const char *volume) {
    ui_set_background(BACKGROUND_ICON_INSTALLING);
    ui_show_indeterminate_progress();
    ui_print("Formatting %s...\n", volume);

    ensure_path_unmounted(volume);

    if (strcmp(volume, "/cache") == 0) {
        // Any part of the log we'd copied to cache is now gone.
        // Reset the pointer so we copy from the beginning of the temp
        // log.
        tmplog_offset = 0;
    }

    return format_volume(volume);
}
上面紅字標明的是重要函數調用
int ensure_path_unmounted(const char* path) {
Volume* v = volume_for_path(path);
result = scan_mounted_volumes();
return unmount_mounted_volume(mv);
}
就是將指定的path中徑mount point進行卸載掉,而 format_volume的主要功能就是:
MtdWriteContext *write = mtd_write_partition(partition);
mtd_erase_blocks(write, -1);
mtd_write_close(write);
不要細說了吧,就是將整個分區數據全清掉。
最後一個函數:
void
clear_sdcard_update_bootloader_message() {
struct bootloader_message boot;
memset(&boot, 0, sizeof(boot));
set_bootloader_message(&boot);
}
就是將misc分區數據重置清0
這樣子就完成的恢復出廠設置的情況了。將 data/cache分區erase擦掉就好了。
3、OTA 安裝 核心代碼實現
主要函數就是如何安裝 Package :
* 5. install_package() attempts to install the update
* NOTE: the package install must itself be restartable from any point
int
install_package(const char* path, int* wipe_cache, const char* install_file)
-->
static int
really_install_package(const char *path, int* wipe_cache){
clear_sdcard_update_bootloader_message();
ui_set_background(BACKGROUND_ICON_INSTALLING);
ui_print("Finding update package...\n");
ui_show_indeterminate_progress();
LOGI("Update location: %s\n", path);
更新 ui 顯示
for(;((i < 5)&&(ensure_path_mounted(path) != 0));i++){
LOGE("Can't mount %s\n",path);
sleep(1);
}
if((i >= 5)&&(ensure_path_mounted(path) != 0)){
return INSTALL_CORRUPT;
}
確保升級包所在分區已經mount,通常為 cache 分區或者 SD 分區 RSAPublicKey* loadedKeys = load_keys(PUBLIC_KEYS_FILE, &numKeys);// Look for an RSA signature embedded in the .ZIP file comment given
// the path to the zip. Verify it matches one of the given public
// keys.
//
// Return VERIFY_SUCCESS, VERIFY_FAILURE (if any error is encountered
// or no key matches the signature).
err = verify_file(path, loadedKeys, numKeys); 從/res/keys中裝載公鑰,並進行確認文件的合法性
/* Try to open the package.
*/
ZipArchive zip;
err = mzOpenZipArchive(path, &zip); 打開升級包,將相關信息存到ZipArchive數據機構中,便於後面處理。
/* Verify and install the contents of the package.
*/
ui_print("Installing update...\n");
return try_update_binary(path, &zip, wipe_cache); 進行最後的安裝包文件
}
// If the package contains an update binary, extract it and run it.
static int
try_update_binary(const char *path, ZipArchive *zip, int* wipe_cache) {
const ZipEntry* binary_entry =
mzFindZipEntry(zip, ASSUMED_UPDATE_BINARY_NAME);
char* binary = "/tmp/update_binary";
unlink(binary);
int fd = creat(binary, 0755);
bool ok = mzExtractZipEntryToFile(zip, binary_entry, fd);
close(fd);
mzCloseZipArchive(zip);
將升級包內文件META-INF/com/google/android/update-binary 復制為/tmp/update_binary
// When executing the update binary contained in the package, the
// arguments passed are:
//
// - the version number for this interface
//
// - an fd to which the program can write in order to update the
// progress bar. The program can write single-line commands:
int pipefd[2];
pipe(pipefd);
char** args = malloc(sizeof(char*) * 5);
args[0] = binary;
args[1] = EXPAND(RECOVERY_API_VERSION); // defined in Android.mk
args[2] = malloc(10);
sprintf(args[2], "%d", pipefd[1]);
args[3] = (char*)path;
args[4] = buf_uuid;
args[5] = NULL;
組裝新的進程參數
pid_t pid = fork();
if (pid == 0) { // child process
close(pipefd[0]);
execv(binary, args);
}
// parent process
close(pipefd[1]);
ui_show_progress
ui_set_progress
ui_print
總結一下代碼主要行為功能:
1、將會創建新的進程,執行:/tmp/update_binary
2、同時,會給該進程傳入一些參數,其中最重要的就是一個管道fd,供新進程與原進程通信。
3、新進程誕生後,原進程就變成了一個服務進程,它提供若干UI更新服務:
a) progress
b) set_progress
c) ui_print
這樣,新進程就可以通過老進程的UI系統完成顯示任務。而其他功能就靠它自己了
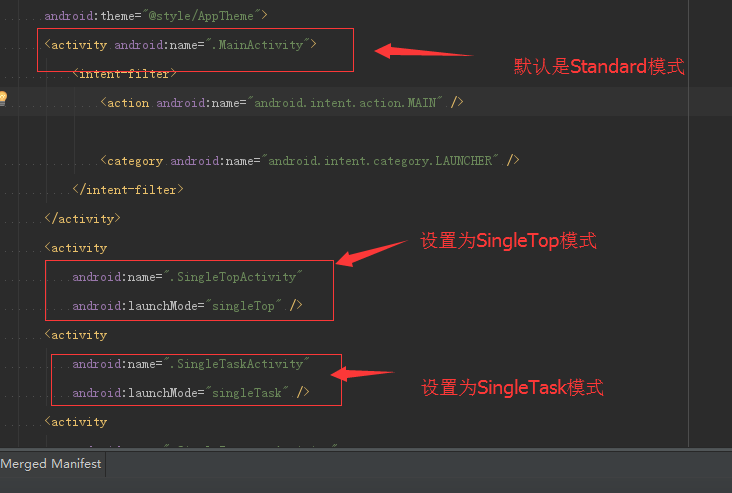 Android啟動模式總結
啟動模式:LaunchMode在多個Activity跳轉的過程中扮演著重要的角色,它可以決定是否生成新的Activity實例,是否重用已存在的Activity實例,是否和
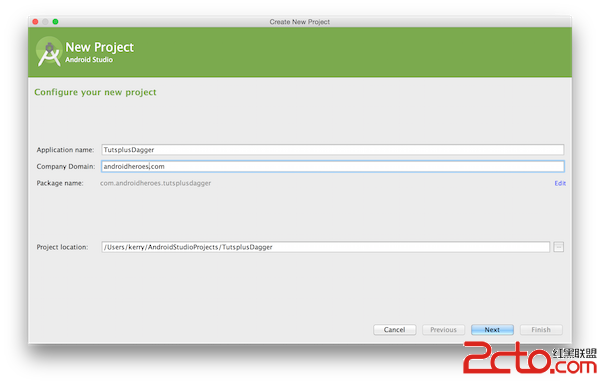 Android項目使用Dagger2進行依賴注入
原文鏈接:http://code.tutsplus.com/tutorials/dependency-injection-with-dagger-2-on-android
 Android開發模擬器啟動失敗的解決方法
1. 錯誤提示信息 錯誤大概意思:連接到adb(android debug bridge)出現了一個嚴重的錯誤,你必須重啟adb和Eclipse工具,請確保在位置…
 Android - 位置定位(Location)服務(Service)類的基本操作
位置定位(Location)服務(Service)類的基本操作本文地址: http://blog.csdn.net/caroline_wendy定位服務(Location