編輯:關於Android編程
package cc.testservice2;
import android.app.Activity;
import android.content.ComponentName;
import android.content.Intent;
import android.content.ServiceConnection;
import android.os.Bundle;
import android.os.IBinder;
import android.view.View;
import android.view.View.OnClickListener;
import android.widget.Button;
import android.widget.TextView;
/**
 * Demo描述:
 * 采用bindService()方法啟動服務
 * 該Demo描述的本地服務,即服務和訪問者在同一進程
 *
 * 客戶端總結:
 * 客戶端(此處為MainActivity)的核心目的:
 * 得到服務返回來的Binder對象,然後利用此Binder對象調用服務裡的相關方法
 *
 * 詳細步驟:
 * 1 寫一個ServiceConnectionImpl類實現了ServiceConnection接口
 *   即 private final class ServiceConnectionImpl implements ServiceConnection
 * 2 新建ServiceConnectionImpl類的對象conn.然後利用Context激活服務,與服務建立連接
 *   即 this.bindService(service, conn, this.BIND_AUTO_CREATE);
 * 3 覆寫ServiceConnectionImpl類的public void onServiceConnected(ComponentName name, IBinder service)
 *   方法,該為一個回調方法!!!!當客戶端與服務建立連接後,服務端的public IBinder onBind(Intent intent)()方法
 *   就會返回一個IBinder對象給客服端.此IBinder對象就是方法
 *   public void onServiceConnected(ComponentName name,IBinder service)中的service
 * 4 利用服務器返回的IBinder對象調用服務中的方法
 *
 * 注意:
 * 1 在綁定和解除綁定用的都是從mServiceConnectionImpl對象,它的類實現了ServiceConnection接口
 * 2 注意不但要重寫MainActivity的onCreate()裡與服務建立連接,而且還要重寫Activity的 onDestroy()方法!
 *    以便在此Activity退出時,關閉與服務的連接
 * 3 在這個小應用中為什麼要定義一個接口呢?
 *   因為服務要返回給MainActivity一個Binder對象,MainActivity接收此對象。此對象是在服務裡內部類的對象。
 *   但是一般來說內部類是私有的。所以在MainActivity裡不可能new()一個內部類對象來接收此對象
 *   所以在此定義了接口--->用接口來接收Binder對象.這樣做而且很規范,將業務抽象成接口.
 *
 * 服務端總結:
 * 1 自定義服務類ServiceSubclass繼承自Service
 * 2 寫一個自定義的內部類BinderSubclass實現了業務接口,且繼承自Binder
 * 3 重寫Service的public IBinder onBind(Intent intent)方法,返回一個IBinder對象.
 *   即這裡的BinderSubclass類對象
 */
public class MainActivity extends Activity {
    TextView mNumberTextView;
    TextView mResultTextView;
    Button mSearchButton;
    ServiceConnectionImpl mServiceConnectionImpl;
    QueryInterface  mBinder;
    public void onCreate(Bundle savedInstanceState) {
        super.onCreate(savedInstanceState);
        setContentView(R.layout.main);
        //用於接收服務返回的Binder對象
        mServiceConnectionImpl=new ServiceConnectionImpl();
        mNumberTextView=(TextView) findViewById(R.id.numberEditText);
        mResultTextView=(TextView) findViewById(R.id.resultTextView);
        mSearchButton=(Button) findViewById(R.id.searchButton);
        mSearchButton.setOnClickListener(new ButtonOnClickListener());
        Intent intent=new Intent(this,ServiceSubclass.class);
        //當Activity啟動的時候就啟動服務
        bindService(intent, mServiceConnectionImpl, this.BIND_AUTO_CREATE);
    }

    private class ButtonOnClickListener implements OnClickListener{
		public void onClick(View v) {
			String number=mNumberTextView.getText().toString();
			String result=mBinder.queryByNumber(Integer.valueOf(number));
			mResultTextView.setText(result);
		}
    }

    //綁定服務和解除服務
    private final class ServiceConnectionImpl implements ServiceConnection{
    	//綁定服務時,此方法調用
		public void onServiceConnected(ComponentName name, IBinder service) {
			 mBinder=(QueryInterface) service;
		}
		//解除服務時,此方法調用
		public void onServiceDisconnected(ComponentName name) {
			mBinder=null;
		}
    }

   //解除與服務的連接
	protected void onDestroy() {
		unbindService(mServiceConnectionImpl);
		super.onDestroy();
	}


}
package cc.testservice2;

import android.app.Service;
import android.content.Intent;
import android.os.Binder;
import android.os.IBinder;
/**
* 服務端總結:
* 1 自定義服務類ServiceSubclass繼承自Service
* 2 寫一個自定義的內部類BinderSubclass實現了業務接口,且繼承自Binder
* 3 重寫Service的public IBinder onBind(Intent intent)方法,返回一個IBinder對象.
*   即這裡的BinderSubclass類對象
*/
public class ServiceSubclass extends Service {
	private String[] names = new String[] { "小明", "小王", "小楊", "小李", "小強" };
	BinderSubclass mBinderSubclass = new BinderSubclass();

	@Override
	public IBinder onBind(Intent intent) {
		return mBinderSubclass;
	}
	// queryByNumber就是接口裡的業務方法.
	//一般來講將業務抽象為一個接口,然後去實現接口,比如此處。
	// 注意:BinderSubclass繼承自Binder也實現了業務接口
	private final class BinderSubclass extends Binder implements QueryInterface {
		public String queryByNumber(int number) {
			return query(number);
		}
	}

	//服務內部的方法
	public String query(int i) {
		if (i > 0 && i < 6) {
			return names[i - 1];
		}
		return "查詢錯誤,請再次輸入";
	}

}
package cc.testservice2;
//業務接口
public interface QueryInterface {
   public String queryByNumber(int number);
}
<?xml version="1.0" encoding="utf-8"?>
<LinearLayout xmlns:android="http://schemas.android.com/apk/res/android"
    android:layout_width="fill_parent"
    android:layout_height="fill_parent"
    android:orientation="vertical" >

    <TextView
        android:layout_width="fill_parent"
        android:layout_height="wrap_content"
        android:text="請輸入1到5的數字" />

    <EditText
        android:id="@+id/numberEditText"
        android:layout_width="fill_parent"
        android:layout_height="wrap_content" />

    <Button
        android:id="@+id/searchButton"
        android:layout_width="wrap_content"
        android:layout_height="wrap_content"
        android:text="查詢" />

    <TextView
        android:id="@+id/resultTextView"
        android:layout_width="fill_parent"
        android:layout_height="wrap_content" />

</LinearLayout>
 Android4.4 鼠標光標切換具體整改
鼠標客制化目的:在應用層,進入特定的應用顯示自己的指定的鼠標icon,或者隨時切換鼠標icon。實現方案:開機預加載鼠標icon,app發送廣播方式通過不同的index,
 匯總Android視頻錄制中常見問題
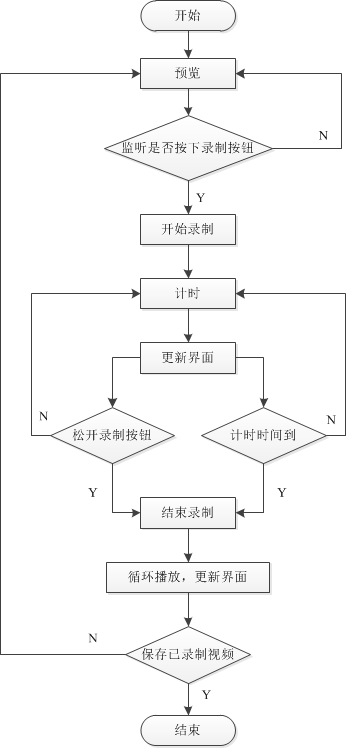
本文分享自己在視頻錄制播放過程中遇到的一些問題,主要包括: 視頻錄制流程 視頻預覽及SurfaceHolder 視頻清晰度及文件大小 視頻文件旋轉 一、視頻錄制
 Socket實現文件互傳(一)
好長時間沒更博客了,最近一直在做比賽的一個項目,就是實現客戶端和PC端的文件互傳,其實一開始在看到這個題目的時候,完全不知道怎麼去實現,感覺一臉懵逼,後來在查閱了資料以及
 Android中實現Webview頂部帶進度條的方法
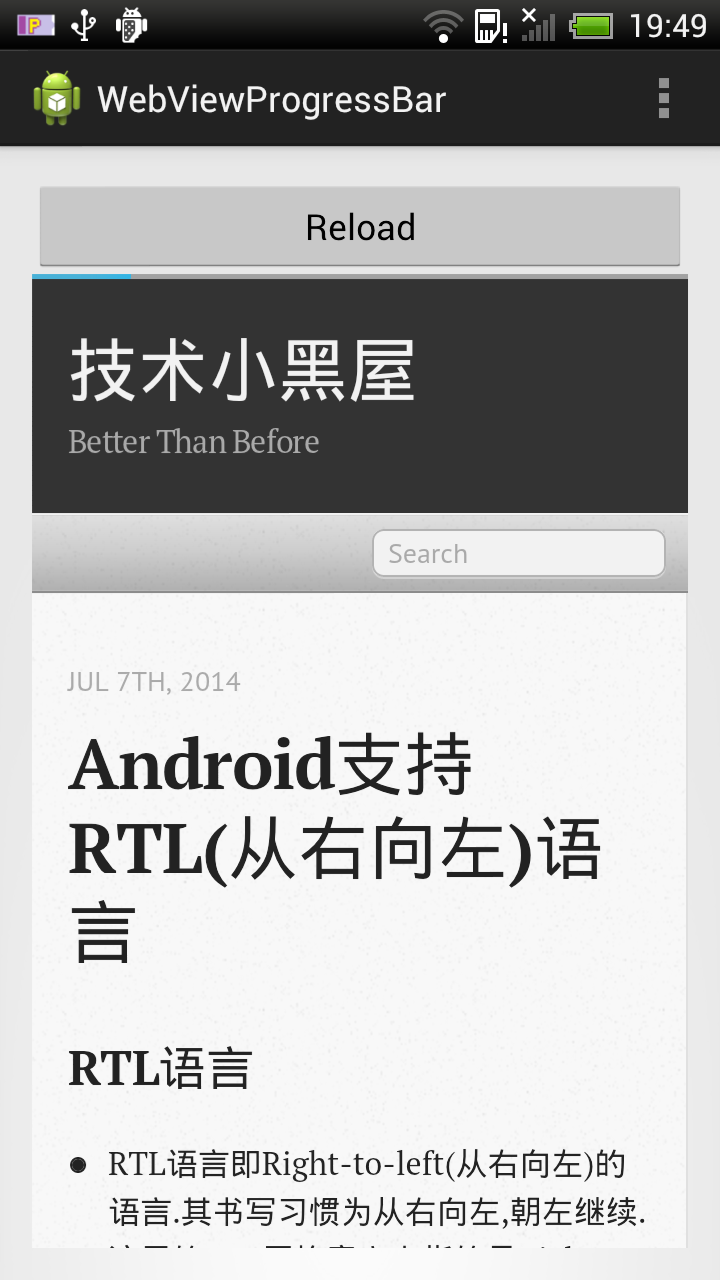
寫這篇文章,做份備忘,簡單滴展示一個帶進度條的Webview示例,進度條位於Webview上面.示例圖如下:主Activity代碼:復制代碼 代碼如下:package c