Android API Demos中有很多非常Nice的例子,這些例子的代碼都寫的很出色,如果大家把API Demos中的每個例子研究透了,那麼恭喜你已經成為一個真正的Android高手了。這也算是給一些比較迷茫的Android開發者一個指出了一個提升自我能力的方向吧。API Demos中的例子眾多,今天我們就來模仿其中一個3D變換的特效,來實現一種別樣的圖片浏覽器。
既然是做中軸旋轉的特效,那麼肯定就要用到3D變換的功能。在Android中如果想要實現3D效果一般有兩種選擇,一是使用Open GL ES,二是使用Camera。Open GL ES使用起來太過復雜,一般是用於比較高級的3D特效或游戲,像比較簡單的一些3D效果,使用Camera就足夠了。
Camera中提供了三種旋轉方法,分別是rotateX()、rotateY()和rotateZ,調用這三個方法,並傳入相應的角度,就可以讓視圖圍繞這三個軸進行旋轉,而今天我們要做的中軸旋轉效果其實就是讓視圖圍繞Y軸進行旋轉。
那我們就開始動手吧,首先創建一個Android項目,起名叫做RotatePicBrowserDemo,
而API Demos中已經給我們提供了一個非常好用的3D旋轉動畫的工具類Rotate3dAnimation,這個工具類就是使用Camera來實現的,我們先將這個這個類復制到項目中來,代碼如下所示:
[java]
/**
* An animation that rotates the view on the Y axis between two specified angles.
* This animation also adds a translation on the Z axis (depth) to improve the effect.
*/
public class Rotate3dAnimation extends Animation {
private final float mFromDegrees;
private final float mToDegrees;
private final float mCenterX;
private final float mCenterY;
private final float mDepthZ;
private final boolean mReverse;
private Camera mCamera;
/**
* Creates a new 3D rotation on the Y axis. The rotation is defined by its
* start angle and its end angle. Both angles are in degrees. The rotation
* is performed around a center point on the 2D space, definied by a pair
* of X and Y coordinates, called centerX and centerY. When the animation
* starts, a translation on the Z axis (depth) is performed. The length
* of the translation can be specified, as well as whether the translation
* should be reversed in time.
*
* @param fromDegrees the start angle of the 3D rotation
* @param toDegrees the end angle of the 3D rotation
* @param centerX the X center of the 3D rotation
* @param centerY the Y center of the 3D rotation
* @param reverse true if the translation should be reversed, false otherwise
*/
public Rotate3dAnimation(float fromDegrees, float toDegrees,
float centerX, float centerY, float depthZ, boolean reverse) {
mFromDegrees = fromDegrees;
mToDegrees = toDegrees;
mCenterX = centerX;
mCenterY = centerY;
mDepthZ = depthZ;
mReverse = reverse;
}
@Override
public void initialize(int width, int height, int parentWidth, int parentHeight) {
super.initialize(width, height, parentWidth, parentHeight);
mCamera = new Camera();
}
@Override
protected void applyTransformation(float interpolatedTime, Transformation t) {
final float fromDegrees = mFromDegrees;
float degrees = fromDegrees + ((mToDegrees - fromDegrees) * interpolatedTime);
final float centerX = mCenterX;
final float centerY = mCenterY;
final Camera camera = mCamera;
final Matrix matrix = t.getMatrix();
camera.save();
if (mReverse) {
camera.translate(0.0f, 0.0f, mDepthZ * interpolatedTime);
} else {
camera.translate(0.0f, 0.0f, mDepthZ * (1.0f - interpolatedTime));
}
camera.rotateY(degrees);
camera.getMatrix(matrix);
camera.restore();
matrix.preTranslate(-centerX, -centerY);
matrix.postTranslate(centerX, centerY);
}
}
可以看到,這個類的構造函數中接收一些3D旋轉時所需用到的參數,比如旋轉開始和結束的角度,旋轉的中心點等。然後重點看下applyTransformation()方法,首先根據動畫播放的時間來計算出當前旋轉的角度,然後讓Camera也根據動畫播放的時間在Z軸進行一定的偏移,使視圖有遠離視角的感覺。接著調用Camera的rotateY()方法,讓視圖圍繞Y軸進行旋轉,從而產生立體旋轉的效果。最後通過Matrix來確定旋轉的中心點的位置。
有了這個工具類之後,我們就可以借助它非常簡單地實現中軸旋轉的特效了。接著創建一個圖片的實體類Picture,代碼如下所示:
[java]
public class Picture {
/**
* 圖片名稱
*/
private String name;
/**
* 圖片對象的資源
*/
private int resource;
public Picture(String name, int resource) {
this.name = name;
this.resource = resource;
}
public String getName() {
return name;
}
public int getResource() {
return resource;
}
}
這個類中只有兩個字段,name用於顯示圖片的名稱,resource用於表示圖片對應的資源。
然後創建圖片列表的適配器PictureAdapter, 代碼如下所示:
[java]
public class PictureAdapter extends ArrayAdapter<Picture> {
public PictureAdapter(Context context, int textViewResourceId, List<Picture> objects) {
super(context, textViewResourceId, objects);
}
@Override
public View getView(int position, View convertView, ViewGroup parent) {
Picture picture = getItem(position);
View view;
if (convertView == null) {
view = LayoutInflater.from(getContext()).inflate(android.R.layout.simple_list_item_1,
null);
} else {
view = convertView;
}
TextView text1 = (TextView) view.findViewById(android.R.id.text1);
text1.setText(picture.getName());
return view;
}
}
以上代碼都非常簡單,沒什麼需要解釋的,接著我們打開或新建activity_main.xml,作為程序的主布局文件,代碼如下所示:
[html]
<RelativeLayout xmlns:android="http://schemas.android.com/apk/res/android"
android:id="@+id/layout"
android:layout_width="match_parent"
android:layout_height="match_parent"
>
<ListView
android:id="@+id/pic_list_view"
android:layout_width="match_parent"
android:layout_height="match_parent"
>
</ListView>
<ImageView
android:id="@+id/picture"
android:layout_width="match_parent"
android:layout_height="match_parent"
android:scaleType="fitCenter"
android:clickable="true"
android:visibility="gone"
/>
</RelativeLayout>
最後,打開或新建MainActivity作為程序的主Activity,代碼如下所示:
[java]
public class MainActivity extends Activity {
/**
* 根布局
*/
private RelativeLayout layout;
/**
* 用於展示圖片列表的ListView
*/
private ListView picListView;
/**
* 用於展示圖片詳細的ImageView
*/
private ImageView picture;
/**
* 圖片列表的適配器
*/
private PictureAdapter adapter;
/**
* 存放所有圖片的集合
*/
private List<Picture> picList = new ArrayList<Picture>();
@Override
protected void onCreate(Bundle savedInstanceState) {
super.onCreate(savedInstanceState);
requestWindowFeature(Window.FEATURE_NO_TITLE);
setContentView(R.layout.activity_main);
// 對圖片列表數據進行初始化操作
initPics();
layout = (RelativeLayout) findViewById(R.id.layout);
picListView = (ListView) findViewById(R.id.pic_list_view);
picture = (ImageView) findViewById(R.id.picture);
adapter = new PictureAdapter(this, 0, picList);
picListView.setAdapter(adapter);
picListView.setOnItemClickListener(new OnItemClickListener() {
@Override
public void onItemClick(AdapterView<?> parent, View view, int position, long id) {
// 當點擊某一子項時,將ImageView中的圖片設置為相應的資源
picture.setImageResource(picList.get(position).getResource());
// 獲取布局的中心點位置,作為旋轉的中心點
float centerX = layout.getWidth() / 2f;
float centerY = layout.getHeight() / 2f;
// 構建3D旋轉動畫對象,旋轉角度為0到90度,這使得ListView將會從可見變為不可見
final Rotate3dAnimation rotation = new Rotate3dAnimation(0, 90, centerX, centerY,
310.0f, true);
// 動畫持續時間500毫秒
rotation.setDuration(500);
// 動畫完成後保持完成的狀態
rotation.setFillAfter(true);
rotation.setInterpolator(new AccelerateInterpolator());
// 設置動畫的監聽器
rotation.setAnimationListener(new TurnToImageView());
layout.startAnimation(rotation);
}
});
picture.setOnClickListener(new OnClickListener() {
@Override
public void onClick(View v) {
// 獲取布局的中心點位置,作為旋轉的中心點
float centerX = layout.getWidth() / 2f;
float centerY = layout.getHeight() / 2f;
// 構建3D旋轉動畫對象,旋轉角度為360到270度,這使得ImageView將會從可見變為不可見,並且旋轉的方向是相反的
final Rotate3dAnimation rotation = new Rotate3dAnimation(360, 270, centerX,
centerY, 310.0f, true);
// 動畫持續時間500毫秒
rotation.setDuration(500);
// 動畫完成後保持完成的狀態
rotation.setFillAfter(true);
rotation.setInterpolator(new AccelerateInterpolator());
// 設置動畫的監聽器
rotation.setAnimationListener(new TurnToListView());
layout.startAnimation(rotation);
}
});
}
/**
* 初始化圖片列表數據。
*/
private void initPics() {
Picture bird = new Picture("Bird", R.drawable.bird);
picList.add(bird);
Picture winter = new Picture("Winter", R.drawable.winter);
picList.add(winter);
Picture autumn = new Picture("Autumn", R.drawable.autumn);
picList.add(autumn);
Picture greatWall = new Picture("Great Wall", R.drawable.great_wall);
picList.add(greatWall);
Picture waterFall = new Picture("Water Fall", R.drawable.water_fall);
picList.add(waterFall);
}
/**
* 注冊在ListView點擊動畫中的動畫監聽器,用於完成ListView的後續動畫。
*
* @author guolin
*/
class TurnToImageView implements AnimationListener {
@Override
public void onAnimationStart(Animation animation) {
}
/**
* 當ListView的動畫完成後,還需要再啟動ImageView的動畫,讓ImageView從不可見變為可見
*/
@Override
public void onAnimationEnd(Animation animation) {
// 獲取布局的中心點位置,作為旋轉的中心點
float centerX = layout.getWidth() / 2f;
float centerY = layout.getHeight() / 2f;
// 將ListView隱藏
picListView.setVisibility(View.GONE);
// 將ImageView顯示
picture.setVisibility(View.VISIBLE);
picture.requestFocus();
// 構建3D旋轉動畫對象,旋轉角度為270到360度,這使得ImageView將會從不可見變為可見
final Rotate3dAnimation rotation = new Rotate3dAnimation(270, 360, centerX, centerY,
310.0f, false);
// 動畫持續時間500毫秒
rotation.setDuration(500);
// 動畫完成後保持完成的狀態
rotation.setFillAfter(true);
rotation.setInterpolator(new AccelerateInterpolator());
layout.startAnimation(rotation);
}
@Override
public void onAnimationRepeat(Animation animation) {
}
}
/**
* 注冊在ImageView點擊動畫中的動畫監聽器,用於完成ImageView的後續動畫。
*
* @author guolin
*/
class TurnToListView implements AnimationListener {
@Override
public void onAnimationStart(Animation animation) {
}
/**
* 當ImageView的動畫完成後,還需要再啟動ListView的動畫,讓ListView從不可見變為可見
*/
@Override
public void onAnimationEnd(Animation animation) {
// 獲取布局的中心點位置,作為旋轉的中心點
float centerX = layout.getWidth() / 2f;
float centerY = layout.getHeight() / 2f;
// 將ImageView隱藏
picture.setVisibility(View.GONE);
// 將ListView顯示
picListView.setVisibility(View.VISIBLE);
picListView.requestFocus();
// 構建3D旋轉動畫對象,旋轉角度為90到0度,這使得ListView將會從不可見變為可見,從而回到原點
final Rotate3dAnimation rotation = new Rotate3dAnimation(90, 0, centerX, centerY,
310.0f, false);
// 動畫持續時間500毫秒
rotation.setDuration(500);
// 動畫完成後保持完成的狀態
rotation.setFillAfter(true);
rotation.setInterpolator(new AccelerateInterpolator());
layout.startAnimation(rotation);
}
@Override
public void onAnimationRepeat(Animation animation) {
}
}
}
MainActivity中的代碼已經有非常詳細的注釋了,這裡我再帶著大家把它的執行流程梳理一遍。首先在onCreate()方法中調用了initPics()方法,在這裡對圖片列表中的數據進行初始化。然後獲取布局中控件的實例,並讓列表中的數據在ListView中顯示。接著分別給ListView和ImageView注冊了它們的點擊事件。
當點擊了ListView中的某一子項時,會首先將ImageView中的圖片設置為被點擊那一項對應的資源,然後計算出整個布局的中心點位置,用於當作中軸旋轉的中心點。之後創建出一個Rotate3dAnimation對象,讓布局以計算出的中心點圍繞Y軸從0度旋轉到90度,並注冊了TurnToImageView作為動畫監聽器。在TurnToImageView中監測動畫完成事件,如果發現動畫已播放完成,就將ListView設為不可見,ImageView設為可見,然後再創建一個Rotate3dAnimation對象,這次是從270度旋轉到360度。這樣就可以實現讓ListView圍繞中軸旋轉消失,然後ImageView又圍繞中軸旋轉出現的效果了。
當點擊ImageView時的處理其實和上面就差不多了,先將ImageView從360度旋轉到270度(這樣就保證以相反的方向旋轉回去),然後在TurnToListView中監聽動畫事件,當動畫完成後將ImageView設為不可見,ListView設為可見,然後再將ListView從90度旋轉到0度,這樣就完成了整個中軸旋轉的過程。
好了,現在全部的代碼都已經完成,我們來運行一下看看效果吧。在圖片名稱列表界面點擊某一項後,會中軸旋轉到相應的圖片,然後點擊該圖片,又會中軸旋轉回到圖片名稱列表界面,如下圖所示:
效果非常炫麗吧!本篇文章中的主要代碼其實都來自於API Demos裡,我自己原創的部分並不多。而我是希望通過這篇文章大家都能夠大致了解Camera的用法,然後在下一篇文章中我將帶領大家使用Camera來完成更炫更酷的效果。
好了,今天的講解到此結束,有疑問的朋友請在下面留言。
 Android仿QQ微信側滑刪除效果
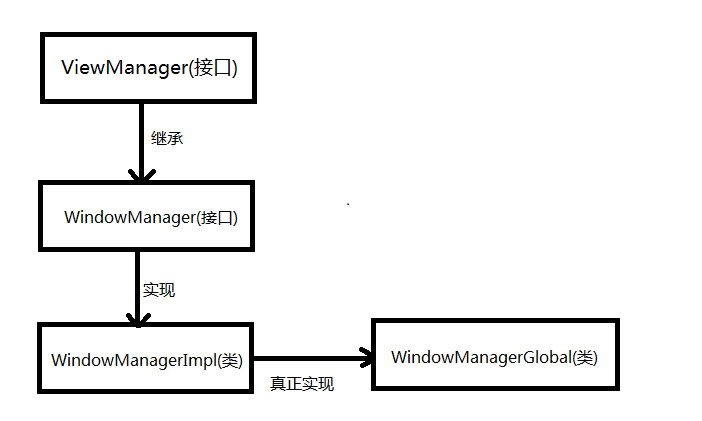 我眼中的Window創建/添加/刪除/更新過程
 Andoird Crash的跟蹤方法,使用騰訊Bugly來捕捉一些疑難雜症,讓我們APP穩定上線
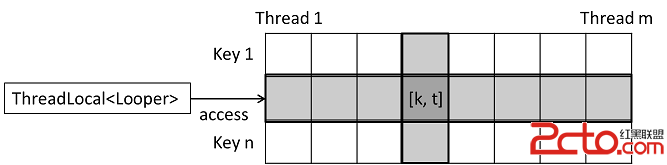 Android如何保證一個線程最多只能有一個Looper?