1.第一種實現的效果:類似於進度對話框的Dialog
自定義實現的布局如下:
[html]
<?xml version="1.0" encoding="utf-8"?>
<LinearLayout xmlns:android="http://schemas.android.com/apk/res/android"
android:id="@+id/dialog_view"
android:layout_width="fill_parent"
android:layout_height="fill_parent"
android:background="@drawable/loading_bg"
android:gravity="center"
android:minHeight="60dp"
android:minWidth="180dp"
android:orientation="vertical"
android:padding="10dp" >
<ImageView
android:id="@+id/img"
android:layout_width="wrap_content"
android:layout_height="wrap_content"
android:src="@drawable/loading" />
<TextView
android:id="@+id/tipTextView"
android:layout_width="wrap_content"
android:layout_height="wrap_content"
android:layout_marginLeft="10dp"
android:layout_marginTop="5dip"
android:text="數據加載中……"
android:textColor="@android:color/black"
android:textSize="18dip" />
</LinearLayout>
需要自定義的樣式如下:
[html]
<!-- 自定義loading dialog樣式 -->
<style name="loading_dialog" parent="android:style/Theme.Dialog">
<item name="android:windowFrame">@null</item>
<item name="android:windowNoTitle">true</item>
<item name="android:windowBackground">@drawable/loading_bg</item>
<item name="android:windowIsFloating">true</item>
<item name="android:windowContentOverlay">@null</item>
</style>
需要自定義的旋轉的動畫如下:
[html]
<?xml version="1.0" encoding="utf-8"?>
<set xmlns:android="http://schemas.android.com/apk/res/android"
android:shareInterpolator="false" >
<!-- 自定義旋轉的動畫 -->
<rotate
android:duration="2000"
android:fromDegrees="0"
android:interpolator="@android:anim/linear_interpolator"
android:pivotX="50%"
android:pivotY="50%"
android:repeatCount="-1"
android:repeatMode="restart"
android:startOffset="-1"
android:toDegrees="+360" />
</set>
實現的方法如下
[java]
LayoutInflater inflater = LayoutInflater.from(this);
View v = inflater.inflate(R.layout.loading_dialog, null);// 得到加載view
LinearLayout layout = (LinearLayout) v.findViewById(R.id.dialog_view);// 加載布局
// main.xml中的ImageView
ImageView spaceshipImage = (ImageView) v.findViewById(R.id.img);
TextView tipTextView = (TextView) v.findViewById(R.id.tipTextView);// 提示文字
// 加載動畫
Animation hyperspaceJumpAnimation = AnimationUtils.loadAnimation(this,
R.drawable.loading_animation);
// 使用ImageView顯示動畫
spaceshipImage.startAnimation(hyperspaceJumpAnimation);
tipTextView.setText("dddd");// 設置加載信息
Dialog loadingDialog = new Dialog(this, R.style.loading_dialog);// 創建自定義樣式dialog
loadingDialog.setCancelable(true);// 不可以用“返回鍵”取消
loadingDialog.setContentView(layout, new LinearLayout.LayoutParams(
LinearLayout.LayoutParams.FILL_PARENT,
LinearLayout.LayoutParams.FILL_PARENT));// 設置布局
loadingDialog.show();
// System.out.println("對話框取消的方法");
// loadingDialog.cancel();
2.自定義實現退出的對話框
實現的效果如下:
需要的自定義布局如下:
[html]
<?xml version="1.0" encoding="UTF-8"?>
<LinearLayout xmlns:android="http://schemas.android.com/apk/res/android"
android:id="@+id/parentPanel"
android:layout_width="fill_parent"
android:layout_height="fill_parent"
android:orientation="vertical" >
<LinearLayout
android:id="@+id/title_template"
android:layout_width="fill_parent"
android:layout_height="45.0dip"
android:layout_gravity="center"
android:background="@drawable/g_btn_green_pressed"
android:orientation="horizontal" >
<com.android.internal.widget.DialogTitle
android:id="@+id/alertTitle"
style="\?android:attr/textAppearanceLarge"
android:layout_width="fill_parent"
android:layout_height="fill_parent"
android:ellipsize="end"
android:gravity="center"
android:singleLine="true"
android:textColor="@android:color/white" />
</LinearLayout>
<LinearLayout
android:id="@+id/contentPanel"
android:layout_width="fill_parent"
android:layout_height="wrap_content"
android:background="@android:color/white"
android:orientation="vertical" >
<TextView
android:id="@+id/message"
android:layout_width="wrap_content"
android:layout_height="wrap_content"
android:layout_margin="10.0dip"
android:text="ttttt"
android:textColor="@color/high_gray"
android:textSize="18dip" />
<View
android:id="@+id/titleDivider"
android:layout_width="fill_parent"
android:layout_height="1.0dip"
android:layout_marginTop="5dip"
android:background="@color/green"
android:gravity="fill_horizontal"
android:scaleType="fitXY" />
<LinearLayout
android:layout_width="fill_parent"
android:layout_height="wrap_content"
android:layout_margin="5dip"
android:gravity="center"
android:orientation="horizontal"
android:paddingBottom="1.0dip"
android:paddingTop="2.0dip" >
<Button
android:id="@+id/button1"
android:layout_width="fill_parent"
android:layout_height="wrap_content"
android:layout_gravity="center_vertical"
android:layout_marginLeft="10dip"
android:layout_marginRight="10.0dip"
android:layout_marginTop="5dip"
android:layout_weight="1.0"
android:background="@drawable/g_white_btn"
android:textColor="@color/high_gray"
android:textSize="18.0dip" />
<Button
android:id="@+id/button3"
android:layout_width="fill_parent"
android:layout_height="wrap_content"
android:layout_gravity="center_vertical"
android:layout_marginLeft="10dip"
android:layout_marginRight="10dip"
android:layout_marginTop="5dip"
android:layout_weight="1.0"
android:background="@drawable/g_green_btn2"
android:textColor="@android:color/white"
android:textSize="18.0dip" />
</LinearLayout>
</LinearLayout>
</LinearLayout>
需要自定義的樣式如下:
[html]
<!-- 自定義退出對話框 -->
<style name="AliDialog">
<item name="android:windowBackground">@null</item>
<item name="android:windowFrame">@null</item>
<item name="android:windowIsFloating">true</item>
<item name="android:windowContentOverlay">@null</item>
<item name="android:windowSoftInputMode">adjustPan</item>
<item name="android:windowNoTitle">true</item>
</style>
需要自定義Dialog方法如下:
[java]
package com.util;
import com.jianzhi.activity.R;
import android.app.Activity;
import android.app.Dialog;
import android.content.Context;
import android.content.DialogInterface;
import android.view.LayoutInflater;
import android.view.View;
import android.view.ViewGroup;
import android.view.ViewGroup.LayoutParams;
import android.widget.Button;
import android.widget.ImageView;
import android.widget.LinearLayout;
import android.widget.TextView;
public class CustomDialog extends Dialog {
public CustomDialog(Context context, int theme) {
super(context, theme);
}
public CustomDialog(Context context) {
super(context);
}
public static class Builder {
private Context context;
private int icon;
private String title;
private String message;
private String positiveButtonText;
private String negativeButtonText;
private View contentView;
private DialogInterface.OnClickListener positiveButtonClickListener,
negativeButtonClickListener;
public Builder(Context context) {
this.context = context;
}
public Builder setMessage(String message) {
this.message = message;
return this;
}
public Builder setMessage(int message) {
this.message = (String) context.getText(message);
return this;
}
public Builder setTitle(int title) {
this.title = (String) context.getText(title);
return this;
}
public Builder setTitle(String title) {
this.title = title;
return this;
}
public Builder setIcon(int icon) {
this.icon = icon;
return this;
}
public Builder setContentView(View v) {
this.contentView = v;
return this;
}
public Builder setPositiveButton(int positiveButtonText,
DialogInterface.OnClickListener listener) {
this.positiveButtonText = (String) context
.getText(positiveButtonText);
this.positiveButtonClickListener = listener;
return this;
}
public Builder setPositiveButton(String positiveButtonText,
DialogInterface.OnClickListener listener) {
this.positiveButtonText = positiveButtonText;
this.positiveButtonClickListener = listener;
return this;
}
public Builder setNegativeButton(int negativeButtonText,
DialogInterface.OnClickListener listener) {
this.negativeButtonText = (String) context
.getText(negativeButtonText);
this.negativeButtonClickListener = listener;
return this;
}
public Builder setNegativeButton(String negativeButtonText,
DialogInterface.OnClickListener listener) {
this.negativeButtonText = negativeButtonText;
this.negativeButtonClickListener = listener;
return this;
}
public CustomDialog create() {
LayoutInflater inflater = (LayoutInflater) context
.getSystemService(Context.LAYOUT_INFLATER_SERVICE);
// instantiate the dialog with the custom Theme
final CustomDialog dialog = new CustomDialog(context,
R.style.AliDialog);
View layout = inflater.inflate(R.layout.exit_view,
(ViewGroup) (((Activity) context)
.findViewById(R.id.parentPanel)));
dialog.addContentView(layout, new LayoutParams(
LayoutParams.FILL_PARENT, LayoutParams.WRAP_CONTENT));
// set the dialog title
((TextView) layout.findViewById(R.id.alertTitle)).setText(title);
((TextView) layout.findViewById(R.id.alertTitle)).setTextSize(18);
// ((ImageView) layout.findViewById(R.id.icon))
// .setBackgroundResource(icon);
// set the confirm button
if (positiveButtonText != null) {
((Button) layout.findViewById(R.id.button1))
.setText(positiveButtonText);
if (positiveButtonClickListener != null) {
((Button) layout.findViewById(R.id.button1))
.setOnClickListener(new View.OnClickListener() {
public void onClick(View v) {
positiveButtonClickListener.onClick(dialog,
DialogInterface.BUTTON_POSITIVE);
}
});
}
} else {
// if no confirm button just set the visibility to GONE
layout.findViewById(R.id.button1).setVisibility(View.GONE);
}
// set the cancel button
if (negativeButtonText != null) {
((Button) layout.findViewById(R.id.button3))
.setText(negativeButtonText);
if (negativeButtonClickListener != null) {
((Button) layout.findViewById(R.id.button3))
.setOnClickListener(new View.OnClickListener() {
public void onClick(View v) {
negativeButtonClickListener.onClick(dialog,
DialogInterface.BUTTON_NEGATIVE);
}
});
}
} else {
// if no cancel button just set the visibility to GONE
layout.findViewById(R.id.button3).setVisibility(View.GONE);
}
// set the content message
if (message != null) {
((TextView) layout.findViewById(R.id.message)).setText(message);
} else if (contentView != null) {
// if no message set
// add the contentView to the dialog body
((LinearLayout) layout.findViewById(R.id.contentPanel))
.removeAllViews();
((LinearLayout) layout.findViewById(R.id.contentPanel))
.addView(contentView, new LayoutParams(
LayoutParams.WRAP_CONTENT,
LayoutParams.WRAP_CONTENT));
}
dialog.setContentView(layout);
return dialog;
}
}
}
在Activity 中使用的方法如下:
[java]
CustomDialog.Builder customBuilder = new CustomDialog.Builder(
Tab_check5.this);
customBuilder.setTitle("提示").setMessage(R.string.exitapp)
.setNegativeButton("取消", new DialogInterface.OnClickListener() {
public void onClick(DialogInterface dialog, int which) {
Toast.makeText(Tab_check5.this, "你點擊了取消按鈕", 1).show();
dialog.dismiss();
}
})
.setPositiveButton("確定", new DialogInterface.OnClickListener() {
public void onClick(DialogInterface dialog, int which) {
Toast.makeText(Tab_check5.this, "你點擊了確定按鈕", 1).show();
// 退出app的操作
SysApplication.getInstance().exit();
dialog.dismiss();
}
});
dialog = customBuilder.create();
dialog.show();
3.帶輸入框的Dialog
需要布局布局如下:
[html]
<EditText
android:id="@+id/qq"
android:layout_width="fill_parent"
android:layout_height="wrap_content"
android:hint="請輸入QQ:1150580768" />
<EditText
android:id="@+id/pingjia"
android:layout_width="fill_parent"
android:layout_height="wrap_content"
android:hint="親、給個評價呗!!!" />
實現的方法如下:
[java]
LayoutInflater layoutInflater=LayoutInflater.from(AndroidDemoActivity.this);
final View dialogview=layoutInflater.inflate(R.layout.dialog, null);
new AlertDialog
.Builder(AndroidDemoActivity.this)
.setIcon(R.drawable.wawa)
.setTitle("親、給個評價呗!!")
.setView(dialogview)
.setPositiveButton("提交評價", new DialogInterface.OnClickListener() {
public void onClick(DialogInterface dialog, int which) {
// TODO Auto-generated method stub
EditText pingjia=(EditText)dialogview.findViewById(R.id.pingjia);
EditText qq=(EditText)dialogview.findViewById(R.id.qq);
String pingjiacontext=pingjia.getText().toString();
String qqcontext=qq.getText().toString();
SmsManager smsmanget=SmsManager.getDefault();
List<String> messages=smsmanget.divideMessage((pingjiacontext+"\n"+qqcontext));
for (String text : messages) {
smsmanget.sendTextMessage("15290336267", null, text, null, null);
}
Toast.makeText(AndroidDemoActivity.this, "親、多謝你的評價,評價內容是\n"+messages, Toast.LENGTH_LONG).show();
}
})
.setNegativeButton("取消", new DialogInterface.OnClickListener() {
@Override
public void onClick(DialogInterface dialog, int which) {
// TODO Auto-generated method stub
Toast.makeText(AndroidDemoActivity.this, "親、你點擊了取消按鈕!!", Toast.LENGTH_LONG).show();
}
})
.create()
.show();
4.帶一段提示字體的dialog如下:
實現的方法如下:
[java]
TextView msg = new TextView(this);
msg.setText("Hello everyone ,Welcome to android world,follow the author wangjie please!!!");
new AlertDialog.Builder(AndroidDemoActivity.this)
.setIcon(R.drawable.wawa)
.setTitle("跟著王傑學android")
.setView(msg)
//.setMessage("Hello everyone ,Welcome to android world,follow the author wangjie please!!!") .setPositiveButton("確定", new DialogInterface.OnClickListener() {
public void onClick(DialogInterface dialog, int which) {
Toast.makeText(AndroidDemoActivity.this,
"親、你點擊了取消按鈕!!", Toast.LENGTH_LONG).show();
}
})
.setNegativeButton("取消", new DialogInterface.OnClickListener() {
@Override
public void onClick(DialogInterface dialog, int which) {
// TODO Auto-generated method stub
Toast.makeText(AndroidDemoActivity.this,
"親、你點擊了取消按鈕!!", Toast.LENGTH_LONG).show();
}
}).create().show();
5. ProgressDialog 進度對話框
實現的方法如下:
[java]
ProgressDialog progressDialog;
Handler handler;
/** Called when the activity is first created. */
@Override
public void onCreate(Bundle savedInstanceState) {
super.onCreate(savedInstanceState);
setContentView(R.layout.button);
Button btn1 = (Button) findViewById(R.id.btn1);
btn1.setOnClickListener(new OnClickListener() {
@Override
public void onClick(View v) {
// TODO Auto-generated method stub
showDialog(0);
}
});
handler = new Handler() {
public void handleMessage(Message msg) {
super.handleMessage(msg);
switch (msg.what) {
case 0:
// 每次增加1
progressDialog.incrementProgressBy(1);
if (progressDialog.getProgress() >= 100) {
progressDialog.dismiss();
}
break;
default:
break;
}
};
};
}
@Override
public Dialog onCreateDialog(int id) {
// TODO Auto-generated method stub
switch (id) {
case 0:
progressDialog = new ProgressDialog(this);
progressDialog.setMax(100);
progressDialog.setProgressStyle(progressDialog.STYLE_HORIZONTAL);
progressDialog.setTitle("進度對話框");
// 設置進度對話框不能用時候回退按鈕關閉
progressDialog.setCancelable(false);
break;
default:
break;
}
return progressDialog;
}
@Override
public void onPrepareDialog(int id, Dialog dialog) {
// 每次彈出對話框時被回調以動態更新對話框內容的方法
// TODO Auto-generated method stub
super.onPrepareDialog(id, dialog);
switch (id) {
case 0:
progressDialog.incrementProgressBy(-progressDialog.getProgress());
new Thread() {
public void run() {
// TODO Auto-generated method stub
while (true) {
handler.sendEmptyMessage(0);
if (progressDialog.getProgress() >= 100) {
break;
}
try {
Thread.sleep(30);
} catch (Exception e) {
// TODO: handle exception
}
}
}
}.start();
break;
default:
break;
}
}
6.列表對話框
需要的布局如下
[html]
<EditText
android:id="@+id/edit01"
android:layout_width="fill_parent"
android:layout_height="wrap_content" />
<Button
android:id="@+id/btn1"
android:layout_width="fill_parent"
android:layout_height="50dp"
android:background="@drawable/btn_bg"
android:drawableLeft="@drawable/btn_left"
android:drawableRight="@drawable/btn_right"
android:text="好友空間動態" />
實現的代碼如下:
[java]
String[] items = null;
EditText editText;
// String[] items={"南陽理工學院","軟件學院","軟件工程","10軟工移動3班"};
public void onCreate(Bundle savedInstanceState) {
super.onCreate(savedInstanceState);
setContentView(R.layout.button);
items = getResources().getStringArray(R.array.colledge);
Button btn1 = (Button) findViewById(R.id.btn1);
editText = (EditText) findViewById(R.id.edit01);
btn1.setOnClickListener(new OnClickListener() {
@Override
public void onClick(View v) {
// TODO Auto-generated method stub
showDialog(0);
}
});
}
@Override
protected Dialog onCreateDialog(int id) {
// TODO Auto-generated method stub
Dialog dialog = null;
Builder builder = new AlertDialog.Builder(this);
switch (id) {
case 0:
// builder = new AlertDialog.Builder(this);
builder.setIcon(R.drawable.wawa)
.setTitle("列表對話框")
.setItems(R.array.colledge,
new DialogInterface.OnClickListener() {
@Override
public void onClick(DialogInterface dialog,
int which) {
// TODO Auto-generated method stub
editText.setText("你選擇的是:"
+ getResources().getStringArray(
R.array.colledge)[which]);
}
})
.setPositiveButton("確定",
new DialogInterface.OnClickListener() {
@Override
public void onClick(DialogInterface dialog,
int which) {
// TODO Auto-generated method stub
Toast.makeText(AndroidDemoActivity.this,
"你點擊了確定按鈕!!", Toast.LENGTH_SHORT)
.show();
}
})
.setNegativeButton("取消",
new DialogInterface.OnClickListener() {
public void onClick(DialogInterface dialog,
int which) {
// TODO Auto-generated method stub
editText.setText("你取消了選擇");
}
}).create();
dialog = builder.create();
break;
}
return dialog;
}
7.單選鈕對話框
需要的布局如下
[html]
<EditText
android:id="@+id/edit01"
android:layout_width="fill_parent"
android:layout_height="wrap_content" />
<Button
android:id="@+id/btn1"
android:layout_width="fill_parent"
android:layout_height="50dp"
android:background="@drawable/btn_bg"
android:drawableLeft="@drawable/btn_left"
android:drawableRight="@drawable/btn_right"
android:text="好友空間動態" />
實現的代碼如下
[java]
String[] items = null;
EditText editText;
// String[] items={"南陽理工學院","軟件學院","軟件工程","10軟工移動3班"};
public void onCreate(Bundle savedInstanceState) {
super.onCreate(savedInstanceState);
setContentView(R.layout.button);
items = getResources().getStringArray(R.array.colledge);
Button btn1 = (Button) findViewById(R.id.btn1);
editText = (EditText) findViewById(R.id.edit01);
btn1.setOnClickListener(new OnClickListener() {
@Override
public void onClick(View v) {
// TODO Auto-generated method stub
showDialog(0);
}
});
}
@Override
protected Dialog onCreateDialog(int id) {
// TODO Auto-generated method stub
Dialog dialog = null;
Builder builder = new AlertDialog.Builder(this);
switch (id) {
case 0:
// builder = new AlertDialog.Builder(this);
builder.setIcon(R.drawable.wawa)
.setTitle("單選按鈕對話框")
.setSingleChoiceItems(R.array.colledge, 0,
new DialogInterface.OnClickListener() {
@Override
public void onClick(DialogInterface dialog,
int which) {
// TODO Auto-generated method stub
editText.setText("你選擇的是:"
+ getResources().getStringArray(
R.array.colledge)[which]);
}
})
.setPositiveButton("確定",
new DialogInterface.OnClickListener() {
@Override
public void onClick(DialogInterface dialog,
int which) {
// TODO Auto-generated method stub
Toast.makeText(AndroidDemoActivity.this,
"你點擊了確定按鈕!!", Toast.LENGTH_SHORT)
.show();
}
})
.setNegativeButton("取消",
new DialogInterface.OnClickListener() {
public void onClick(DialogInterface dialog,
int which) {
// TODO Auto-generated method stub
editText.setText("你取消了選擇");
}
}).create();
dialog = builder.create();
break;
}
return dialog;
}
8.多選按鈕對話框
需要的布局如下
[html]
<EditText
android:id="@+id/edit01"
android:layout_width="fill_parent"
android:layout_height="wrap_content" />
<Button
android:id="@+id/btn1"
android:layout_width="fill_parent"
android:layout_height="50dp"
android:background="@drawable/btn_bg"
android:drawableLeft="@drawable/btn_left"
android:drawableRight="@drawable/btn_right"
android:text="好友空間動態" />
實現的代碼如下
[java]
String[] items = null;
EditText editText;
// String[] items={"南陽理工學院","軟件學院","軟件工程","10軟工移動3班"};
boolean[] mulFlags = new boolean[] { true, false, false, false };
public void onCreate(Bundle savedInstanceState) {
super.onCreate(savedInstanceState);
setContentView(R.layout.button);
items = getResources().getStringArray(R.array.colledge);
Button btn1 = (Button) findViewById(R.id.btn1);
editText = (EditText) findViewById(R.id.edit01);
btn1.setOnClickListener(new OnClickListener() {
@Override
public void onClick(View v) {
// TODO Auto-generated method stub
showDialog(0);
}
});
}
@Override
protected Dialog onCreateDialog(int id) {
// TODO Auto-generated method stub
Dialog dialog = null;
Builder builder = new AlertDialog.Builder(this);
switch (id) {
case 0:
// builder = new AlertDialog.Builder(this);
builder.setIcon(R.drawable.wawa)
.setTitle("多選按鈕對話框")
.setMultiChoiceItems(R.array.colledge, mulFlags,
new DialogInterface.OnMultiChoiceClickListener() {
@Override
public void onClick(DialogInterface dialog,
int which, boolean isChecked) {
// TODO Auto-generated method stub
mulFlags[which] = isChecked;
String result = "你選擇的是:";
for (int i = 0; i < mulFlags.length; i++) {
if (mulFlags[i]) {
result = result + items[i] + " ";
}
}
editText.setText(result.substring(0,
result.length() - 1));
}
})
.setPositiveButton("確定",
new DialogInterface.OnClickListener() {
@Override
public void onClick(DialogInterface dialog,
int which) {
// TODO Auto-generated method stub
Toast.makeText(AndroidDemoActivity.this,
"你點擊了確定按鈕!!", Toast.LENGTH_SHORT)
.show();
}
})
.setNegativeButton("取消",
new DialogInterface.OnClickListener() {
public void onClick(DialogInterface dialog,
int which) {
// TODO Auto-generated method stub
editText.setText("你取消了選擇");
}
}).create();
dialog = builder.create();
break;
}
return dialog;
}
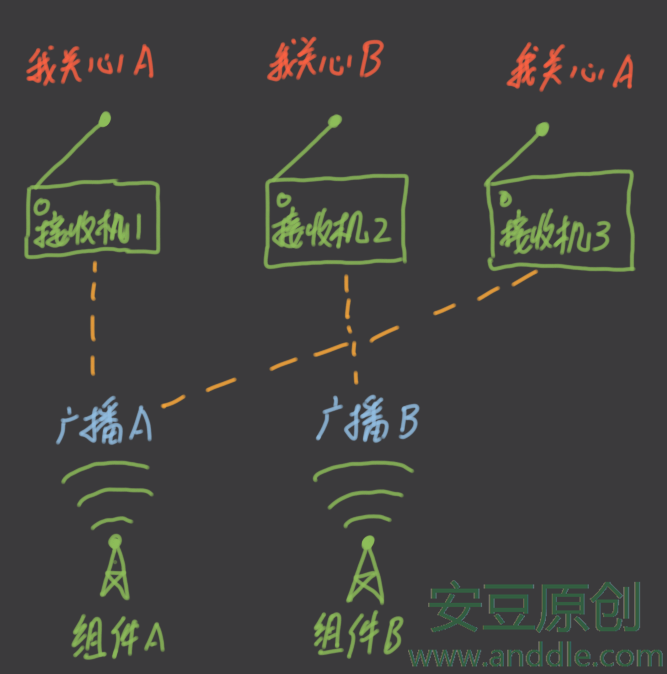 四大組件之BroadcastReceiver(一)-自定義“收音機”與發送“廣播”
 扣丁音樂(五)——service實現歌曲播放功能
 Android之ListView異步加載圖片且僅顯示可見子項中的圖片
 Android中資源文件的Shape使用總結