編輯:關於Android編程
1、notification 組件就是當來一條短息時,在手機任務欄中顯示出一條短信的提示,點擊時會激活一個activity
2、創建和使用:
public void click(Viewview){
//1 Get a reference to the NotificationManager:
// 獲取一個notification的管理者
NotificationManager manager = (NotificationManager)getSystemService(
NOTIFICATION_SERVICE);
// 2.初始化 manager要顯示的notification
int icon = R.drawable.ic_launcher;
CharSequence tickerText = "Hello 標題";
long when = System.currentTimeMillis();
//構造函數參數:(圖標,標題,notification顯示的時間)
Notificationnotification = new Notification(icon, tickerText, when);
//3. notification的具體事件
// 指定聲音
notification.sound = Uri.fromFile(newFile("/sdcard/ha.mp3"));
notification.ledARGB // 顯示什麼樣子的led燈
//震動 指定定震動時間 單位毫秒
Notification.vibrate() ; //參數long[] 數組 20 50 80
//指定notification的顯示狀態。(FLAG_NO_CLEAR:不顯示,FLAG_INSISTENT:一直顯示)
notification.flags = Notification.FLAG_NO_CLEAR;
// 延期的意圖
Intent intent = new Intent();
intent.setAction(Intent.ACTION_CALL);
intent.setData(Uri.parse("tel:123456"));
//創建延期意圖getActivity方法參數(上下文, 0,意圖對象,0)
PendingIntent contentIntent = PendingIntent.getActivity(this, 0,intent, 0);
為notification 設置延期意圖:
notification.contentIntent = contentIntent;
//setLatestEventInfo()方法是設置點擊notification打開的內容,和執行延期意圖。
notification.setLatestEventInfo(this, "標題", "正文", contentIntent);
//4.利用notification管理者把notification顯示出來
manager.notify(0, notification);
}
}
1、確定取消對話框:
public void click1(View view) {
// 1.創建一個對話框的構建器
AlertDialog.Builderbuilder = new Builder(this);
builder.setIcon(R.drawable.ic_launcher);
builder.setTitle("我是標題");
builder.setMessage("我是正文");
//對話框的確定按鈕
builder.setPositiveButton("確定", newOnClickListener() {
@Override
public void onClick(DialogInterface dialog, int which) {
// TODO Auto-generatedmethod stub
System.out.println("確定被點擊了");
}
});
//設置取消按鈕和點擊事件
builder.setNegativeButton("取消", newOnClickListener() {
@Override
public void onClick(DialogInterface dialog, int which) {
// TODO Auto-generatedmethod stub
System.out.println("取消被點擊了");
}
});
//創建對話框,再顯示出來
builder.create().show();
}
2、選擇對話框
public void click2(View view) {
AlertDialog.Builder builder = new Builder(this);
final String[] items = { "紅", "藍", "綠" };
//設置選擇對話框的數據和 點擊事件
builder.setItems(items, new OnClickListener() {
方法參數(當前dialog , 被點擊的條目在items數組下標)
public voidonClick(DialogInterface dialog, int which) {
Toast.makeText(getApplicationContext(),
items[which] + "被點擊了",
0).show();
}
});
//顯示對話框
builder.create().show();
}
3、單選對話框:
public void click3(View view) {
final CharSequence[] items = { "Red","Green", "Blue" };
AlertDialog.Builder builder = new AlertDialog.Builder(this);
builder.setTitle("Pick a color");
//方法參數(數組,默認選擇的條目小標-1沒有默認選擇,點擊事件)
builder.setSingleChoiceItems(items, -1,
new DialogInterface.OnClickListener() {
public voidonClick(DialogInterface dialog, int item) {
Toast.makeText(getApplicationContext(), items[item],
Toast.LENGTH_SHORT).show();
// 關閉對話框
dialog.dismiss();
}
});
AlertDialog alert = builder.create();
alert.show();
}
4、多選對話框:
public void click4(View view) {
final CharSequence[] items = { "Red","Green", "Blue" };
AlertDialog.Builder builder = new AlertDialog.Builder(this);
builder.setTitle("Pick a color");
//方法參數:(數組,默認選擇的數組,true表示對應的條目選中,點擊事件)
builder.setMultiChoiceItems(items,
new boolean[] { false, true, false },
new OnMultiChoiceClickListener() {
@Override
public voidonClick(DialogInterface dialog, int which,
boolean isChecked) {
Toast.makeText(getApplicationContext(),
items[which] + "" + isChecked,
Toast.LENGTH_SHORT).show();
}
});
//設置確認按鈕
builder.setPositiveButton("確定", newOnClickListener() {
@Override
public voidonClick(DialogInterface dialog, int which) {
// TODO Auto-generated method stub
}
});
AlertDialog alert = builder.create();
alert.show();
}
5、進度條對話框:ProgressDialog 類
public void click5(Viewview) {
ProgressDialog pd = new ProgressDialog(this);
pd.setTitle("提示標題");
pd.setMessage("處理中...");
pd.show();
}
1、下拉列表的組件:
android:id="@+id/spinner"
android:layout_width="fill_parent"
android:layout_height="wrap_content" />
2、下拉列表的操作:
//獲取下拉列表組件
Spinner spinner = (Spinner) this.findViewById(R.id.spinner);
//創建適配器
ArrayAdapter
android.R.layout.simple_spinner_item);
//為適配設置布局
//android.R.layout.simple_spinner_dropdown_item
adapter.setDropDownViewResource(android.R.layout.simple_spinner_dropdown_item);
adapter.add("java");
adapter.add("dotNet");
adapter.add("php");
spinner.setAdapter(adapter);
//點擊事件
spinner.setOnItemSelectedListener(new OnItemSelectedListener() {
@Override
public voidonItemSelected(AdapterViewparent, View view,
int position, long id) {
// TODO Auto-generated method stub
}
@Override
public voidonNothingSelected(AdapterViewparent) {
// TODO Auto-generated method stub
}
});
1、拖動條組件:
android:id="@+id/seekBar1"
android:layout_width="match_parent"
android:layout_height="wrap_content" />
2、組件的使用:
//拖動條組件對象
seekBar1 = (SeekBar) this.findViewById(R.id.seekBar1);
seekBar1.setMax(100);//設置拖動條最大
seekBar1.setProgress(50);//拖動條當前的值
//拖動時的事件
seekBar1.setOnSeekBarChangeListener(new OnSeekBarChangeListener(){
//停止拖動時的方法
public voidonStopTrackingTouch(SeekBar seekBar) {
// TODO Auto-generated method stub
System.out.println("停止拖動了");
//獲取當前的位置
int position = seekBar.getProgress();
}
@Override
//開始拖動時的方法:
public voidonStartTrackingTouch(SeekBar seekBar) {
// TODO Auto-generated method stub
System.out.println("開始拖動了");
}
@Override
public voidonProgressChanged(SeekBar seekBar, int progress,
boolean fromUser) {
// TODO Auto-generated method stub
}
});
在activity類中覆寫兩個方法:
@Override//設置菜單項
public boolean onCreateOptionsMenu(Menu menu) {
menu.add(Menu.NONE, 1, Menu.NONE, "添加");
menu.add(Menu.NONE, 2, Menu.NONE, "更新");
return super.onCreateOptionsMenu(menu);
}
@Override//點擊菜單項的事件
public boolean onMenuItemSelected(int featureId, MenuItem item) {
switch (item.getItemId()) {
case 1://添加
Log.i("tag","add was selected");
return true;
case 2://更新
Log.i("tag","update was selected");
return true;
default:
returnsuper.onMenuItemSelected(featureId, item);
}
}
1、組件
android:layout_width="fill_parent"
android:layout_height="wrap_content"
android:completionThreshold="1"
android:id="@+id/name" />
2、操作:
public void onCreate(Bundle savedInstanceState) {
super.onCreate(savedInstanceState);
setContentView(R.layout.main);
String[] names = {"老張", "老方", "老畢", "李明" , "李麗", "陳江", "abc","acc"};
AutoCompleteTextViewnameText = (AutoCompleteTextView)
this.findViewById(R.id.name);
ArrayAdapter
this,android.R.layout.simple_dropdown_item_1line, names);
nameText.setAdapter(adapter);
}
七.ScrollView :滾動顯示內容
android:layout_width="fill_parent"
android:layout_height="fill_parent"
android:orientation="vertical" >
android:layout_width="match_parent"
android:layout_height="match_parent"
android:id="@+id/tv"
/>
 Android TextView高級顯示技巧實例小結
本文實例總結了Android TextView高級顯示技巧。分享給大家供大家參考,具體如下:1. 自定義字體可以使用setTypeface(Typeface)方法來設置文
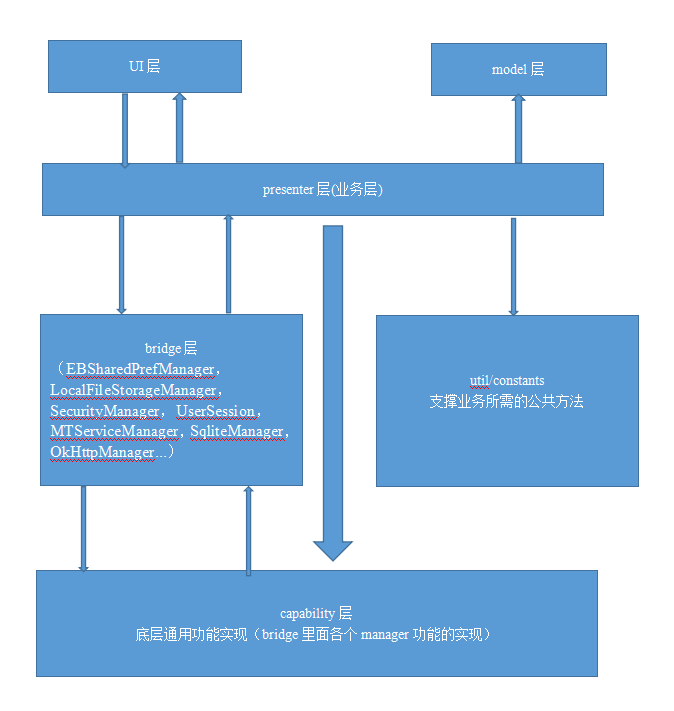 Android應用架構搭建
1. 前言安卓屬於小團隊開發,架構的重要性在很多公司其實不是那麼的明顯,加上現在的開源框架層出不窮,更好的幫助我們上手android項目的開發。我前兩年也在公司主導過項目
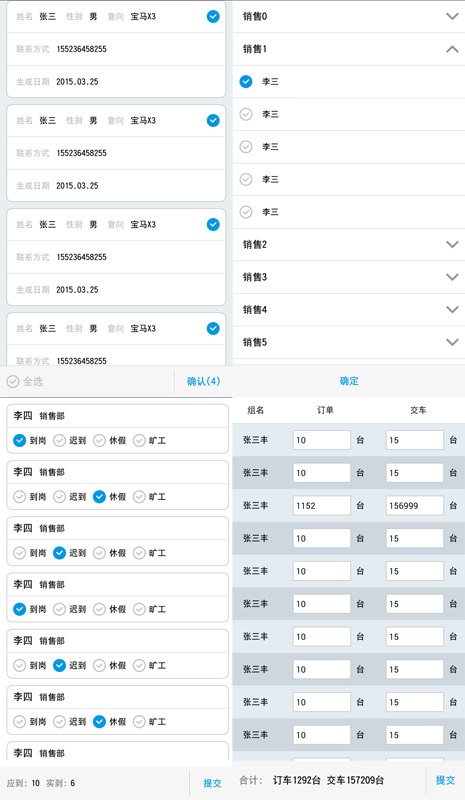 Android listview ExpandableListView實現多選,單選,全選,edittext實現批量輸入的實例代碼
最近在項目開發中,由於項目的需求要實現一些列表的單選,多選,全選,批量輸入之類的功能,其實功能的實現倒不是很復雜,需求中也沒有涉及到復雜的動畫什麼之類,主要是解決列表數據
 Android內核中判別啟動模式
Android內核中判別啟動模式 問題出現在驅動組描述了一個問題是內核的一個驅動中設置的電壓值在正常模式和其它模式啟動時電壓值