編輯:關於Android編程
自己的前幾篇文章基本都是簡單的把動畫實現,能夠看看效果。這次帶來的翻轉動畫自然少不了的顯示動畫效果。
但這次多了實用性、可擴展性的考慮,把翻轉動畫不僅僅是針對個別iew的動畫效果,而是一個可以翻轉的layout,並實現接口flipable,具備一定的封裝性;方便在添加其它控件,具備一定的擴展性,在例子中,也示例性地改變翻轉內容,把layout中默認的textview 改為 由代碼填充的imageView。能夠在實際代碼中使用。
首先,翻轉自然需要兩個界面,可以是view 也可以是layout ;
然後,使用android的屬性動畫,rotationX,創建兩個動畫,分別是為翻轉出現/翻轉消失。
        ObjectAnimator visToInvis = ObjectAnimator.ofFloat(visibleLayout, "rotationX", 0f, 90f);
        ObjectAnimator invisToVis = ObjectAnimator.ofFloat(invisibleLayout, "rotationX",
                -90f, 0f);
接著,設置在一個動畫結束的時候讓另一個動畫播放,並調用播放,就可以看到效果了。 visToInvis.addListener(new AnimatorListenerAdapter() {
public void onAnimationEnd(Animator anim) {
visibleLayout.setVisibility(View.GONE);
invisToVis.start();
invisibleLayout.setVisibility(View.VISIBLE);
}
});
visToInvis.start();最後,把這些放到一個函數裡,在點擊事件裡調用,就完成了。
首先,設計接口Flipable
public interface Flipable {
    public void flip();
}
然後,設計布局文件flipable_relativelayout.xml,這裡面的textview是為了演示設置的默認布局。
然後,自定義layout,並添加構造函數,加載布局文件。
public class FlipableRelativeLayout extends RelativeLayout implements Flipable {
    private LinearLayout mFontLayout;
    private LinearLayout mBackLayout;

    public FlipableRelativeLayout(Context context) {
        super(context, null);
        inflate(getContext(), R.layout.flipable_relativelayout, this);
    }

    public FlipableRelativeLayout(Context context, AttributeSet attrs) {
        super(context, attrs);
        inflate(getContext(), R.layout.flipable_relativelayout, this);
    }

    public FlipableRelativeLayout(Context context, AttributeSet attrs, int defStyle) {
        super(context, attrs, defStyle);
        inflate(getContext(), R.layout.flipable_relativelayout, this);
    }

    @Override
    protected void onFinishInflate() {
        super.onFinishInflate();
        mFontLayout = (LinearLayout) findViewById(R.id.front);
        mBackLayout = (LinearLayout) findViewById(R.id.back);
    }
增加set方法,方便擴展
    protected void setFront(View v) {
        mFontLayout.removeAllViews();
        mFontLayout.addView(v);
        invalidate();
    }

    protected void setBack(View v) {
        mBackLayout.removeAllViews();
        mBackLayout.addView(v);
        invalidate();
    }
增加flip 方法,實現翻轉動畫。
    @Override
    public void flip() {
        // 上文中提到的實現
}引用剛剛寫好的FlipableRelativeLayout
    private void initView() {
        setContentView(R.layout.multiple_flip_example);
        mFlipButton = (Button) findViewById(R.id.button_flip);
        mFlipButton.setOnClickListener(this);
        mChangeButton = (Button) findViewById(R.id.button_change);
        mChangeButton.setOnClickListener(this);
        mFlipLayout = (FlipableRelativeLayout) findViewById(R.id.flip);
} @Override
public void onClick(View v) {
animateClickView(v, new ClickAnimation() {
@Override
public void onClick(View v) {
if (v == mFlipButton) {
mFlipLayout.flip();
} else if (v == mChangeButton) {
ImageView front = new ImageView(getApplicationContext());
front.setImageResource(R.drawable.avatar);
front.setVisibility(View.VISIBLE);
ImageView back = new ImageView(getApplicationContext());
back.setImageResource(R.drawable.chobber);
back.setVisibility(View.VISIBLE);
mFlipLayout.setFront(front);
mFlipLayout.setBack(back);
mFlipLayout.flip();
}
}
});
}private void animateClickView(final View v, final ClickAnimation callback)
http://v.youku.com/v_show/id_XNjY0NDA2MDI4.html
在上述功能實現的基礎上,繼續加工。實現多個翻轉組件的順序的翻轉動畫。
增加fliplayout 的getAnimator 方法,和createFlipAnimator方法。
    private Animator createFlipAnimator() {
        //創建過程如上文所示
        return mVisToInvis;
    }

    public Animator getFlipAnimator() {
        return createFlipAnimator();
    }
在example 中增加動畫列表
private ArrayList mFlipList = new ArrayList();並實現獲取所有布局flip動畫的方法, 通過遍歷布局中所有的child,並判斷是否是FlipableRelativeLayout ,加入到列表中。
    private void collectFlipAnim() {
        mFlipList.clear();
        traversalCollectFlip(mMainLayout);
    }

    private void traversalCollectFlip(ViewGroup parent){
        if(parent==null){
            return;
        }
        if(parent.getChildCount()==0 ){
            return;
        }
        for (int index = 0; index < parent.getChildCount(); index++) {
            if (parent.getChildAt(index) instanceof FlipableRelativeLayout) {
                mFlipList.add(((FlipableRelativeLayout) (parent.getChildAt(index))).getFlipAnimator());
                continue;
            }
            try{
                traversalCollectFlip((ViewGroup) parent.getChildAt(index));
            }catch(ClassCastException e){
                // not a ViewGroup, continue
            }
        }
} private void flipAll() {
collectFlipAnim();
AnimatorSet animSet = new AnimatorSet();
animSet.playSequentially(mFlipList);
animSet.start();
}android 翻轉動畫完整版 http://v.youku.com/v_show/id_XNjY0NDgwODM2.html
 Android基礎入門教程——8.4.3 Android動畫合集之屬性動畫-初見
Android基礎入門教程——8.4.3 Android動畫合集之屬性動畫-初見標簽(空格分隔): Android基礎入門教程本節引言: 本節給帶
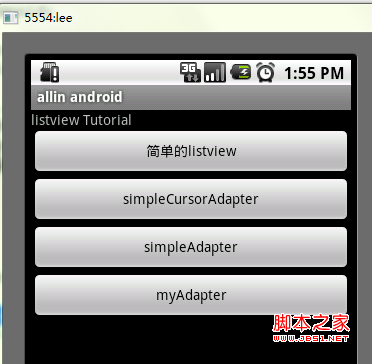
 Android開發系列(十四):ListView用法、對ListView監聽的三種方法以及ListView中Adapter的使用方法
一、ArrayAdapter的介紹以及ListView的用法: Adapter是數據和視圖之間的橋梁,數據在adapter中做處理,然後顯示到視圖上面。就是用來綁定數據用
 Android自定義View和屬性動畫完美結合,創造出酷炫圓環動畫,帶標尺和進度
主要是在原來的基礎上添加了如下功能1.進度圓環的顏色是漸變。 2.添加一個進度標尺,類似與鐘表表盤的樣子,用來顯示刻度。3.添加一個進度指示器,三角形的樣子,用來顯示進
 Android5.0新特性——SVG(可縮放矢量圖形)
什麼是SVG(Scalable Vector Graphics)SVG一種用於描述圖像的標記語言。類似HTML。SVG嚴格遵從XML語法,並用文本格式的描述性語言來描述圖