編輯:關於Android編程
Android4.3按鍵消息處理與之前的版本有稍微的區別,基本原理還是一樣的,這裡主要從兩個階段來分析:
1.前期的准備工作,即開機時啟動相應的的線程,靜候按鍵事件的來臨
2.當有按鍵消息時,進行消息的分發等處理
先看一張類圖:
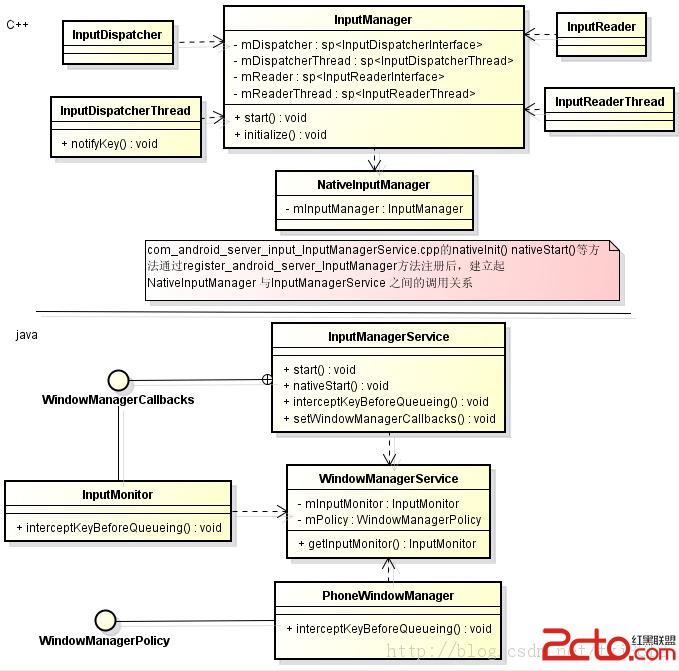
從類圖中看出,主要涉及到的類有PhoneWindowManager、WindowManagerService、inputManagerService、 InputManager
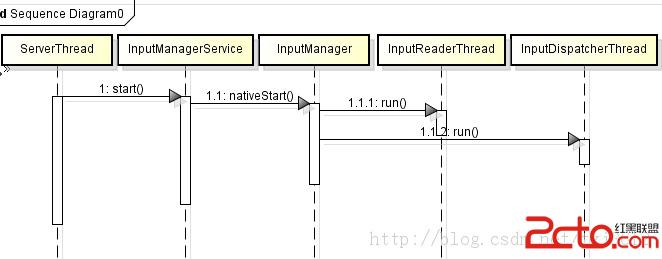
先看第一個問題,前期的准備工作:
1.開機時先啟動inputManagerService,由ServerThread負責啟動;
  inputManager = new InputManagerService(context, wmHandler);

            Slog.i(TAG, "Window Manager");
            wm = WindowManagerService.main(context, power, display, inputManager,
                    uiHandler, wmHandler,
                    factoryTest != SystemServer.FACTORY_TEST_LOW_LEVEL,
                    !firstBoot, onlyCore);
            ServiceManager.addService(Context.WINDOW_SERVICE, wm);
            ServiceManager.addService(Context.INPUT_SERVICE, inputManager);

            ActivityManagerService.self().setWindowManager(wm);

            inputManager.setWindowManagerCallbacks(wm.getInputMonitor());
            inputManager.start();
 public InputManagerService(Context context, Handler handler) {
        this.mContext = context;
        this.mHandler = new InputManagerHandler(handler.getLooper());

        mUseDevInputEventForAudioJack =
                context.getResources().getBoolean(R.bool.config_useDevInputEventForAudioJack);
        Slog.i(TAG, "Initializing input manager, mUseDevInputEventForAudioJack="
                + mUseDevInputEventForAudioJack);
        mPtr = nativeInit(this, mContext, mHandler.getLooper().getQueue());
    }
先new一個InputManagerHandler,然後調用一個native方法,把service和handler的消息隊列作為參數傳入,
nativeInit對應是com_android_server_input_InputManagerService.cpp中的nativeInit,,這個通過JNI的機制進行關聯。
這裡不多說,看nativeInit:
static jint nativeInit(JNIEnv* env, jclass clazz,
        jobject serviceObj, jobject contextObj, jobject messageQueueObj) {
    sp messageQueue = android_os_MessageQueue_getMessageQueue(env, messageQueueObj);
    if (messageQueue == NULL) {
        jniThrowRuntimeException(env, "MessageQueue is not initialized.");
        return 0;
    }

    NativeInputManager* im = new NativeInputManager(contextObj, serviceObj,
            messageQueue->getLooper());
    im->incStrong(0);
    return reinterpret_cast(im);
}
這裡主要是創建一個NativeInputManager對象,看起構造函數:
NativeInputManager::NativeInputManager(jobject contextObj,
        jobject serviceObj, const sp& looper) :
        mLooper(looper) {
    JNIEnv* env = jniEnv();


    mContextObj = env->NewGlobalRef(contextObj);
    mServiceObj = env->NewGlobalRef(serviceObj);


    {
        AutoMutex _l(mLock);
        mLocked.systemUiVisibility = ASYSTEM_UI_VISIBILITY_STATUS_BAR_VISIBLE;
        mLocked.pointerSpeed = 0;
        mLocked.pointerGesturesEnabled = true;
        mLocked.showTouches = false;
    }


    sp eventHub = new EventHub();
    mInputManager = new InputManager(eventHub, this, this);
}
這裡主要是創建一個InputManager,看起構造函數:
InputManager::InputManager(
        const sp& eventHub,
        const sp& readerPolicy,
        const sp& dispatcherPolicy) {
    mDispatcher = new InputDispatcher(dispatcherPolicy);
    mReader = new InputReader(eventHub, readerPolicy, mDispatcher);
    initialize();
}


void InputManager::initialize() {
    mReaderThread = new InputReaderThread(mReader);
    mDispatcherThread = new InputDispatcherThread(mDispatcher);
}
這裡看到了創建對象InputDispatcher 、InputReader以及兩個時刻在跑的線程對象:mReaderThread、mDispatcherThread
至此初始化的第一步是完成了,但創建的線程還沒start,還開始正真的干活,看開啟過程
至此前期的准備工作都做完,兩線程開始干活,靜候按鍵事件來臨
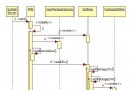
2.當有按鍵事件時兩個線程處理流程見下圖:
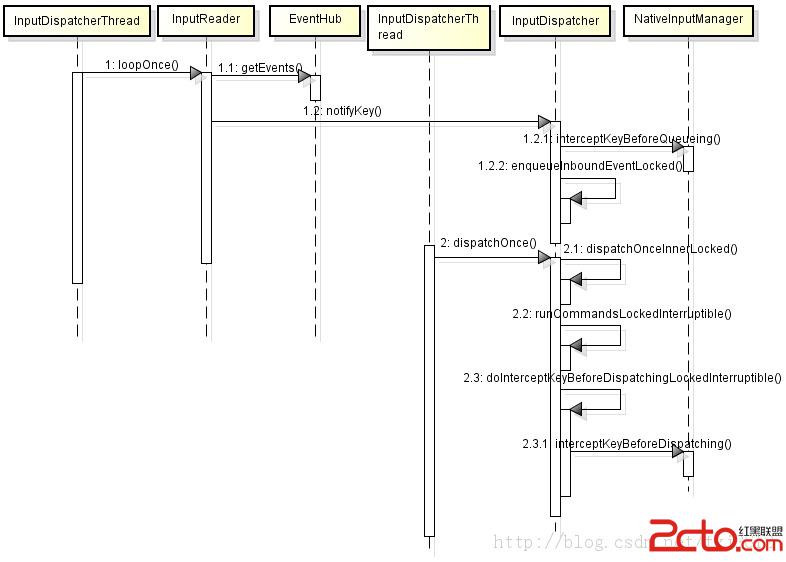
兩條主線:
a. InputReader從EventHub中獲取到按鍵事件,並通知InputDispatcher;InputDispatcher接到通知後調用
interceptKeyBeforeQueueing方法進行相關的操作,並把按鍵事件加入到隊列中,等待後面處理。
加入隊列源碼:
bool InputDispatcher::enqueueInboundEventLocked(EventEntry* entry) {
    bool needWake = mInboundQueue.isEmpty();
    mInboundQueue.enqueueAtTail(entry);
    traceInboundQueueLengthLocked();
b. InputDispatcher從消息隊列中獲取按鍵消息,調用interceptKeyBeforeDispatching方法判斷是否對此消息進行攔截,
根據其結果進行判斷:
    nsecs_t delay = mPolicy->interceptKeyBeforeDispatching(commandEntry->inputWindowHandle,
            &event, entry->policyFlags);

    mLock.lock();

    if (delay < 0) {
        entry->interceptKeyResult = KeyEntry::INTERCEPT_KEY_RESULT_SKIP;
    } else if (!delay) {
        entry->interceptKeyResult = KeyEntry::INTERCEPT_KEY_RESULT_CONTINUE;
    } else {
        entry->interceptKeyResult = KeyEntry::INTERCEPT_KEY_RESULT_TRY_AGAIN_LATER;
        entry->interceptKeyWakeupTime = now() + delay;
    }
其中在InputDispatcher中調用的interceptKeyBeforeQueueing和interceptKeyBeforeDispatching方法都是對應著
PhoneWindowManager中的同名方法。
 AIDL(續)
這篇文章講的是在不同的工程文件中實現IPC。這次我決定用一個工程完成首先,我先介紹一下流程1服務端先創建Service來監聽客戶端的連接請求,然後創建AIDL文件,將暴露
 Android Wear
原文地址:http://developer.android.com/design/wear/index.html 前言 設計Android Wear可穿戴設備應用程
 Android下屏幕適配
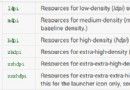
適配:即當前應用在相同的手機上面顯示相同的效果。適配前需要首先確定當前手機所屬像素密度類型(如:xhdpi、hdpi、mdpi等),然後計算其像素密度,按一定比例給出界面
 開發隨筆:界面、推薦邏輯優化(文末小彩蛋)
開發隨筆,小結項目開發中的得與失,項目優化工作,用到了以下幾個知識點,在這裡和大家分享一下:進展-界面、推薦邏輯優化:layout_margin、layout_heigh