package com.amos.sharedpreference;
import android.app.Activity;
import android.content.SharedPreferences;
import android.content.SharedPreferences.Editor;
import android.os.Bundle;
import android.view.View;
import android.view.View.OnClickListener;
import android.widget.Button;
import android.widget.CheckBox;
import android.widget.EditText;
public class MainActivity extends Activity implements OnClickListener {
String tag = "MainActivity";
EditText et_name;// 用戶名
EditText et_password;// 密碼
Button bt_login;// 登錄按鈕
CheckBox cb_password;// 單選框
// 用來保存參數的接口
SharedPreferences sharedPreference;
@Override
protected void onCreate(Bundle savedInstanceState) {
super.onCreate(savedInstanceState);
setContentView(R.layout.activity_main);
// 初始化
et_name = (EditText) this.findViewById(R.id.et_name);
et_password = (EditText) this.findViewById(R.id.et_password);
bt_login = (Button) this.findViewById(R.id.bt_login);
cb_password = (CheckBox) this.findViewById(R.id.cb_password);
// 初始化參數配置
sharedPreference=this.getSharedPreferences("spconfig", MODE_PRIVATE);
if(sharedPreference.getBoolean("issetup", false)){
et_name.setText(sharedPreference.getString("name", ""));
et_password.setText(sharedPreference.getString("password", ""));
}
// 注冊監聽事件
bt_login.setOnClickListener(this);
}
@Override
public void onClick(View v) {
switch (v.getId()) {
case R.id.bt_login:
String name = et_name.getText().toString().trim();
String password = et_password.getText().toString().trim();
System.out.println("name:"+name);
System.out.println("password:"+password);
// 定義用來保存參數的接口
Editor edit = sharedPreference.edit();
edit.putString("name", name);
edit.putString("password", password);
edit.putBoolean("issetup", true);
//清空編輯器
//edit.clear();
// 當有兩個編輯器(Editor)進行編輯同一個sharedPreference時,最後一個提交的將會生效
edit.commit();
default:
break;
}
}
}
復制代碼
sharedpreference的使用是相當方便,這裡同樣會將用戶名密碼保存下來,但這裡不同點在於,通過sharedPreference會生成規整的xml的文件,這裡主要用到的是Edit類中的方法去put值到相應的位置.一般情況下其它配置也是會保存到sharedPreference中,如setting:
3.補充
1).使用openFileInput('...')讀取數據.
前面文章中將密碼寫到rom文件中主要采用的是openFileOutput('XXX/xxx').
這裡同樣可以類似的通過openFileInput('xx/xxx')進行讀取文件.比較簡單,這裡不再舉例.
2).使用命令生成sdcard
復制代碼
t-bundle-linux-x86_64-20131030/sdk/tools$ ./mksdcard 20
mksdcard: create a blank FAT32 image to be used with the Android emulator
usage: mksdcard [-l label] <size> <file>
if <size> is a simple integer, it specifies a size in bytes
if <size> is an integer followed by 'K', it specifies a size in KiB
if <size> is an integer followed by 'M', it specifies a size in MiB
if <size> is an integer followed by 'G', it specifies a size in GiB
Minimum size is 9M. The Android emulator cannot use smaller images.
Maximum size is 1099511627264 bytes, 1073741823K, 1048575M or 1023G
amosli@amosli-pc:/media/f91a4cca-0b96-4c30-b140-7918a196de3e/amosli/java/soft/adt-bundle-linux-x86_64-20131030/sdk/tools$
復制代碼
3).更新ADT(android development tools )
方法一:將 https://dl-ssl.google.com/android/eclipse/ 鏈接加入到, Help > Install New Software > add url
方法二:直接下載zip包ADT-22.6.3.zip (https://dl.google.com/android/ADT-22.6.3.zip),不用解壓.步驟與add url類似,官方介紹如下.
Download the ADT Plugin zip file (do not unpack it):
Package Size MD5 Checksum
ADT-22.6.3.zip 14590813 bytes 3982259fd2cc81e53bbbe05dcd6529a7
Start Eclipse, then select Help > Install New Software.
Click Add, in the top-right corner.
In the Add Repository dialog, click Archive.
Select the downloaded ADT-22.6.3.zip file and click OK.
Enter "ADT Plugin" for the name and click OK.
In the Available Software dialog, select the checkbox next to Developer Tools and click Next.
In the next window, you'll see a list of the tools to be downloaded. Click Next.
Read and accept the license agreements, then click Finish.
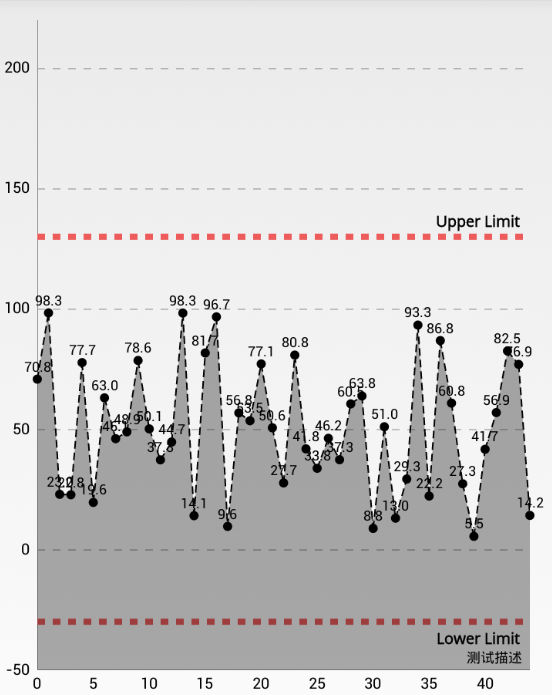 笑談Android圖表------MPAndroidCharts
 微信朋友圈留言“送你一朵小花”怎麼玩 微信朋友圈留言送你一朵
 三方分享長圖、大圖
 Android Scroll滑動效果實例