前言
基本上現在所有的應用都會有一個歡迎界面,在歡迎界面對應用做一個整體的介紹,然後在跳入到主界面,這次要說的這個引導頁就是帶翻頁的引導頁。效果如下所示
概要實現
主要分為兩部分功能,一個是翻頁效果,一個是頁面位置指示器。為了實現翻頁效果我采用系統自帶的ViewPager對象來實現;頁面指示器則通過一個LinearLayout在其中放置相應個數的圖片,然後根據頁面的滑動動態修改各個圖片的資源。布局文件如下所示
復制代碼
1 <RelativeLayout xmlns:android="http://schemas.android.com/apk/res/android"
2 xmlns:tools="http://schemas.android.com/tools"
3 android:layout_width="match_parent"
4 android:layout_height="match_parent"
5 tools:context=".MainActivity" >
6
7 <android.support.v4.view.ViewPager
8 xmlns:android="http://schemas.android.com/apk/res/android"
9 android:id="@+id/welcome_pager"
10 android:layout_width="match_parent"
11 android:layout_height="match_parent" />
12
13 <!-- 圖片位置指示器 -->
14 <LinearLayout
15 android:id="@+id/director"
16 android:layout_width="match_parent"
17 android:layout_height="wrap_content"
18 android:gravity="center_horizontal"
19 android:orientation="horizontal"
20 android:layout_marginBottom="15dip"
21 android:layout_alignParentBottom="true"
22 >
23
24 <ImageView
25 android:layout_width="wrap_content"
26 android:layout_height="wrap_content"
27 android:background="@drawable/pageindicator_on" />
28
29 <ImageView
30 android:layout_width="wrap_content"
31 android:layout_height="wrap_content"
32 android:background="@drawable/pageindicator_off" />
33
34 <ImageView
35 android:layout_width="wrap_content"
36 android:layout_height="wrap_content"
37 android:background="@drawable/pageindicator_off" />
38
39 <ImageView
40 android:layout_width="wrap_content"
41 android:layout_height="wrap_content"
42 android:background="@drawable/pageindicator_off" />
43 </LinearLayout>
44
45 </RelativeLayout>
復制代碼
ViewPager
先來看下官方解釋:Layout manager that allows the user to flip left and right through pages of data.意思是說,Viewpage是一個允許用戶在多個頁面數據之間通過左滑或者右滑的方式切換頁面數據的布局管理器。
主要功能點有兩部分,數據適配器Adapter,和事件監聽器OnPageChangeListener。數據適配器用來管理這個ViewPager對象的顯示內容,而OnPageChangeListener用來處理當頁面切換的時候的行為動作,我修改頁面指示器就是通過這個事件來完成的。
適配器
復制代碼
1 class pagerAdapter extends FragmentPagerAdapter{
2
3 public pagerAdapter(FragmentManager fm) {
4 super(fm);
5 }
6
7 @Override
8 public Fragment getItem(int arg0) {
9 //得到要顯示的對象並初始化圖片
10 WelcomeFragment fm = new WelcomeFragment();
11 fm.setImg(imgs.get(arg0));
12
13 return fm;
14 }
15
16 @Override
17 public int getCount() {
18 return imgs.size();
19 }
20
21 }
復制代碼
上面這段就是ViewPager要用的適配器了,其中imgs是一個id數組,存放了要在歡迎界面展示的圖片的id,WelcomeFragment是一個Fragment類,用來展示頁面內容,這兩個代碼會在完整代碼中體現。兩個方法需要實現,getCout,用來表示有多少個頁面;getItem,用來獲取指定位置的Pager對象。
imgs數組定義及實現:
復制代碼
1 List<Integer> imgs = null;
2 //初始化歡迎界面圖片數組
3 imgs = new ArrayList<Integer>();
4 imgs.add(R.drawable.help1);
5 imgs.add(R.drawable.help2);
6 imgs.add(R.drawable.help3);
7 imgs.add(R.drawable.help4);
復制代碼
WelcomeFragment類定義
復制代碼
1 public class WelcomeFragment extends Fragment {
2
3 View view = null;
4 int imgId ;
5 @Override
6 public View onCreateView(LayoutInflater inflater, ViewGroup container,
7 Bundle savedInstanceState) {
8 view = inflater.inflate(R.layout.welcome_fragment, null);
9
10 ImageView fragmentVw = (ImageView) view.findViewById(R.id.welcome_Img);
11 fragmentVw.setBackgroundResource(imgId);
12 return view;
13 }
14
15 /**
16 * 為該Fragment設置顯示圖片
17 * */
18 public void setImg(int imgID){
19
20 imgId = imgID;
21 }
22 }
復制代碼
WelcomeFragment布局文件
復制代碼
1 <FrameLayout xmlns:android="http://schemas.android.com/apk/res/android"
2 android:layout_width="match_parent"
3 android:layout_height="match_parent" >
4
5 <ImageView
6 android:id="@+id/welcome_Img"
7 android:contentDescription="welcome"
8 android:layout_width="match_parent"
9 android:layout_height="match_parent" />
10
11 </FrameLayout>
復制代碼
事件監聽器OnPageChangeListener
這個監聽器用來監聽頁面切換事件,實現這個接口用來處理頁面切換時,頁面指示器跟著改變狀態。實現代碼如下
復制代碼
1 /**
2 * 頁面切換的事件監聽器
3 * */
4 class pageChangeListener implements OnPageChangeListener{
5
6 /**
7 * 當某一個頁面被選中的時候觸發
8 * */
9 @Override
10 public void onPageSelected(int arg0) {
11 int count = directorLayout.getChildCount();
12 /**
13 * 指示器自對象順序和頁面顯示順序一樣的設置為on,其余的設置為off
14 * */
15 for(int i=0;i<count;i++){
16 ImageView iv = (ImageView) directorLayout.getChildAt(i);
17 if(i == arg0){
18 iv.setBackgroundResource(R.drawable.pageindicator_on);
19 }else{
20 iv.setBackgroundResource(R.drawable.pageindicator_off);
21 }
22 }
23 }
24
25 @Override
26 public void onPageScrolled(int arg0, float arg1, int arg2) {
27 // TODO Auto-generated method stub
28 }
29
30 @Override
31 public void onPageScrollStateChanged(int arg0) {
32 // TODO Auto-generated method stub
33 }
34 }
 Android自定義狀態欄顏色
 Android實現手勢滑動多點觸摸縮放平移圖片效果(二)
 Android開源項目PullToRefresh下拉刷新功能詳解
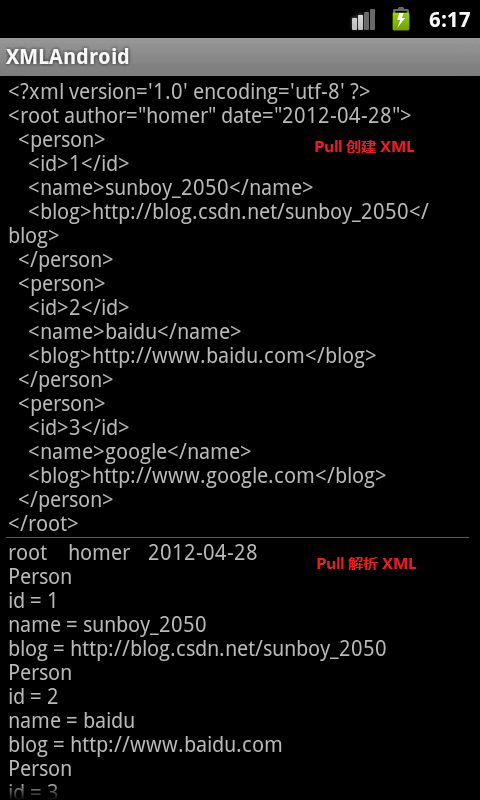 Android 創建與解析XML(四)——詳解Pull方式