編輯:關於Android編程
上一次我們講了一堆實現自定義控件的理論基礎,列舉了View類一些可以重寫的方法,我們對這些方法的重寫是我們繼承View類來派生自定義控件的關鍵
我通過一個最簡單的例子給大家展示了這一個過程,無論是多麼復雜的自定義控件,思路總是這樣子的,但是因為我們僅僅重寫了onDraw方法使得大家覺得怪怪的,作為一個控件,我們居然還要為了他的實現為其增加麻煩的監聽,這就不能叫做控件了。
下面再給大家介紹一個經常重寫的方法法:publicboolean onTouchEvent (MotionEvent event)
通過這個方法,我們就把寫在Activity的監聽部分內置在控件內部了,這才能叫做一個完整的控件,其功能是建立一片區域,並其中包含一個可以根據手指觸摸而改變位置的小球。
下面我們來看一下這個觸摸事件方法:
publicboolean onTouchEvent (MotionEvent event)
Added in API level 1
Implement this method to handle touch screen motionevents.
If this method is used to detect click actions, it isrecommended that the actions be performed by implementing and calling performClick(). This willensure consistent system behavior, including:
obeying click sound preferences
dispatching OnClickListener calls
handling ACTION_CLICK whenaccessibility features are enabled
Parameters
event
The motion event.
Returns
True if the event was handled, false otherwise.
這樣我們就可以把我們剛才在Activity的類中做的工作放到我們的自定義控件中來實現
只要去掉剛才的setter 和 getter 然後重寫這個觸摸事件的方法就可以了:
public boolean onTouchEvent(MotionEvent motionevent){

		CircleX  = motionevent.getX();
		CircleY  = motionevent.getY();
		this.invalidate();

		return true;
這樣我們只需要再簡單的在xml中調用,一切都愉快的解決了!
這個例子我會和第一個一並放在一起的,就和我之前寫的適配器的教程一樣,源碼我會整理再一起再給大家。第二個程序我注釋就不那麼注意啦……不是我懶,最近比較忙(其實就是懶)
下面我貼一下代碼:
Activity的代碼:
package com.example.customcomponentsdemo.Activity;

import com.example.customcomponentsdemo.R;

import android.app.Activity;
import android.content.Context;
import android.os.Bundle;

public class MoveBallActivity2 extends Activity{

	@Override
	protected void onCreate(Bundle savedInstanceState){

		super.onCreate(savedInstanceState);
		setContentView(R.layout.activity_moveball2);
	}

}
自定義View版本2的代碼:
package com.example.customcomponentsdemo.component;

import android.content.Context;
import android.graphics.Canvas;
import android.graphics.Color;
import android.graphics.Paint;
import android.util.AttributeSet;
import android.view.MotionEvent;
import android.view.View;

public class DrawView2 extends View{

	private Context context;

	private float CircleX = 100;
	private float CircleY = 100;
	private float CircleR = 10;

	public DrawView2(Context context, AttributeSet attrs) {
		super(context, attrs);
		this.context = context;
	}

	@Override
	public void onDraw(Canvas canves){
		Paint paint = new Paint();

		paint.setColor(Color.BLUE);
		canves.drawCircle(CircleX, CircleY, CircleR, paint);
	}

	@Override
	public boolean onTouchEvent(MotionEvent motionevent){

		CircleX  = motionevent.getX();
		CircleY  = motionevent.getY();
		this.invalidate();

		return true;

	}


}
還有xml布局文件:
這樣我們的第二個教程也就先到這裡了,這次的主題不是這個ontouch方法,而是要告訴大家,自定義控件的核心是重寫這些方法,並添加所需要的邏輯,View的方法不多也不少,我就用這個例子給大家拋磚引玉一下,希望大家在自定義自己的控件並選擇了繼承View這條路時,要花時間去了解和理解這些方法的重寫方法,這是十分重要的。 下次再給大家介紹一下如果自定義的View需要有自定義的屬性我們該如何處理,下一講也將會是這個系列完結篇了,因為自定義View之路還有很遠,我也沒有舉一些很難的例子,我認為基礎知識只有這些,學習了這些之後自定義控件的基礎也就講完了,剩下的是大家在基礎之上發揮了!之後如果有比較好的例子我還會繼續補充的。
源碼我會在下次一並發給大家鏈接的,希望大家能學到一些東西~
另外我也是學生,如果有寫的不好或者有錯誤的地方還請大家多多指教,謝謝!
 Android深入淺出自定義控件(二)
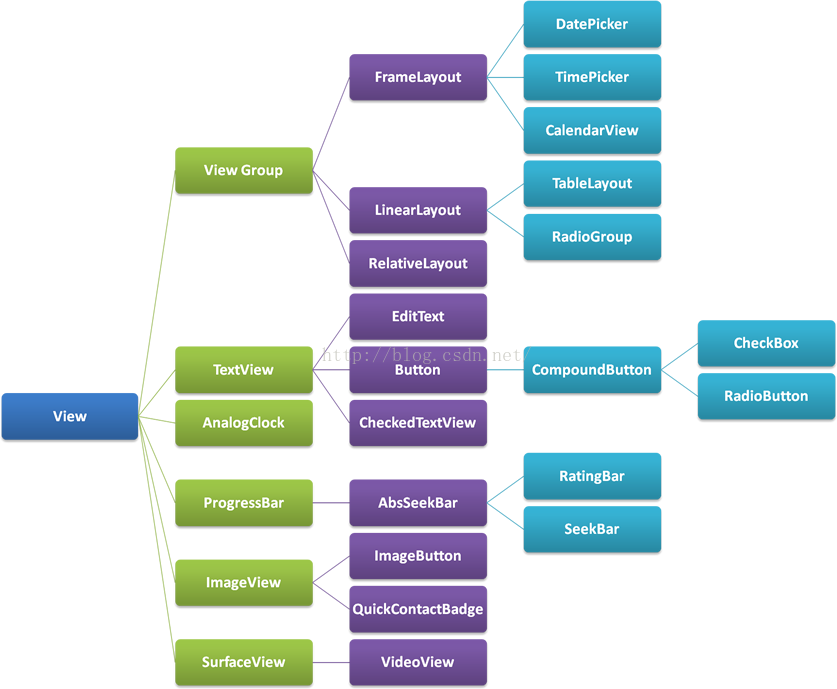
什麼是ViewGroup?在Android的樹狀結構圖中,ViewGroup類衍生出我們所熟悉的LinearLayout、RelativeLayout等布局:
 Activity啟動模式launchMode
今天要講得是Activity的四種啟動模式launchMode屬性,該屬性用於配置該Activity的加載模式,該屬性支持以下4個屬性值。standard:標准模式,也是
 android:windowSoftInputMode屬性詳解
在前面的一篇文章中,簡單的介紹了一下如何實現軟鍵盤不自動彈出,使用的方法是設置android:windowSoftInputMode屬性。那麼,這個屬性到底是干什麼的,他
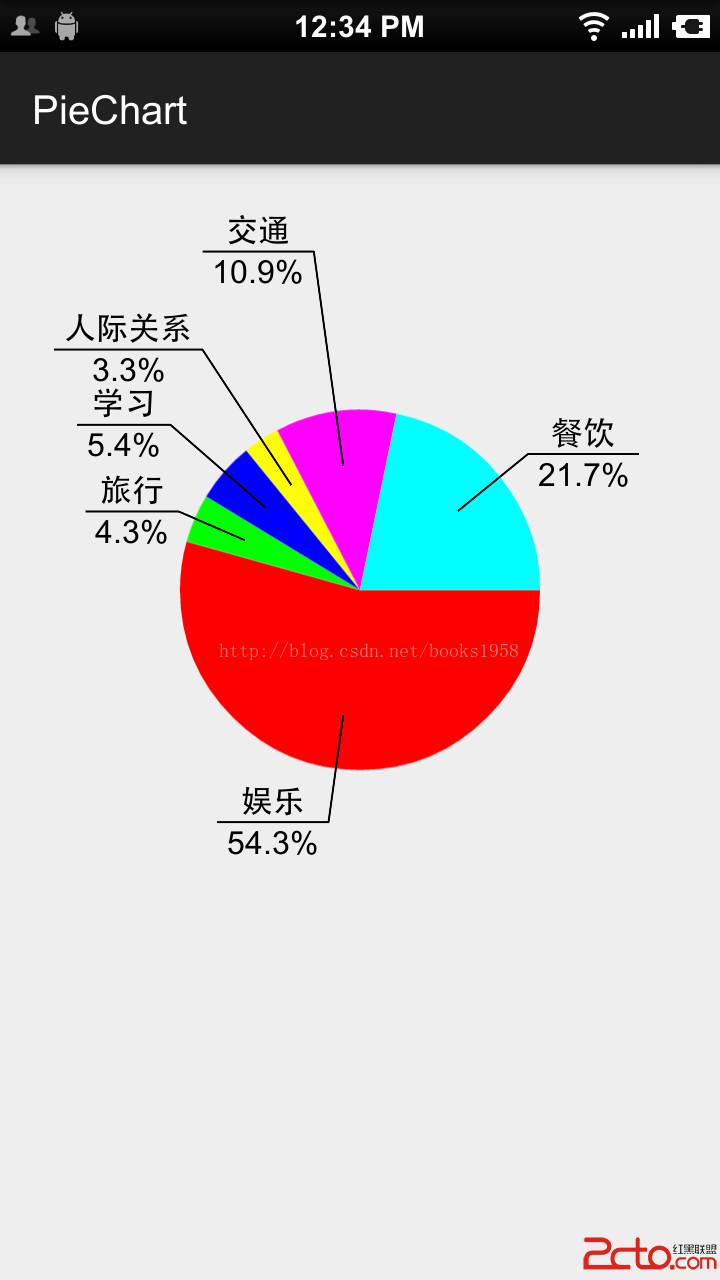 Android:使用canvas繪制餅狀統計圖(自動適應條目數量/大小)
本例的目的是實現一個簡單的餅狀統計圖,效果如下: 特點: 1.使用非常方便,可放在xml布局文件中,然後在代碼中設置內容,即: PieChartVie