編輯:關於Android編程
Android Wear 數據同步機制總結
當手機與手表建立藍牙連接之後,數據就可以通過Google Play Service進行傳輸。
同步數據對象Data Item
DataItem提供手機與手表數據存儲的自動同步,一個DataItem對象由其創建者與路徑組成的URI所確定。一個DataItem對象為手機和手表提供了一個數據通路,開發者通過改變指定的DataItem實現手機和手表的數據自動同步。
訪問數據層API
DataItem可以提供手機和手表數據的保存,改變該對象的操作則依賴數據層API(the Data Layer APIs),也就是說,在改變DataItem數據之前,需要先訪問數據層,獲得一個GoogleApiClient實例,從而能夠使用數據層API。
下面是實例化GoogleApiClient的代碼
GoogleApiClient mGoogleAppiClient = new GoogleApiClient.Builder(this)
        .addConnectionCallbacks(new ConnectionCallbacks() {
               @Override
               public void onConnected(Bundle connectionHint) {
                   Log.d(TAG, "onConnected: " + connectionHint);
                   // Now you canuse the data layer API
               }
               @Override
               public void onConnectionSuspended(int cause) {
                   Log.d(TAG, "onConnectionSuspended: " + cause);
               }
        })
        .addOnConnectionFailedListener(new OnConnectionFailedListener() {
               @Override
               public void onConnectionFailed(ConnectionResult result) {
                   Log.d(TAG, "onConnectionFailed: " + result);
               }
            })
        .addApi(Wearable.API)
        .build();
在使用數據層Api的之前,需要先調用connect()方法,如果成功則會回調onConnected()方法,否則回調onConnectionFailed()。
同步DataItems
GoogleApiClient連接成功後,就可以通過DataItem進行數據同步了。
一個DataItem包括連個部分,一個是Payload,這是一個字節數組,可以通過序列化或者反序列化保存需要的數據類型和對象;另一個是Path,這是一個唯一的字符串,由反斜槓開頭,區別不同的DataItem。
通常在開發過程中是使用DataMap類實現DataItem接口,類似Bundle鍵值對的存儲方式。
下面是使用的DataMap步驟:
1、 創建PutDataMapRequest對象,為DataItem設置path值;
2、 使用put…()方法為DataMap設置需要的數據;
3、 調用PutDataMapRequest.asPutDataRequest()創建PutDataRequest對象;
4、 調用DataApi.putDataItem()請求系統創建DataItem。
如果此時手機和手表沒有建立連接,則會將數據保存在Buffer中,等下次連接後會發送到另一方。
下面是使用DataMap創建DataItem的方法
PutDataMapRequest dataMap = PutDataMapRequest.create("/count");
dataMap.getDataMap().putInt(COUNT_KEY, count++);
PutDataRequest request = dataMap.asPutDataRequest();
PendingResult pendingResult = Wearable.DataApi
        .putDataItem(mGoogleApiClient, request);
監聽數據層事件
由於數據層同步或發送的數據連接手機和手表,所以經常需要獲知何時DataItem被創建以及手機與手表什麼時候連接或斷開等事件。
監聽數據層時間可以使用兩種方式,一種是繼承WearableListenerService,一種是在Activity中實現DataApi.DataListener。無論使用兩種方式的哪種,可以重寫其需要的回調方法執行相應的操作。
1、 使用WearableListenerService
該service在手機和手表端都可以使用,如果在一方不需要監聽數據層時間可以不適用該服務。
例如,可以在手機端接收和設置DataItem,然後在手表端實現該服務,監聽數據層的事件,從而修改手表的UI。
WearableListenerService提供回調接口onDataChanged()處理DataItem的變化,當DataItem被創建、更改或刪除,手機和手表的該事件將被觸發。
下面是使用WearableListenerService的方法
1、 創建一個類繼承WearableListenerService;
2、 監聽需要的事件,如onDataChanged();
3、 在配置文件中聲明一個intentfilter通知系統監聽WearableListenerService,這樣在系統需要的時候就會綁定WearableListenerService。
下面代碼是一個簡單的WearableListenerService實現。
public class DataLayerListenerService extends WearableListenerService {

    private static final String TAG = "DataLayerSample";
    private static final String START_ACTIVITY_PATH = "/start-activity";
    private static final String DATA_ITEM_RECEIVED_PATH = "/data-item-received";

    @Override
    public void onDataChanged(DataEventBuffer dataEvents) {
        if (Log.isLoggable(TAG, Log.DEBUG)) {
            Log.d(TAG, "onDataChanged: " + dataEvents);
        }
        final List events = FreezableUtils
                .freezeIterable(dataEvents);

        GoogleApiClient googleApiClient = new GoogleApiClient.Builder(this)
                .addApi(Wearable.API)
                .build();

        ConnectionResult connectionResult =
                googleApiClient.blockingConnect(30, TimeUnit.SECONDS);

        if (!connectionResult.isSuccess()) {
            Log.e(TAG, "Failed to connect to GoogleApiClient.");
            return;
        }

        // Loop through the events and send a message
        / to the node that created the data item.
        for (DataEvent event : events) {
            Uri uri = event.getDataItem().getUri();

            // Get the node id from the host value of the URI
            String nodeId = uri.getHost();
            // Set the data of the message to be the bytes of the URI.
            byte[] payload = uri.toString().getBytes();

            // Send the RPC
            Wearable.MessageApi.sendMessage(googleApiClient, nodeId,
                    DATA_ITEM_RECEIVED_PATH, payload);
        }
    }
}
下面代碼是配置文件中聲明的intentfilter
使用DataApi.DataListener監聽數據層
如果不需要後台長時間進行監聽,可以使用DataApi.DataListener進行監聽,下面是使用該方式的方法。
1、 使用DataApi.DataListener接口
2、 在onCreate中創建 GoogleApiClient,訪問數據層API
3、 在onStart中調用connect()連接Google PlayService
4、 但連接上GooglePlay Service後,系統調用onConnected(),通知Google Play service該activity監聽數據層事件
5、 在onStop中調用DataApi.removeListener()
6、 實現 onDataChanged()回調
下面是使用DataApi.DataListener監聽數據層事件的代碼
public class MainActivity extends Activity implements
        DataApi.DataListener, ConnectionCallbacks, OnConnectionFailedListener {

    @Override
    protected void onCreate(Bundle savedInstanceState) {
        super.onCreate(savedInstanceState);

        setContentView(R.layout.main);
        mGoogleApiClient = new GoogleApiClient.Builder(this)
                .addApi(Wearable.API)
                .addConnectionCallbacks(this)
                .addOnConnectionFailedListener(this)
                .build();
    }

    @Override
    protected void onStart() {
        super.onStart();
        if (!mResolvingError) {
            mGoogleApiClient.connect();
        }
    }

   @Override
    public void onConnected(Bundle connectionHint) {
        if (Log.isLoggable(TAG, Log.DEBUG)) {
            Log.d(TAG, "Connected to Google Api Service");
        }
        Wearable.DataApi.addListener(mGoogleApiClient, this);
    }

    @Override
    protected void onStop() {
        if (null != mGoogleApiClient && mGoogleApiClient.isConnected()) {
            Wearable.DataApi.removeListener(mGoogleApiClient, this);
            mGoogleApiClient.disconnect();
        }
        super.onStop();
    }

    @Override
    public void onDataChanged(DataEventBuffer dataEvents) {
        for (DataEvent event : dataEvents) {
            if (event.getType() == DataEvent.TYPE_DELETED) {
                Log.d(TAG, "DataItem deleted: " +        event.getDataItem().getUri());
            } else if (event.getType() == DataEvent.TYPE_CHANGED) {
                 Log.d(TAG, "DataItem changed: " + event.getDataItem().getUri());
            }
        }
    }
獲取手機通知大家的服務
Android提供了一個服務類接口NotificationListenerService,繼承該服務,可以獲取手機中應用發起的通知,在配置文件中需要添加如下聲明和權限
這樣在系統設置中會出現一個是否允許該服務捕獲通知的選項,在設置--安全與隱私--通知讀取權限
該服務有兩個抽象方法需要實現,分別是當有通知發起與通知被銷毀,都會觸發其回調方法。
public class NotificationCollectorService extends NotificationListenerService {

    @Override
    public void onNotificationPosted(StatusBarNotification sbn) {
    }
    @Override
    public void onNotificationRemoved(StatusBarNotification sbn) {
    }
}
也就是說當系統發現某應用產生通知或者用戶刪除某通知,都會回調該服務的這兩個函數,函數的參數StatusBarNotification包含著該通知的具體信息。
如果是在Android Wear開發中,使用該方法捕獲手機的通知,然後同步到手表中,就是使用該服務進行的中轉。
通知同步
接收到的通知以StatusBarNotification對象形式傳遞給回調函數onNotificationPosted(),
調用StatusBarNotification對象的公共方法,分別取出StatusBarNotification中的PackageName、Tag、Id、notification對象和PostTime,通過這些值去創建DataItem。
 Android群英傳筆記——第十章:Android性能優化
隨著Android應用增多,功能越來越復雜,布局也越來越豐富了,而這些也成為了阻礙一個應用流暢運行,因此,對復雜的功能進行性能優化是創造高質量應用的基礎,本
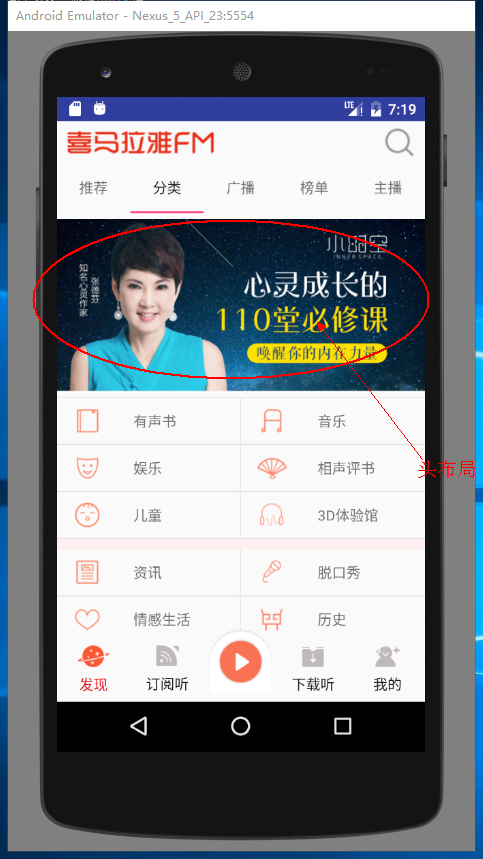 Android ListView添加頭布局和腳布局實例詳解
Android ListView添加頭布局和腳布局之前學習喜馬拉雅的時候做的一個小Demo,貼出來,供大家學習參考;如果我們當前的頁面有多個接口、多種布局的話,我們一般的
 AIDL/IPC Android AIDL/IPC 進程通信機制——超詳細講解及用法案例剖析(播放器)
首先引申下AIDL,什麼是AIDL呢?IPC? ------ Designing a Remote Interface Using AIDL 通常情況下,我們在同一進程內
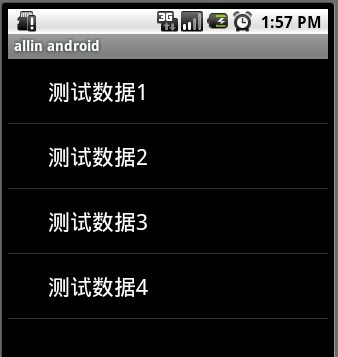 關於ListView的總結
關於ListView網上也有許多的介紹,我選了一些結合到了一起,僅供參考。在android開發中ListView是比較常用的組件官方API地址:http://www.an