編輯:關於Android編程
要理解原理, read the fucking source
HandlerThread是android系統提供的類,繼承Thread,是一個線程。請看run方法。
     public void run() {
        mTid = Process.myTid();
        Looper.prepare();// #1
        synchronized (this) {
            mLooper = Looper.myLooper();// #2
            notifyAll();
        }
        Process.setThreadPriority(mPriority);
        onLooperPrepared();
        Looper.loop();// #3
        mTid = -1;
    }
在代碼段的第1個標示中,是調用了Looper的prepare方法。
     private static void prepare(boolean quitAllowed) {
        if (sThreadLocal.get() != null) {
            throw new RuntimeException("Only one Looper may be created per thread");
        }
        sThreadLocal.set(new Looper(quitAllowed));// #4
    }
在代碼段的第4個標示中,將Looper實例存放在線程局部變量ThreadLocal中,將Looper和當前線程綁定。
在代碼段的第2個標示中,獲取了與當前線程綁定的Looper實例,當前線程就擁有了Looper實例。
在代碼段的第3個標示中,調用了Looper的loop()方法,loop()方法代碼:
    /**
     * Run the message queue in this thread. Be sure to call
     * {@link #quit()} to end the loop.
     */
    public static void loop() {
        final Looper me = myLooper();
        if (me == null) {
            throw new RuntimeException("No Looper; Looper.prepare() wasn't called on this thread.");
        }
        final MessageQueue queue = me.mQueue;

        // Make sure the identity of this thread is that of the local process,
        // and keep track of what that identity token actually is.
        Binder.clearCallingIdentity();
        final long ident = Binder.clearCallingIdentity();

        for (;;) {
            Message msg = queue.next(); // might block
            if (msg == null) {
                // No message indicates that the message queue is quitting.
                return;
            }

            // This must be in a local variable, in case a UI event sets the logger
            Printer logging = me.mLogging;
            if (logging != null) {
                logging.println(">>>>> Dispatching to " + msg.target + " " +
                        msg.callback + ": " + msg.what);
            }

            msg.target.dispatchMessage(msg);

            if (logging != null) {
                logging.println("<<<<< Finished to " + msg.target + " " + msg.callback);
            }

            // Make sure that during the course of dispatching the
            // identity of the thread wasn't corrupted.
            final long newIdent = Binder.clearCallingIdentity();
            if (ident != newIdent) {
                Log.wtf(TAG, "Thread identity changed from 0x"
                        + Long.toHexString(ident) + " to 0x"
                        + Long.toHexString(newIdent) + " while dispatching to "
                        + msg.target.getClass().getName() + " "
                        + msg.callback + " what=" + msg.what);
            }

            msg.recycle();
        }
    }
loop()方法的作用是:從Looper中獲取MessageQueue隊列,再從MessageQueue中取出Message,通過Handler發送出去,直到取完。或許有人會問,Message取完之後,在哪裡喚醒該線程,然後繼續循環獲取Message呢?沒錯,是在調用Handler的sendMessage後,向MessageQueue中插入消息的時候喚醒,調用本地方法nativeWake(mPtr)。
最常見的是,我們都會在Activity中創建一個Handler對象,用於更新UI界面。
   private Handler handler = new Handler(){
        @Override
        public void handleMessage(Message msg)
        {
            // TODO Auto-generated method stub
            super.handleMessage(msg);
        }
    };
看看Handler的構造方法。
   public Handler() {
        this(null, false);
    }

   public Handler(Callback callback, boolean async) {
        if (FIND_POTENTIAL_LEAKS) {
            final Class klass = getClass();
            if ((klass.isAnonymousClass() || klass.isMemberClass() || klass.isLocalClass()) &&
                    (klass.getModifiers() & Modifier.STATIC) == 0) {
                Log.w(TAG, "The following Handler class should be static or leaks might occur: " +
                    klass.getCanonicalName());
            }
        }

        mLooper = Looper.myLooper();
        if (mLooper == null) {
            throw new RuntimeException(
                "Can't create handler inside thread that has not called Looper.prepare()");
        }
        mQueue = mLooper.mQueue;
        mCallback = callback;
        mAsynchronous = async;
    }
大家可以看到,在構造方法中,Handler已經擁有了當前線程的Looper實例、Looper對象的MessageQueue隊列。
說到這裡,大家應該也差不多明白了他們究竟是怎麼樣的關系,線程間是如何交換消息的了。Handler發送消息的方法,其實就是往MessageQueue隊列中插入消息。
 public boolean sendMessageAtTime(Message msg, long uptimeMillis) {
        MessageQueue queue = mQueue;
        if (queue == null) {
            RuntimeException e = new RuntimeException(
                    this + " sendMessageAtTime() called with no mQueue");
            Log.w("Looper", e.getMessage(), e);
            return false;
        }
        return enqueueMessage(queue, msg, uptimeMillis);
    }
而在調用了Handler的enqueueMessage方法時候會調用MessageQueue的enqueueMessage
final boolean enqueueMessage(Message msg, long when) {
        if (msg.isInUse()) {
            throw new AndroidRuntimeException(msg + " This message is already in use.");
        }
        if (msg.target == null) {
            throw new AndroidRuntimeException("Message must have a target.");
        }

        boolean needWake;
        synchronized (this) {
            if (mQuiting) {
                RuntimeException e = new RuntimeException(
                        msg.target + " sending message to a Handler on a dead thread");
                Log.w("MessageQueue", e.getMessage(), e);
                return false;
            }

            msg.when = when;
            Message p = mMessages;
            if (p == null || when == 0 || when < p.when) {
                // New head, wake up the event queue if blocked.
                msg.next = p;
                mMessages = msg;
                needWake = mBlocked;
            } else {
                // Inserted within the middle of the queue.  Usually we don't have to wake
                // up the event queue unless there is a barrier at the head of the queue
                // and the message is the earliest asynchronous message in the queue.
                needWake = mBlocked && p.target == null && msg.isAsynchronous();
                Message prev;
                for (;;) {
                    prev = p;
                    p = p.next;
                    if (p == null || when < p.when) {
                        break;
                    }
                    if (needWake && p.isAsynchronous()) {
                        needWake = false;
                    }
                }
                msg.next = p; // invariant: p == prev.next
                prev.next = msg;
            }
        }
        if (needWake) {
            nativeWake(mPtr);// #5
        }
        return true;
    }
在代碼片段標示5中,調用了nativeWake(mPtr)方法,該方法是本地方法,用於喚醒Thread線程。
參考資料:
android的消息隊列機制
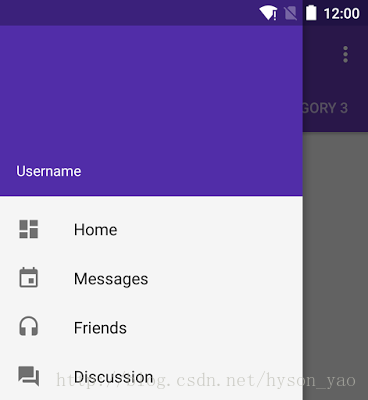 【Android】Android Design Support Library 的使用
Android 5.0 Lollipop 推出了 Material Design 安卓界面風格的設計理念並且給出了一個 Material Design 的兼容庫,庫中包含
 退出應用的第N+1種方法-一行代碼退出應用
前N種方法之前有在網上了解過退出應用的方法,其中包括在每個activity中注冊關閉界面的廣播接受者,當想推出應用時發一條廣播關閉所有的界面,最常用的使用list去模擬任
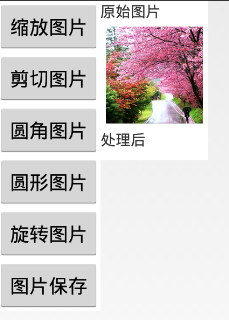 Android實現對圖片的縮放、剪切、旋轉、存儲
一、問題描述 在開發中,當我們需要的有一張大圖片同時還需要一些小圖片時,我們只需要通過代碼對此圖片進行不同比例的縮放即可,這樣大大節約資源,減小了安裝包的尺寸 。除縮
 Android 一個改善的okHttp封裝庫
一、概述之前寫了篇Android OkHttp完全解析 是時候來了解OkHttp了,其實主要是作為okhttp的普及文章,當然裡面也簡單封裝了工具類,沒想到