編輯:關於Android編程
package com.example.desktoptxt; import android.app.Activity; import android.content.Context; import android.content.Intent; import android.graphics.PixelFormat; import android.os.Bundle; import android.view.MotionEvent; import android.view.View; import android.view.View.OnClickListener; import android.view.WindowManager.LayoutParams; import android.view.WindowManager; import android.widget.Button; import android.widget.LinearLayout; import android.widget.TextView; import android.widget.Toast; /** * 實現桌面View * * 1)將要顯示在桌面的view,通過WindowManager.addView,掛在到WindowManager下; 要注意,WindowManager對象來源,源碼裡解釋。 * 並且配置好view的WindowManager.LayoutParams * 1-1)WindowManager.LayoutParams.type 設置為 WindowManager.LayoutParams.TYPE_SYSTEM_OVERLAY;時, * 桌面UI不可以直接setOnClickListener(),該View的onTouchEvent()函數也無效了 * 設置為WindowManager.LayoutParams.TYPE_SYSTEM_ALERT(2003)或者WindowManager.LayoutParams.TYPE_PHONE2002才有效。 * 1-2)WindowManager.LayoutParams.flag 設置為LayoutParams.FLAG_NOT_TOUCH_MODAL | LayoutParams.FLAG_NOT_FOCUSABLE * 如果設置了WindowManager.LayoutParams.type為2002,2003;那麼flag不設置為這兩個flag的話,那麼其他組件就無法獲得touch和focus事件了。 * 設置了該兩個屬性之後就大家都可以獲得Touch和Focus事件 * * 2)androidManifest裡申明權限 ** * * @author jiese1990 * */ public class MainActivity extends Activity { @Override protected void onCreate(Bundle savedInstanceState) { super.onCreate(savedInstanceState); setContentView(R.layout.activity_main); TextView tv = new TextView(this); tv.setText("this is a desktop text"); tv.setTextColor(0xFFFF0000); tv.setOnClickListener(new OnClickListener() { @Override public void onClick(View v) { Toast.makeText(MainActivity.this, "click", Toast.LENGTH_SHORT).show(); } }); tv.setBackgroundColor(0xFF00000); initDestopText(tv); } private void initDestopText(View childView){ //直接通過Activity獲取的 WindowManager,在act退出時,桌面組件也將退出。 // WindowManager wm = (WindowManager)getSystemService(WINDOW_SERVICE); //一定要通過getApplicationContext()獲取WindowManager,這種情況下,當Application終止後,懸浮控件才會被退出 WindowManager wm = (WindowManager)getApplicationContext().getSystemService(WINDOW_SERVICE); WindowManager.LayoutParams params = new WindowManager.LayoutParams(); // params.type = WindowManager.LayoutParams.TYPE_SYSTEM_OVERLAY; //如果設置為 params.type = WindowManager.LayoutParams.TYPE_PHONE; // params.flags = LayoutParams.FLAG_NOT_TOUCH_MODAL | LayoutParams.FLAG_NOT_FOCUSABLE; params.width = WindowManager.LayoutParams.WRAP_CONTENT; params.height = WindowManager.LayoutParams.WRAP_CONTENT; wm.addView(childView, params); } }
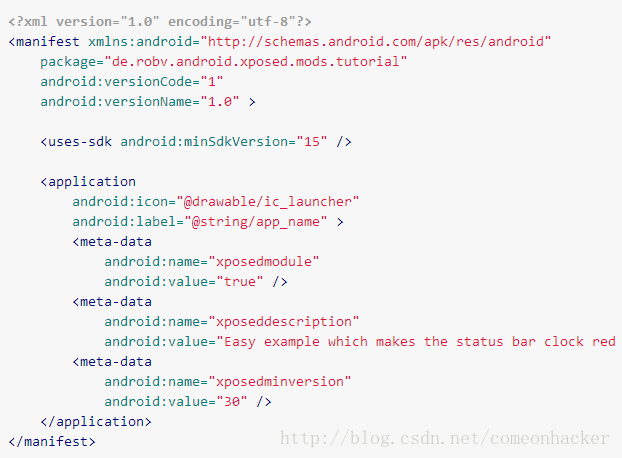 Xpoded模塊開發教程
當然,你可以去學習如何創建一個Xposed模塊。所以你可以閱讀這篇教程(官方教程)去學習怎樣解決這個問題。這不僅僅講解如何新建模塊、如何編寫模塊,我們要往更深處思考,為什
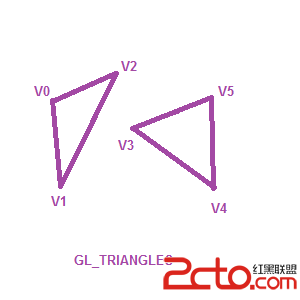 Android OpenGL ES 畫球體
最近因為興趣所向,開始學習OpenGL繪圖。本文以“畫球體”為點,小結一下最近所學。 初識OpenGL ES 接觸OpenGL是從Android開始的。眾所周知,A
 Android通知Notification詳解
Notification的使用大體步驟:1、 獲取狀態通知欄管理2、 實例化通知欄構造器3、 設置NotificationCompat.Builder4、 設置Pendi
 android與fragment交互,fragment顯示unity3d視圖。
這兩天剛剛接觸Unity3d,之前一直是做android開發,對於Unity3d的開發有專門的人才,我主要涉及在Unity3d與android的交互,經過兩天是實驗終於完