編輯:關於Android編程
今天我們來學習怎麼使用 Apache 為android提供的網絡通信接口,如果要使用http協議,就需要使用 HttpClient。
使用HttpClient要比使用 HttpURLConnection更簡單一些,我們來看看代碼:
調用:
		mBtnGet.setOnClickListener(new View.OnClickListener() {
			@Override
			public void onClick(View v) {
				Bitmap picture = getNetPicture(http://192.168.1.19:8080/Web1/img.jpg);
				if (null != picture) {
					mImg.setImageBitmap(picture);
				}
			}
		});
方法:
	private Bitmap getNetPicture(String imgUrl) {
		Bitmap img = null;
		HttpClient client = null;
		HttpGet request = null;
		HttpResponse response = null;

		try {
			request = new HttpGet(imgUrl);
			client = new DefaultHttpClient();
			client.getParams().setParameter(
					CoreConnectionPNames.CONNECTION_TIMEOUT, 1000 * 5); // 鏈接超時
			client.getParams().setParameter(CoreConnectionPNames.SO_TIMEOUT,1000 * 5); // 讀取超時
			response = client.execute(request);
			if (response.getStatusLine().getStatusCode() == HttpStatus.SC_OK) {
				InputStream is = response.getEntity().getContent();
                                //如果是返回得字符串,可以直接用 EntityUtils來處理
                                //EntityUtils.toString(response.getEntity());
				img = BitmapFactory.decodeStream(is);
			} else {
				showToast(get獲取網絡圖片失敗!);
			}
		} catch (ClientProtocolException e) {
			e.printStackTrace();
			showToast(e.getMessage());
		} catch (IOException e) {
			e.printStackTrace();
			showToast(e.getMessage());
		}
		return img;
	}
使用get方法比較簡單,如果要添加參數可以直接在url後面添加 ?par=???&par2=??? 來設置參數。這裡我們請求本地服務器上的一張圖片,沒有設置參數。
使用步驟:
(1)得到一個 HttpClient 對象 ,使用 HttpClient client = new DefaultHttpClient() ; 獲得
(2)設置超時參數(最好是設置,不然如果沒有訪到會等很久)
(3)new 一個 HttpGet 對象,並將url附給它。 HttpGet request = new HttpGet(url);
(4)獲得響應對象: HttpResponse response = client.excute(request);
(5)判斷 response的狀態碼是否成功,如果成功就可以進一步獲得流對象。 response.getEntiry().getContent() 來獲取流對象,拿到流之後,就可以想干什麼就干什麼了。
調用:
		mBtnPost.setOnClickListener(new View.OnClickListener() {
			@Override
			public void onClick(View v) {
				String content = getNetHtml(http://192.168.1.19:8080/Web1/login3.jsp);
				mTv.setText(content!=null ? content:獲取html失敗!);
			}
		});
方法:
	private String getNetHtml(String url){
		HttpClient client = null;
		HttpPost request = null;
		HttpResponse response = null;
		String data = null;

		client = new DefaultHttpClient();
		request = new HttpPost(url);
		List params = new ArrayList();
		params.add(new BasicNameValuePair(par, Httpclinet_android_post));
		try {
			HttpEntity entity = new UrlEncodedFormEntity(params, gb2312);
			request.setEntity(entity);
			client.getParams().setParameter(CoreConnectionPNames.CONNECTION_TIMEOUT, 1000*5);
			client.getParams().setParameter(CoreConnectionPNames.SO_TIMEOUT, 1000*5);
			response = client.execute(request);
			if(HttpStatus.SC_OK == response.getStatusLine().getStatusCode()){
				data = EntityUtils.toString(response.getEntity());
			}
			else{

			}
		} catch (ClientProtocolException e) {
			e.printStackTrace();
			showToast(+e.getMessage());
		} catch (IOException e) {
			e.printStackTrace();
			showToast(+e.getMessage());
		}
		return data;
	}
使用步驟:
相比於get方法,post方法總是要先設置一些參數,所以要復雜一點,不過也很簡單的啦。
(1)獲得HttpClient對象,設置超時。。。
(2)獲得 HttpPost對象,並將 url傳入。
(3)設置要傳遞的參數。post方法中使用到了 NameValuePair 來給Post請求設置參數。這是設置一個參數 par, 值為: Httpclient_android_post
Listparams = new ArrayList (); params.add(new BasicNameValuePair(par, Httpclinet_android_post)); HttpEntity entity = new UrlEncodedFormEntity(params, gb2312);request.setEntity(entity);
(4)接下來的步驟就和get一樣了。
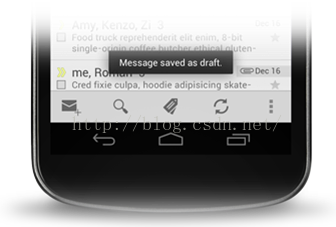
運行效果:
 跟我學Android之十 對話框
本章內容 第1節 Toast提示框 第2節 AlertDialog對話框 第3節 特色對話框 第4節 自定義對話框本章目標 熟練掌握Toast的用法。 熟練掌握Dialo
 開發首屏廣告(Android)簡述
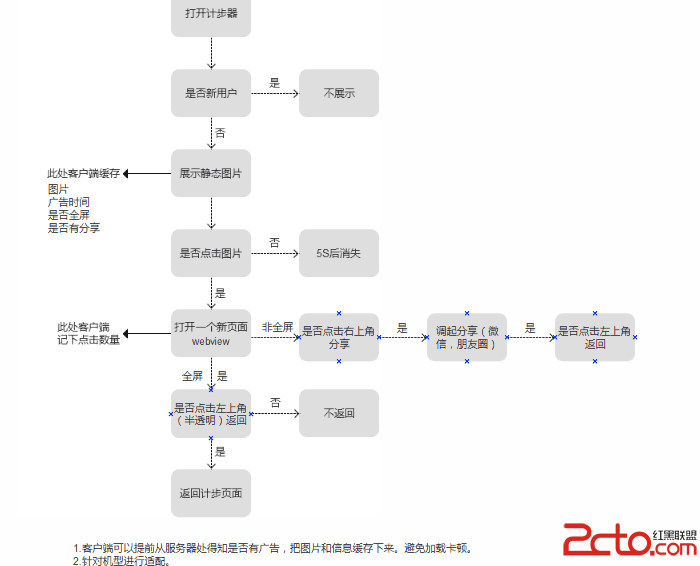
作為一個成熟的應用, 必須要有廣告. 那麼, 如何優雅地開發廣告呢? 需要注意一些細節.本文提供一個簡單的示例, 代碼僅供參考.需求:1. 下載廣告在歡迎頁面中, 啟動一
 Android學習之SQL基礎使用
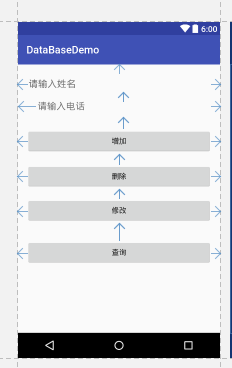
SQLITE 構化查詢語言 (Structured Query Language)是什麼SQLite是一個輕量型的數據庫。怎麼樣輕量級 : SQLite數據庫是一個輕量級
 Volley 源碼解析(一)
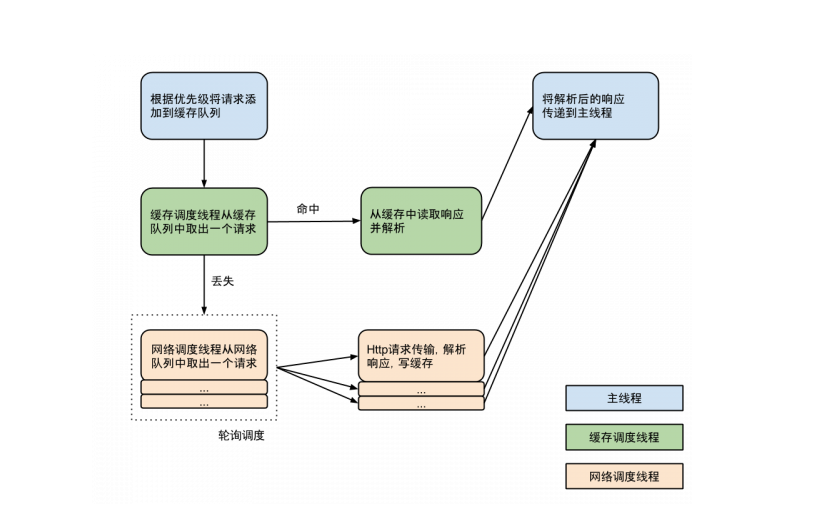
心情來這家公司也有差不多一年的時間了,項目中網絡請求部分用到的是Volley,之前都是從別人的博客中了解Volley的用法和他的工作原理。如今項目也寫的差不多了,回想起來