編輯:關於Android編程
但是為了驗證學習每一種效果,會非常沒必要,而且特別繁瑣。
現在介紹的是兩種管理方法:
一 通過手工的將 Activity 信息添加到一個ActivityManager中,然後在啟動Activity將注冊的Activity信息,填充到一個ListView中。
主要有兩個類。
ActivityManager, ActivityManager$ActivityInfo.
代碼:
/**
 * Created by mjz on 14-12-20.
 */
public class ActivityManager {
    private static ActivityManager single = new ActivityManager();
    private List liAct;

    private ActivityManager() {
        liAct = new ArrayList();
        register();

    }

    public static ActivityManager getInstance() {
        return single;
    }

    private void register() {
        add(com.majunzhe.demos.te_and1.MainActivity.class,
                com.majunzhe.demos.te_and1.MainActivity.class.getName());
        add(MainActivity.class, MainActivity.class.getName());
        add(MyTabActivity.class, Bottom tabs);
        add(AnimMainActivity.class, Animation);
        add(Arcs.class, Arcs);
        add(Sweep.class, Sweep);
        add(Game.class, Game);
        add(TeDemos.class, Entry Manager);
    }

    public void add(Class act, String tag) {
        ActivityInfo actInfo = new ActivityInfo(act, tag);
        liAct.add(actInfo);
    }

    public ActivityInfo get(int index) {
        return liAct.get(index);
    }

    public void remove(ActivityInfo act) {
        liAct.remove(act);
    }

    public List getAll() {
        return liAct;
    }

    public static class ActivityInfo {
        String mTag;
        Class act;

        public ActivityInfo(Class act, String tag) {
            this.act = act;
            this.mTag = tag;
        }

        public Activity getActivity() {
            return null;
        }

        public String getTag() {
            return mTag;
        }

        public void start(Activity home) {
            Intent intent = new Intent();
            intent.setClass(home, act);
            home.startActivity(intent);
        }

        @Override
        public String toString() {
            return mTag;
        }
    }
}
二 這個方法是在看 android apidemos是看到的,覺得較為方便,就重新實現了一遍。
在manifest文件中聲明activity時,給每個activity添加一個android:label,將這個label做為路徑,分類添加到listview中。
例如:
有四個acitvity,label分別是 a/b/c, a/d, e, f/g, h/i/j/k。
那麼當我們打開啟動Acitvity時,界面會顯示
a
e
f
h
,
當點擊 item a時,只會顯示b,然後點擊b,顯示c,點擊c,打開一個Activity。
我們遍歷到的activity是通過給每個要啟動的activity添加一個intent-filter來獲取到的。
下面是主類的代碼:
/**
 * Created by mjz on 15-1-10.
 */
public class TeDemos extends Activity {

    final static String TAG = TeDemos;
    final static String PACKAGE_PATH = com.majunzhe.Path;
    private String mCurPath;

    @Override
    protected void onCreate(Bundle savedInstanceState) {

        super.onCreate(savedInstanceState);
        setContentView(R.layout.activity_home);

        mCurPath = getIntent().getStringExtra(PACKAGE_PATH);
        mCurPath = mCurPath == null ?  : mCurPath;

        ListView liView = (ListView) findViewById(R.id.entry_container);
        SimpleAdapter adapter = new MyAdapter(this, getData(), R.layout.entry_list_item,
                new String[]{title}, new int[]{R.id.entry_tv});
        liView.setAdapter(adapter);
        liView.setOnItemClickListener(listener);
    }


    private List getData() {
        List datas = new ArrayList>();

        Intent intent = new Intent(IntentAction.DEMO_ACTION, null);
        intent.addCategory(Intent.CATEGORY_SAMPLE_CODE);
        PackageManager pm = getPackageManager();
        List liInfo = pm.queryIntentActivities(intent, 0);

        Log.i(TAG, getData() +mCurPath);
        if (null == liInfo) {
            return datas;
        }

        Map entries = new HashMap();

        for (int i = 0; i < liInfo.size(); ++i) {
            ResolveInfo info = liInfo.get(i);
            String label = info.loadLabel(pm).toString();
            if (false == label.startsWith(mCurPath)) {
                continue;
            }
            String paths[] = label.replace(mCurPath, ).split(/);
            String nextLabel = paths[0];

            if (paths.length == 1) {
                addItem(datas, nextLabel, activityIntent(info.activityInfo.packageName, info.activityInfo.name));
            } else if (entries.get(nextLabel) == null) {
                entries.put(nextLabel, true);
                addItem(datas, nextLabel, browseIntent(mCurPath +/+ nextLabel+/));
            }
        }
        return datas;
    }

    private void addItem(List datas, String name, Intent intent) {
        Map map = new HashMap();
        map.put(title, name);
        map.put(intent, intent);
        datas.add(map);
    }

    private Intent activityIntent(String pkg, String cls) {
        Intent intent = new Intent();
        intent.setClassName(pkg, cls);
        return intent;
    }

    private Intent browseIntent(String path) {
        if(path.startsWith(/)){
            path = path.substring(1);
        }
        Intent intent = new Intent();
        intent.setClass(this, TeDemos.class);
        intent.putExtra(PACKAGE_PATH, path);
        return intent;
    }

    class MyAdapter extends SimpleAdapter {
        public MyAdapter(Context context, List> data, int resource, String[] from, int[] to) {
            super(context, data, resource, from, to);
        }
    }

    private AdapterView.OnItemClickListener listener = new AdapterView.OnItemClickListener() {
        @Override
        public void onItemClick(AdapterView parent, View view, int position, long id) {
            Map map = (Map)parent.getItemAtPosition(position);
            Intent intent = (Intent)map.get(intent);
            startActivity(intent);
        }
    };
}
 qq厘米秀故事卡有什麼用|qq厘米秀故事卡怎麼集齊解鎖
QQ厘米秀是騰訊手機QQ推出的全新功能玩法,厘米秀添加了讓人眼前一亮的人物動作互動功能,用戶可以通過手機QQ厘米秀的窗口與好友互動。還有一個故事卡線索功能,
 Android GPS獲取當前經緯度坐標
APP中可能會遇到一種需求,就是將當前所在位置的坐標傳到服務器上,今天我提供三種途徑去獲取經緯度坐標信息,第一種是通過Android API來實現,第二種通過百度地圖AP
 基於Opencv的Android圖像處理(Eclipse和ndk)
前段時間做了一個失敗的圖像處理項目,結果雖然不太好,也學到了不少東西,其中關於在Eclipse裡如何使用opencv的圖片處理api折騰了一陣子,記錄一下:1、Andro
 Android應用開發工程目錄作用介紹
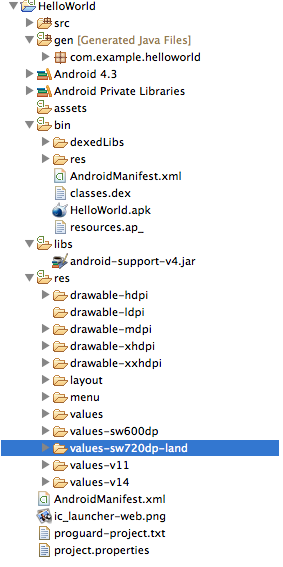
1、src:java源碼文件,自己寫的。2、gen:自動生成的java文件,包名與主包名一致,ADT裡自動生成的。(1)BuildConfig:配置文件,不能更改(2)R