編輯:關於Android編程
android中,很多地方在提到布局優化都會提到使用ViewStub.可能很多人都只是用她,而沒有去看看ViewStub到底是個什麼東西,器特殊的功能是如何實現的!這裡,我來解析一下我們的ViewStub.
打開ViewStub.java,你會發現其實ViewStub就是一個view的子類,和其他framework的java文件一樣,google都給了一個說明.其實通過這個說明,你基本就知道ViewStub的屬性和使用方法來.這裡我就通過她的說明開始入手.
下面我們來看第一段原文說明:
 * A ViewStub is an invisible, zero-sized View that can be used to lazily inflate
 * layout resources at runtime.
這一句英文說明指出來ViewStub的幾乎所有特點:(1)不可見的(invisible);(2)沒有大小的(zero-sized);(3)能夠用於在運行時候延遲加載的.下面來看看,她是如何實現這三個特點的!
(1)不可見的(invisible): 在初始化ViewStub的時候,構造函數就會調用這個方法:initialize,來把這個view(ViewStub)設置為GONE,請看如下源碼:
    private void initialize(Context context) {
        mContext = context;
        setVisibility(GONE);
        setWillNotDraw(true);
    }
setVisibility(GONE);就時把這個view設置成GONE,也就是說我們這個ViewStub默認情況下就是會被初始化成一個GONE的view,這樣以來在布局文件加載的時候,這個ViewStub被視為不可見的!
此外還調用了這個方法:setWillNotDraw(true);這樣一來,該view的onDraw就不會執行!
其實,我個人認為:原文的說明:A ViewStub is an invisible,其實不僅僅是調用上面這兩個方法來實現的, 通過查看ViewStub這個類,你會發現,ViewStub來從寫來父類(view)的兩個方法draw和dispatchDraw以及onMeasure, 以此來覆蓋父類的這兩個方法.下面是ViewStub對方法draw和dispatchDraw以及onMeasure從寫的源碼:
    @Override
    protected void onMeasure(int widthMeasureSpec, int heightMeasureSpec) {
        setMeasuredDimension(0, 0);
    }

    @Override
    public void draw(Canvas canvas) {
    }

    @Override
    protected void dispatchDraw(Canvas canvas) {
    }
看了上面代碼,你肯定會吃驚,draw和dispatchDraw都是什麼也不做! 並且onMeasure還什麼也不做,直接setMeasuredDimension(0, 0);來把view區域設置位0. 看到這幾行源碼你就不得不明白,原來一個ViewStub雖然是一個view,卻是一個沒有任何顯示內容,也不顯示任何內容的特殊view,並且對layout在加載時候不可見的.
原文的說明還有最後一段:lazily inflate layout resources at runtime. 延遲inflate? 在運行的時候?
來看看接下來的一段說明:
 * When a ViewStub is made visible, or when {@link #inflate()}  is invoked, the layout resource
 * is inflated. The ViewStub then replaces itself in its parent with the inflated View or Views.
 * Therefore, the ViewStub exists in the view hierarchy until {@link #setVisibility(int)} or
 * {@link #inflate()} is invoked.
上面的大意是: 當把這個ViewStub設置為visible,或者調用inflate()的時候,這個ViewStubde 的layout就會inflated,並且用inflated出的view替換原來ViewStub在整個布局的位置.
說起來有點復雜,我們來看看下面的源碼:
    public void setVisibility(int visibility) {
        if (mInflatedViewRef != null) {
            View view = mInflatedViewRef.get();
            if (view != null) {
                view.setVisibility(visibility);
            } else {
                throw new IllegalStateException("setVisibility called on un-referenced view");
            }
        } else {
            super.setVisibility(visibility);
            if (visibility == VISIBLE || visibility == INVISIBLE) {
                inflate();
            }
        }
    }
重寫來父類的方法,通過上面方法可以知道,如果mInflatedViewRef為null,並且visibility == VISIBLE || visibility == INVISIBLE) 就會調用的inflate(); 實際上inflate()做的就是初始化這個ViewStub的內容,並且替換自己(ViewStub), 這裡的mInflatedViewRef其實就是inflate()初始化的內容view,所以在上面的setVisibility首先要看看這個ViewStub是否已經inflate()了.
下面來看看inflate()這個方法的源碼:
    public View inflate() {
        final ViewParent viewParent = getParent();

        if (viewParent != null && viewParent instanceof ViewGroup) {
            if (mLayoutResource != 0) {
                final ViewGroup parent = (ViewGroup) viewParent;
                final LayoutInflater factory;
                if (mInflater != null) {
                    factory = mInflater;
                } else {
                    factory = LayoutInflater.from(mContext);
                }
                final View view = factory.inflate(mLayoutResource, parent,
                        false);

                if (mInflatedId != NO_ID) {
                    view.setId(mInflatedId);
                }

                final int index = parent.indexOfChild(this);
                parent.removeViewInLayout(this);

                final ViewGroup.LayoutParams layoutParams = getLayoutParams();
                if (layoutParams != null) {
                    parent.addView(view, index, layoutParams);
                } else {
                    parent.addView(view, index);
                }

                mInflatedViewRef = new WeakReference(view);

                if (mInflateListener != null) {
                    mInflateListener.onInflate(this, view);
                }

                return view;
            } else {
                throw new IllegalArgumentException("ViewStub must have a valid layoutResource");
            }
        } else {
            throw new IllegalStateException("ViewStub must have a non-null ViewGroup viewParent");
        }
    }
通過上面的代碼,你應該很清楚了,這裡的mLayoutResource其實在ViewStub初始化的時候就會被賦值的.看看源碼:
    public ViewStub(Context context, AttributeSet attrs, int defStyle) {
        TypedArray a = context.obtainStyledAttributes(attrs, com.android.internal.R.styleable.ViewStub,
                defStyle, 0);

        mInflatedId = a.getResourceId(R.styleable.ViewStub_inflatedId, NO_ID);
        mLayoutResource = a.getResourceId(R.styleable.ViewStub_layout, 0);

        a.recycle();

        a = context.obtainStyledAttributes(attrs, com.android.internal.R.styleable.View, defStyle, 0);
        mID = a.getResourceId(R.styleable.View_id, NO_ID);
        a.recycle();

        initialize(context);
    }
google其實還給出了使用方法的說明:
 *     ViewStub stub = (ViewStub) findViewById(R.id.stub);
 *     View inflated = stub.inflate();
 Android-Universal-Image-Loader學習筆記(一)
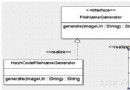
Android-Universal-Image-Loader是一個開源項目,負責處理圖片的加載和緩存。閒暇之時看了一些源代碼,特記錄之。 說道圖片文件(磁盤)緩存,需要
 Android--Activity的生命周期(二)
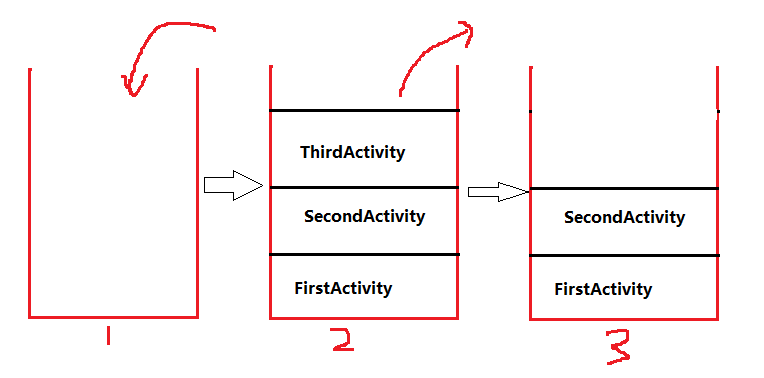
1、Activity的工作原理在我們的應用程序中,當存在多個Activity切換時,他們如何切換的。在上一個文章中,我們知道了Activity生命周期的幾個函數,當Act
 Android中利用matrix 控制圖片的旋轉、縮放、移動
本文主要講解利用android中Matrix控制圖形的旋轉縮放移動,具體參見一下代碼:復制代碼 代碼如下:/** * 使用矩陣控制圖片移動、縮放、旋轉 &nb
 Android程序開發之防止密碼輸入錯誤 密碼明文顯示功能
在使用App的時候,首次登錄都需要用戶輸入密碼的,有些朋友為了安全起見密碼設置的比較長,導致很多次密碼都輸入錯誤,嚴重影響了用戶體驗效果。這一點移動開發者做好了准備工作,