編輯:關於Android編程
大家在使用APP的過程中,經常會看到上部banner圖片輪播的效果,那麼今天我們就一起來學習一下,android中圖片輪詢的幾種實現方法:
第一種:使用動畫的方法實現:(代碼繁瑣)
這種發放需要:兩個動畫效果,一個布局,一個主類來實現,不多說了,來看代碼吧:
public class IamgeTrActivity extends Activity {
/** Called when the activity is first created. */
public ImageView imageView;
public ImageView imageView2;
public Animation animation1;
public Animation animation2;
public TextView text;
public boolean juage = true;
public int images[] = new int[] { R.drawable.icon, R.drawable.expriment,
R.drawable.changer, R.drawable.dataline, R.drawable.preffitication };
public int count = 0;
public Handler handler = new Handler();
public Runnable runnable = new Runnable() {
@Override
public void run() {
// TODO Auto-generated method stub
AnimationSet animationSet1 = new AnimationSet(true);
AnimationSet animationSet2 = new AnimationSet(true);
imageView2.setVisibility(0);
TranslateAnimation ta = new TranslateAnimation(
Animation.RELATIVE_TO_SELF, 0f, Animation.RELATIVE_TO_SELF,
-1f, Animation.RELATIVE_TO_SELF, 0f,
Animation.RELATIVE_TO_SELF, 0f);
ta.setDuration(2000);
animationSet1.addAnimation(ta);
animationSet1.setFillAfter(true);
ta = new TranslateAnimation(Animation.RELATIVE_TO_SELF, 1.0f,
Animation.RELATIVE_TO_SELF, 0f, Animation.RELATIVE_TO_SELF,
0f, Animation.RELATIVE_TO_SELF, 0f);
ta.setDuration(2000);
animationSet2.addAnimation(ta);
animationSet2.setFillAfter(true);
//iamgeView 出去 imageView2 進來
imageView.startAnimation(animationSet1);
imageView2.startAnimation(animationSet2);
imageView.setBackgroundResource(images[count % 5]);
count++;
imageView2.setBackgroundResource(images[count % 5]);
text.setText(String.valueOf(count));
if (juage)
handler.postDelayed(runnable, 6000);
Log.i(handler, handler);
}
};
@Override
public void onCreate(Bundle savedInstanceState) {
super.onCreate(savedInstanceState);
setContentView(R.layout.main);
imageView = (ImageView) findViewById(R.id.imageView);
imageView2 = (ImageView) findViewById(R.id.imageView2);
text=(TextView)findViewById(R.id.text);
text.setText(String.valueOf(count));
//將iamgeView先隱藏,然後顯示
imageView2.setVisibility(4);
handler.postDelayed(runnable, 2000);
}
public void onPause() {
juage = false;
super.onPause();
}
}
布局代碼:
android:layout_width=fill_parent
android:layout_height=fill_parent
android:id=@+id/rl>
android:layout_width=fill_parent
android:background=@drawable/icon
android:layout_below=@+id/rl
android:layout_height=120dp />
android:layout_width=fill_parent
android:background=@drawable/expriment
android:layout_below=@+id/rl
android:layout_height=120dp />
android:layout_width=fill_parent
android:layout_height=wrap_content
android:layout_below=@id/imageView/>
第二種:使用ViewFlipper實現圖片的輪播
Android系統自帶的一個多頁面管理控件,它可以實現子界面的自動切換:
首先 需要為ViewFlipper加入View
(1) 靜態導入:在layout布局文件中直接導入
(2) 動態導入:addView()方法
ViewPlipper常用方法:
setInAnimation:設置View進入屏幕時候使用的動畫
setOutAnimation:設置View退出屏幕時候使用的動畫
showNext:調用該函數來顯示ViewFlipper裡面的下一個View
showPrevious:調用該函數來顯示ViewFlipper裡面的上一個View
setFlipInterval:設置View之間切換的時間間隔
startFlipping使用上面設置的時間間隔來開始切換所有的View,切換會循環進行
stopFlipping:停止View切換
講了這麼多,那麼我們今天要實現的是什麼呢?
(1) 利用ViewFlipper實現圖片的輪播
(2) 支持手勢滑動的ViewFlipper
我們需要先准備幾張圖片:把圖片放進drawable中
創建兩個動畫:在res下面新建一個folder裡面新建兩個xml:
left_in:
android:duration=5000
android:fromXDelta=100%p
android:toXDelta=0/>
left_out:
android:fromXDelta=0
android:toXDelta=-100%p
android:duration=5000/>
一個布局文件:
android:layout_width=match_parent
android:layout_height=match_parent
tools:context=.MainActivity >
android:layout_width=fill_parent
android:layout_height=fill_parent/>
一個主類:
public class MainActivity extends Activity {
private ViewFlipper flipper;
private int[] resId = {R.drawable.pc1,R.drawable.pc2,R.drawable.pc3,R.drawable.pc4};
@Override
protected void onCreate(Bundle savedInstanceState) {
super.onCreate(savedInstanceState);
setContentView(R.layout.activity_main);
flipper = (ViewFlipper) findViewById(R.id.flipper);
/*
* 動態導入的方式為ViewFlipper加入子View
* */
for (int i = 0; i < resId.length; i++) {
flipper.addView(getImageView(resId[i]));
}
/*
* 為ViewFlipper去添加動畫效果
* */
flipper.setInAnimation(this, R.anim.left_in);
flipper.setOutAnimation(this, R.anim.left_out);
flipper.setFlipInterval(5000);
flipper.startFlipping();
}
private ImageView getImageView(int resId){
ImageView image = new ImageView(this);
image.setBackgroundResource(resId);
return image;
}
}
那麼這樣就實現了一個圖片輪詢的功能效果了
我們還可以添加點擊,滑動效果:
我們還需要添加兩個向右的滑動效果:
right_in:
android:fromXDelta=0
android:toXDelta=-100%p
android:duration=2000/>
right_out:
android:fromXDelta=100%p
android:toXDelta=0
android:duration=2000/>
然後我們還需要在主類裡面添加(如果你不想讓圖片自動播放,只想通過手勢來實現圖片播放那麼你需要把“為ViewFlipper添加動畫效果的代碼”刪掉):
public boolean onTouchEvent(MotionEvent event) {
// TODO Auto-generated method stub
switch (event.getAction()) {
case MotionEvent.ACTION_DOWN:
startX = event.getX();
break;
case MotionEvent.ACTION_MOVE://判斷向左滑動還是向右滑動
if (event.getX() - startX > 100) {
flipper.setInAnimation(this, R.anim.left_in);
flipper.setOutAnimation(this, R.anim.left_out);
flipper.showPrevious();
}else if (startX - event.getX() > 100) {
flipper.setInAnimation(this, R.anim.right_in);
flipper.setOutAnimation(this, R.anim.right_out);
flipper.showNext();
}
case MotionEvent.ACTION_UP:
break;
}
return super.onTouchEvent(event);
}
這樣我們利用我們的ViewFlipper完成的圖片輪詢的功能就做完了。
 Android之zxing二維碼生成與識別
二維碼:是用某種特定的幾何圖形按一定規律在平面(二維方向上)分布的黑白相間的圖形記錄數據符號信息的;在代碼編制上巧妙的利用構成計算機內部邏輯基礎的0和1比特流的概念,使用
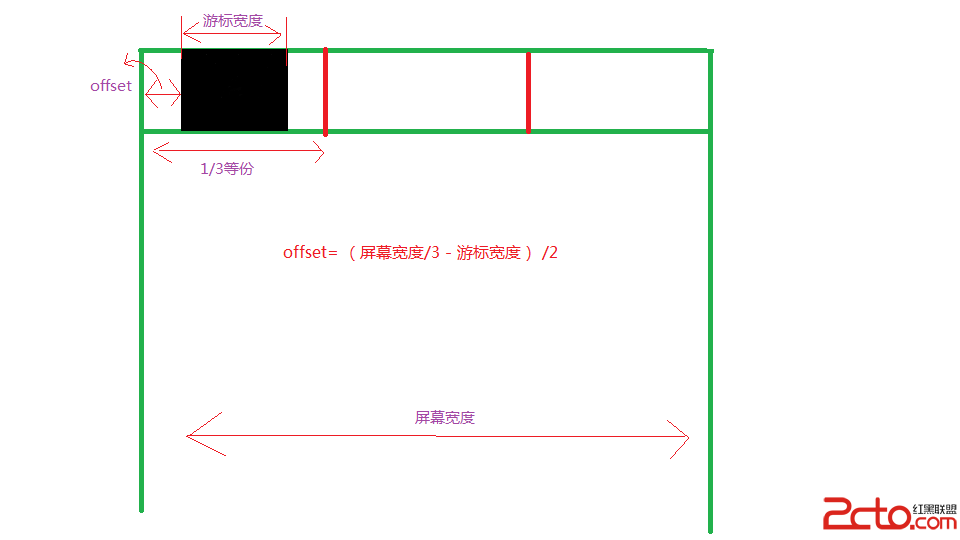
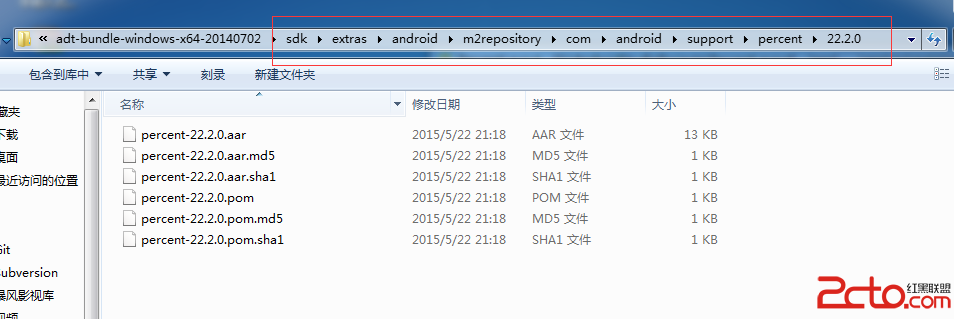 Android Support庫百分比布局
之前寫過一篇屏幕適配的文章Android 屏幕適配最佳實踐,裡面提到了類似百分比布局的東西,但是該方法缺點很明顯,就會增加很多無用的數據,導致apk包變大。而谷歌的sup
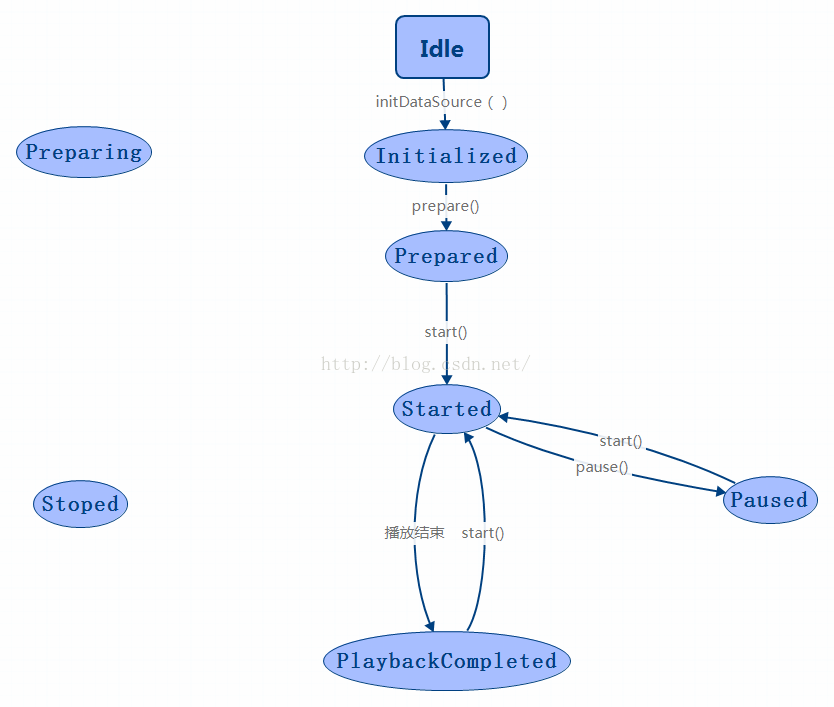 Android MediaPlayer的生命周期
MediaPlayer的狀態轉換圖也表征了它的生命周期,搞清楚這個圖可以幫助我們在使用MediaPlayer時考慮情況更周全,寫出的代碼也更具健壯性。接下來用幾張圖,來慢
 Android wpa_supplcant 啟動之--網絡接口初始化
wpa_supplicant結構體與網絡接口 在手機adb中運行 netcfg或者ifconfig可以看到相關的網絡接口的ip,掩碼,mac地址等信息 Wpa_