編輯:關於Android編程
為了幫助理解,這裡首先描述一個應用場景。
一個項目有兩個版本(一個項目兩個版本的原因或許是由於硬件不同導致的,如不同容量電池,不同分辨率攝像頭等),在升級的時候很容易將相同項目的兩個版本的升級包混淆,因此需要實現兩個版本的防互刷功能,那麼在該應用場景下需要如何實現呢?
注意,這裡肯定會有疑問了,既然一個項目兩個版本容易混淆更新包,那麼把它作為兩個項目來實施不是有效避免這個問題了嗎?當然,把一個項目由於不同版本分拆為不同的項目來做當然可以有效的避免更新包混淆的問題,這也是一個比較快捷的方案。因此該博文是在實施一個項目的場景下來開展的。
熟悉ota_from_target_files、edify_generator.py或則了解install.c和updater-script腳本執行過程的朋友應該很清楚在更新包安裝的一開始會對一些屬性信息進行校驗,這裡貼出部分腳本生成器edify_generator.py的相關的函數:
#校驗時間戳
def AssertOlderBuild(self, timestamp, timestamp_text):
"""Assert that the build on the device is older (or the same as)
the given timestamp."""
self.script.append(
('(!less_than_int(%s, getprop("ro.build.date.utc"))) || '
'abort("Can\'t install this package (%s) over newer '
'build (" + getprop("ro.build.date") + ").");'
) % (timestamp, timestamp_text))
校驗時間戳,我們需要理解上面的方法,上面的函數只是生成一條edify語句,實際上在生成的updater-script腳本中,也就是下面這條語句:
(!less_than_int(%s, getprop("ro.build.date.utc")))①||abort("Can\'t install this package (%s) over newer build (" + getprop("ro.build.date") + ").");②
arg1:timestamp, arg2:timestamp_text//參數1為世界時間,參數2為日期格式
上面的代碼告訴我們如果①的值為True則執行下一步,否則執行語句②,語句①對比時間戳大小,語句②為中斷語句。也就是說如果當前更新包的打包時間如果比手機Build的時間older,就執行中止語句。
#校驗設備信息
def AssertDevice(self, device):
"""Assert that the device identifier is the given string."""
cmd = ('getprop("ro.product.device") == "%s" || '
'abort("This package is for \\"%s\\" devices; '
'this is a \\"" + getprop("ro.product.device") + "\\".");'
) % (device, device)
self.script.append(cmd)
若更新包中打包的設備信息如果與手機Build中的設備信息不一致就會執行中止語句。
#校驗系統指紋
def AssertSomeFingerprint(self, *fp):
"""Assert that the current system build fingerprint is one of *fp."""
if not fp:
raise ValueError("must specify some fingerprints")
cmd = (
' ||\n '.join([('file_getprop("/system/build.prop", '
'"ro.build.fingerprint") == "%s"')
% i for i in fp]) +
' ||\n abort("Package expects build fingerprint of %s; this '
'device has " + getprop("ro.build.fingerprint") + ".");'
) % (" or ".join(fp),)
self.script.append(cmd)
無論是時間戳還是設備信息還是系統指紋都是從build.prop中取值。但是,這裡呢,要對fingerprint信息簡單介紹一下,fingerprint就是我們常說的系統指紋,我們可以在adb模式下能否通過getprop ro.build.fingerprint的方式進行查看或者參考alps\frameworks\base\core\java\android\os\Build.java下對應的FINGERPRINT的取值方式在代碼中進行取值。每個項目的每個版本Fingerprint都不同,按照Google的要求,前後不允許帶有空格、空行、斷行,字符不超過91個,
Fingerprint字段定義格式如下:BUILD_FINGERPRINT :=如:Google/Y100-T00/GoogleY100-T:4.2.2/GoogleY100-T00/CHSC01B001:user/release-keys
$(PRODUCT_BRAND)/$(TARGET_PRODUCT)/$(TARGET_DEVICE):$(PLATFORM_VERSION)/$(BUILD_ID)/$(BUILD_NUMBER):$(TARGET_BUILD_VARIANT)/$(BUILD_VERSION_TAGS)
具體配置請按以下:1.PRODUCT_BRAND為getprop文件中的相關字段:ro.product.brand的信息,全字母大寫or首字母大寫均可。Eg:Google2.TARGET_PRODUCT為getprop文件中的相關字段:ro.product.name的信息,全字母大寫,Eg:Y516-T00。3.TARGET_DEVICE為getprop文件中的相關字段:ro.product.device的信息4.ID為getprop文件中的相關字段:ro.build.id的信息,5.version.incremental為getprop文件中的相關字段:ro.build.version.incremental的信息。要求version.incremental是內部版本號(真實版本號)6.VERSION.RELEASE為getprop文件中的相關字段:ro.build.version.release的信息,一般為Android系統版本號7.TYPE必須是user版本,不能是eng版本。8.TAGS必須是release-keys,不能是test-keys,(將宏MTK_SIGNATURE_CUSTOMIZATION = yes)。如果該版本帶有或者後續將開發OTA升級功能,須使用ota-rel-keys,release-keys,普通版本請使用release-keys。
那麼系統指紋在差分升級的時候才會校驗,設備信息和簽名一般來說同一個項目後者同一個產品對於客戶來講都是不允許修改的,如果客戶允許這些也可以作為防互刷的手段。那麼可能到這裡你或許已經明白這篇博文的目的了。
那麼,對的,本篇博文主要是通過增加新的系統屬性來標識相同項目不同版本防互刷的功能。那麼該如何實現呢?
一、添加系統屬性
這裡需要在/vendor/{項目}/{項目分支}/config/system.prop文件,當然不同平台不同公司對應的system.prop路徑不一致
這裡我在system.prop中最後一行添加如下屬性:
ro.update.version=a1
二、修改腳本
首先在腳本生成器edifty_generator.py文件中定義如下方法:
  def AssertUpdateVersion(self, update_version):
    """Assert that the update_version identifier is the given string."""
    cmd = ('getprop("ro.update.version") == "%s" || '
           'abort("This package is for \\"%s\\" update_version; '
           'this is a \\"" + getprop("ro.update.version") + "\\".");'
           ) % (update_version, update_version)
    self.script.append(cmd)
然後在ota_from_target_file文件中的AppendAssertions函數中添加如下:(紅色為新添加)
並修改WriteFullOTAPackage()函數,如下:
def WriteFullOTAPackage(input_zip, output_zip):
# TODO: how to determine this? We don't know what version it will
# be installed on top of. For now, we expect the API just won't
# change very often.
script = edify_generator.EdifyGenerator(3, OPTIONS.info_dict)
metadata = {"post-build": GetBuildProp("ro.build.fingerprint",
OPTIONS.info_dict),
"pre-device": GetBuildProp("ro.product.device",
OPTIONS.info_dict),
"post-timestamp": GetBuildProp("ro.build.date.utc",
OPTIONS.info_dict),
"update-version": GetBuildProp("ro.update.version",
OPTIONS.info_dict),//定義新的屬性
}
三、驗證(注!不要偷懶,直接修改update包中的build.pro,否則會校驗簽名不過的)
那麼接下來就需要進行驗證了,這裡呢首先使用ro.update.version值為a1的版本制作整包,然後在手機中download屬性ro.update.version值為a2的版本進行sd卡整包升級,在升級的過程中會對update-version進行校驗,如果值不一樣則校驗失敗。
下面貼出校驗失敗的log(也就是防互刷功能成功實現的效果)
script aborted: This package is for "a1" update_version; this is a "a2".
This package is for "a1" update_version; this is a "a2".
E:Error in /sdcard/dload/update.zip
(Status 7)
Installation aborted.
I:no boot messages recovery
I:[1]check the otaupdate is done!
factory_poweroff_flag=0
demo_mode_flag=0
下面是對應的updater-script腳本中防互刷的語句。
getprop("ro.update.version") == "a1" || abort("This package is for \"a1\" update_version; this is a \"" + getprop("ro.update.version") + "\".");
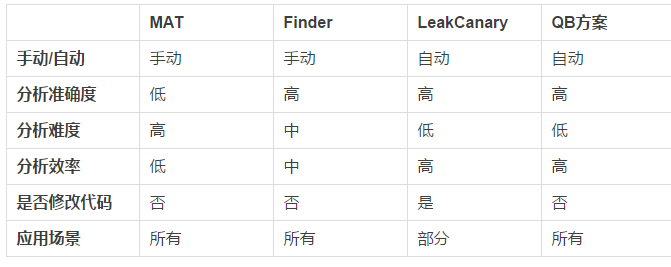 Android內存洩露測試
在進行Android內存洩露分析時,面對成千上萬個對象,你是否藍瘦,香菇?作為測試人員你在進行內存洩露測試之後,是否有勇氣告訴開發同事程序已經沒有內存洩露,可以放心發布了
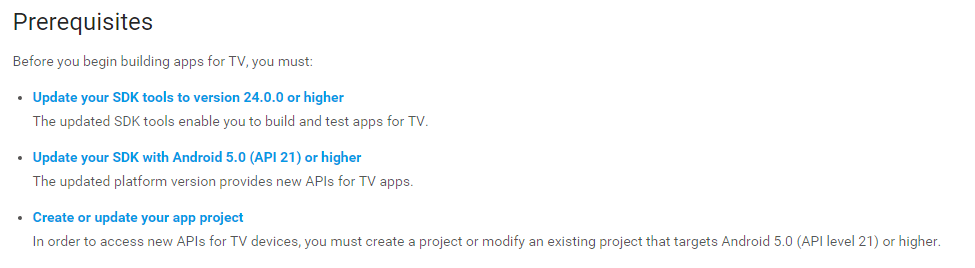 Android TV APPs 的介紹與創建
最近開始接觸到Andorid TV編程,發現目前這方便的資料與比較還比較少,但現在隨著產品與用戶的升級,涉及到Android TV與 Android Watch的編程離我
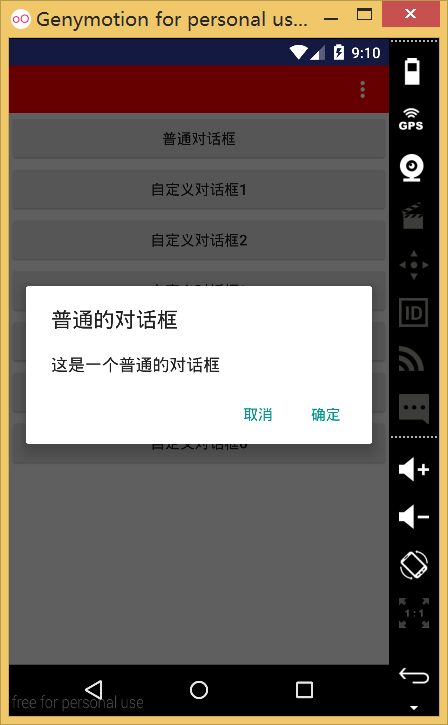
 Android 自定義View (一)
笑對人生,能穿透迷霧;笑對人生,能堅持到底;笑對人生,能化解危機;笑對人生,能照亮黑暗。 本講內容:自定義View(可以在布局文件多次用) 一、步驟:
 android應用Theme(二)
第二種實現android應用Theme的方式是通過apk來實現的。下面是一個demo。 1.首先必須新建一個apk,類似的插件,然後在該apk的Androi